When I started learning about ADA bathroom design, I realized how important it is to make spaces that work for everyone.
An ADA-compliant bathroom isn’t just for people with disabilities – it helps anyone who needs extra safety, space, or support.
These designs focus on ease of use, comfort, and smart layouts that make moving around simpler. From grab bars to wider doorways and roll-in showers, every detail matters.
I’ve seen how a few thoughtful changes can make a bathroom much more accessible without giving up on style.
In this blog, I’ll share simple, helpful ideas that follow ADA guidelines and look great, too.
If you’re remodeling for a loved one or planning for future needs, these tips will help you create a space that’s safe, functional, and welcoming for all. Let’s take a closer look at how to design with access in mind.
Why Accessible Bathroom Design Matters
An accessible bathroom does more than meet building codes; it creates a space where every user can move safely, comfortably, and independently.
If someone uses a wheelchair, walker, or needs extra support, thoughtful design reduces the risk of slips and falls, improves daily routines, and adds long-term value to the home.
Following ADA guidelines ensures the layout works for real-life needs without looking clinical or impersonal.
When designed right, an accessible bathroom blends beautifully into any style, from modern to rustic, and enhances the overall experience for all users, regardless of age or mobility level.
Step-by-Step Guide to Building an ADA-Compliant Bathroom
These updates make a lasting impact, whether for someone living with a disability, a senior who wants to age in place, or a caregiver supporting a loved one.
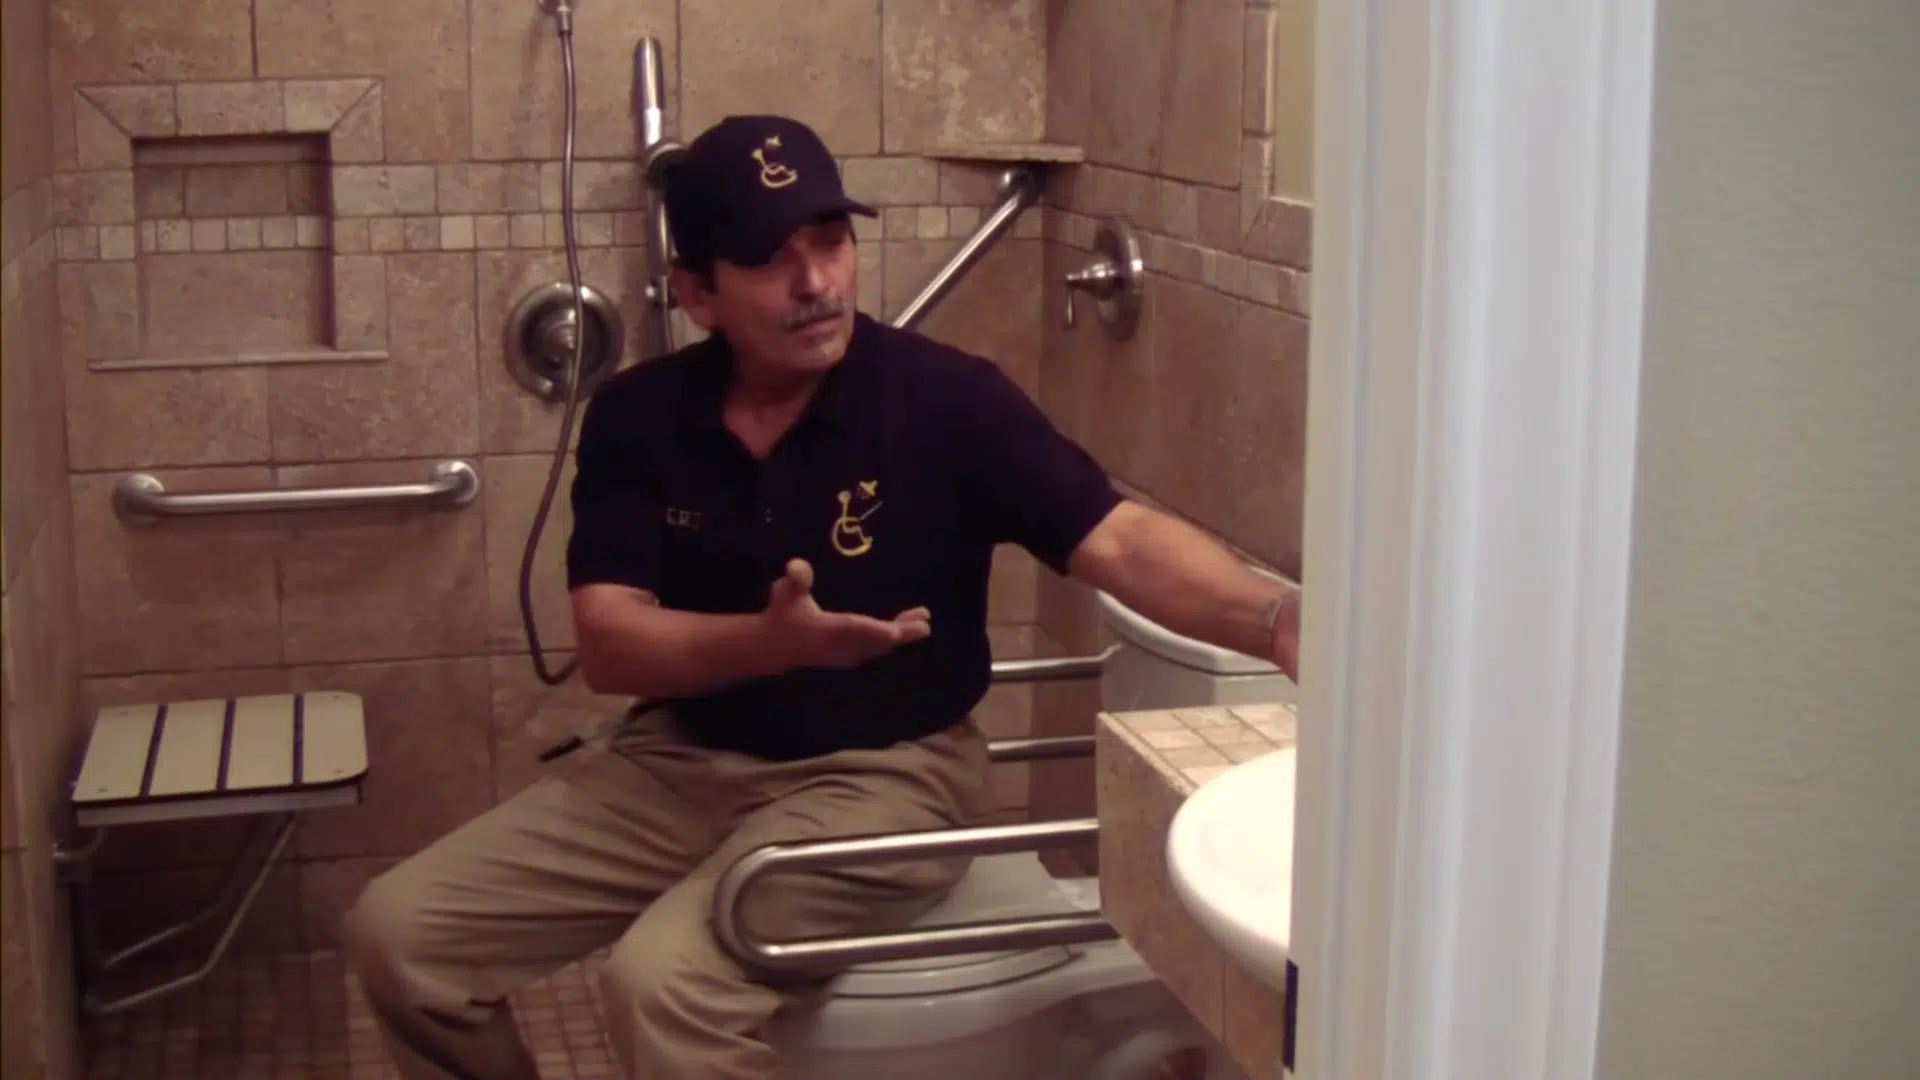
Step 1: Replace the Shower with a Zero-Threshold Design

The first change is replacing the deep shower stall with a roll-in, curb-free shower pan. This creates a seamless entry point for individuals using wheelchairs or walkers.
ADA Guidelines:
- Minimum shower floor space: 60″ x 30″
- The entry must be flush with the surrounding floor
- The floor must slope slightly for drainage without impeding movement
The use of 2×2 travertine tiles on the shower floor offers both texture and traction. Larger 12×12 and 3×6 tiles cover the walls, providing an elegant, clean backdrop.
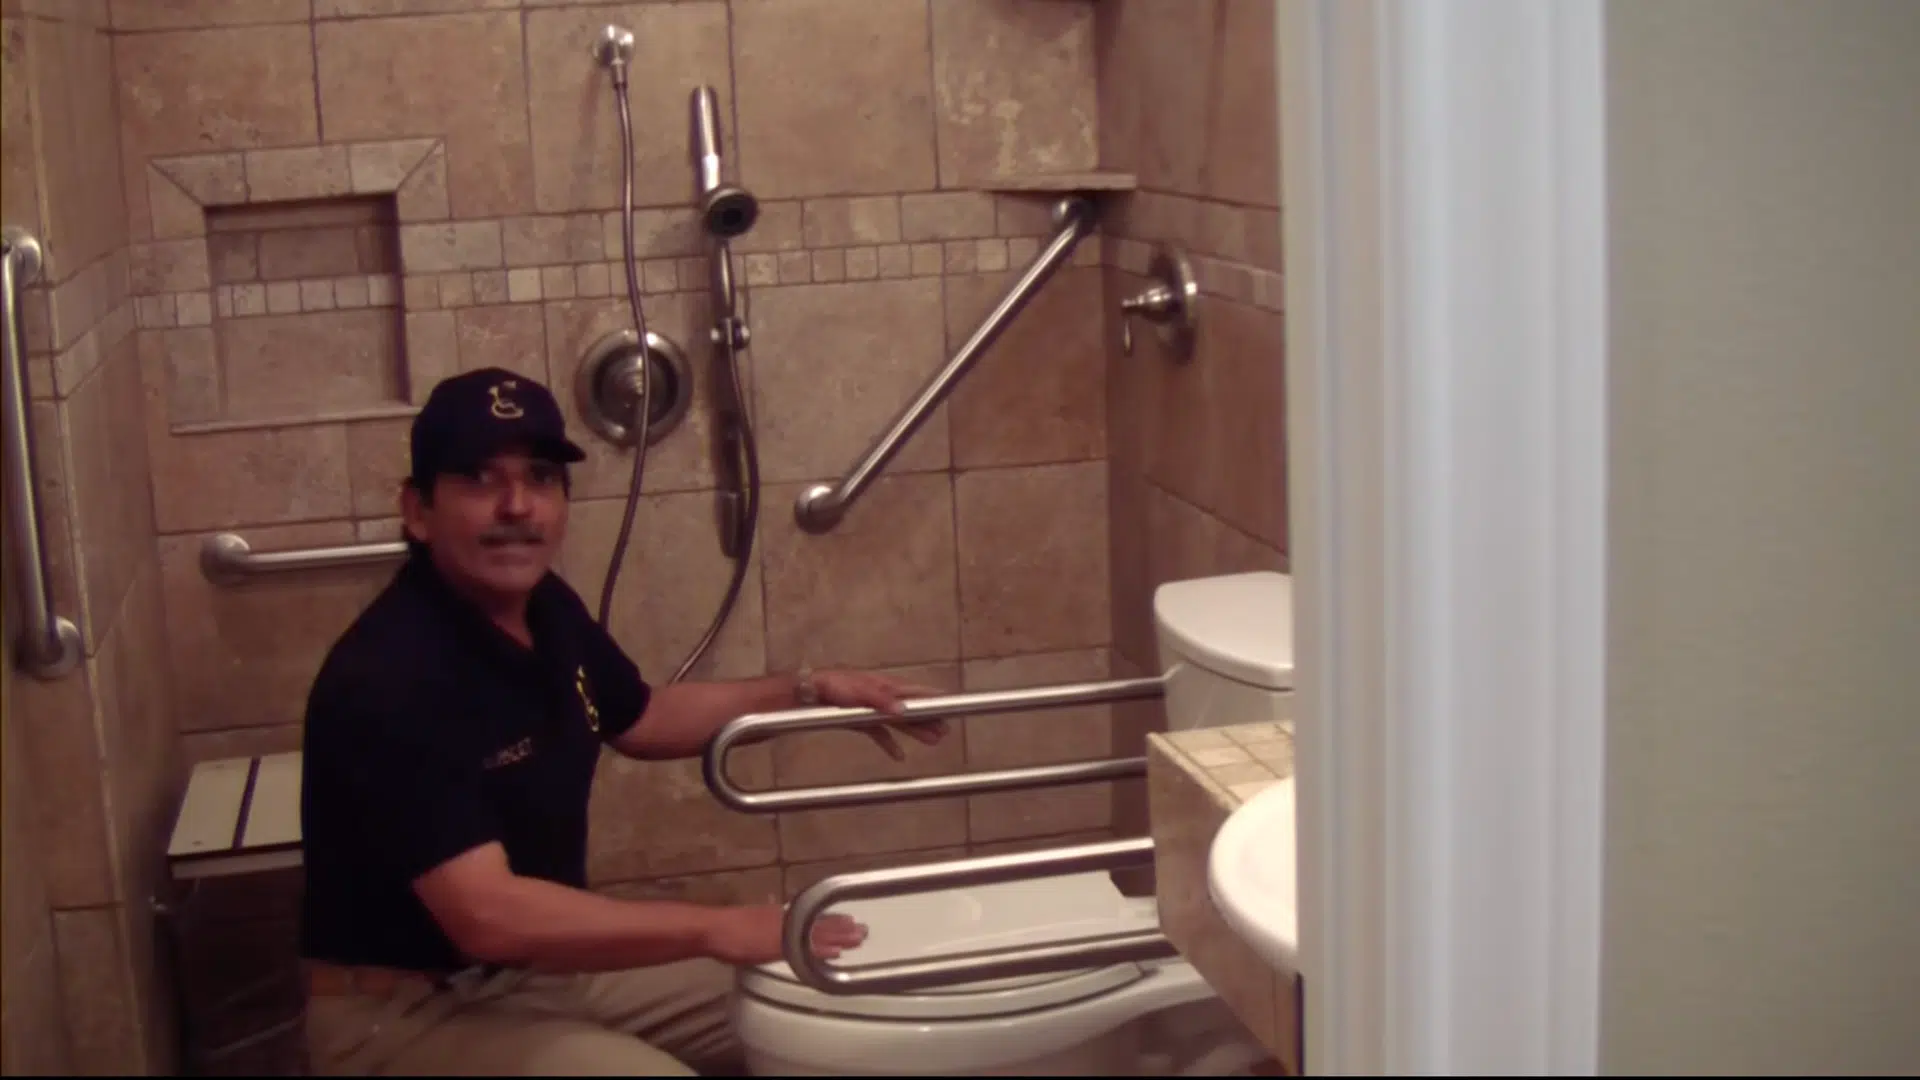
Step 2: Install Multiple Grab Bars for Support
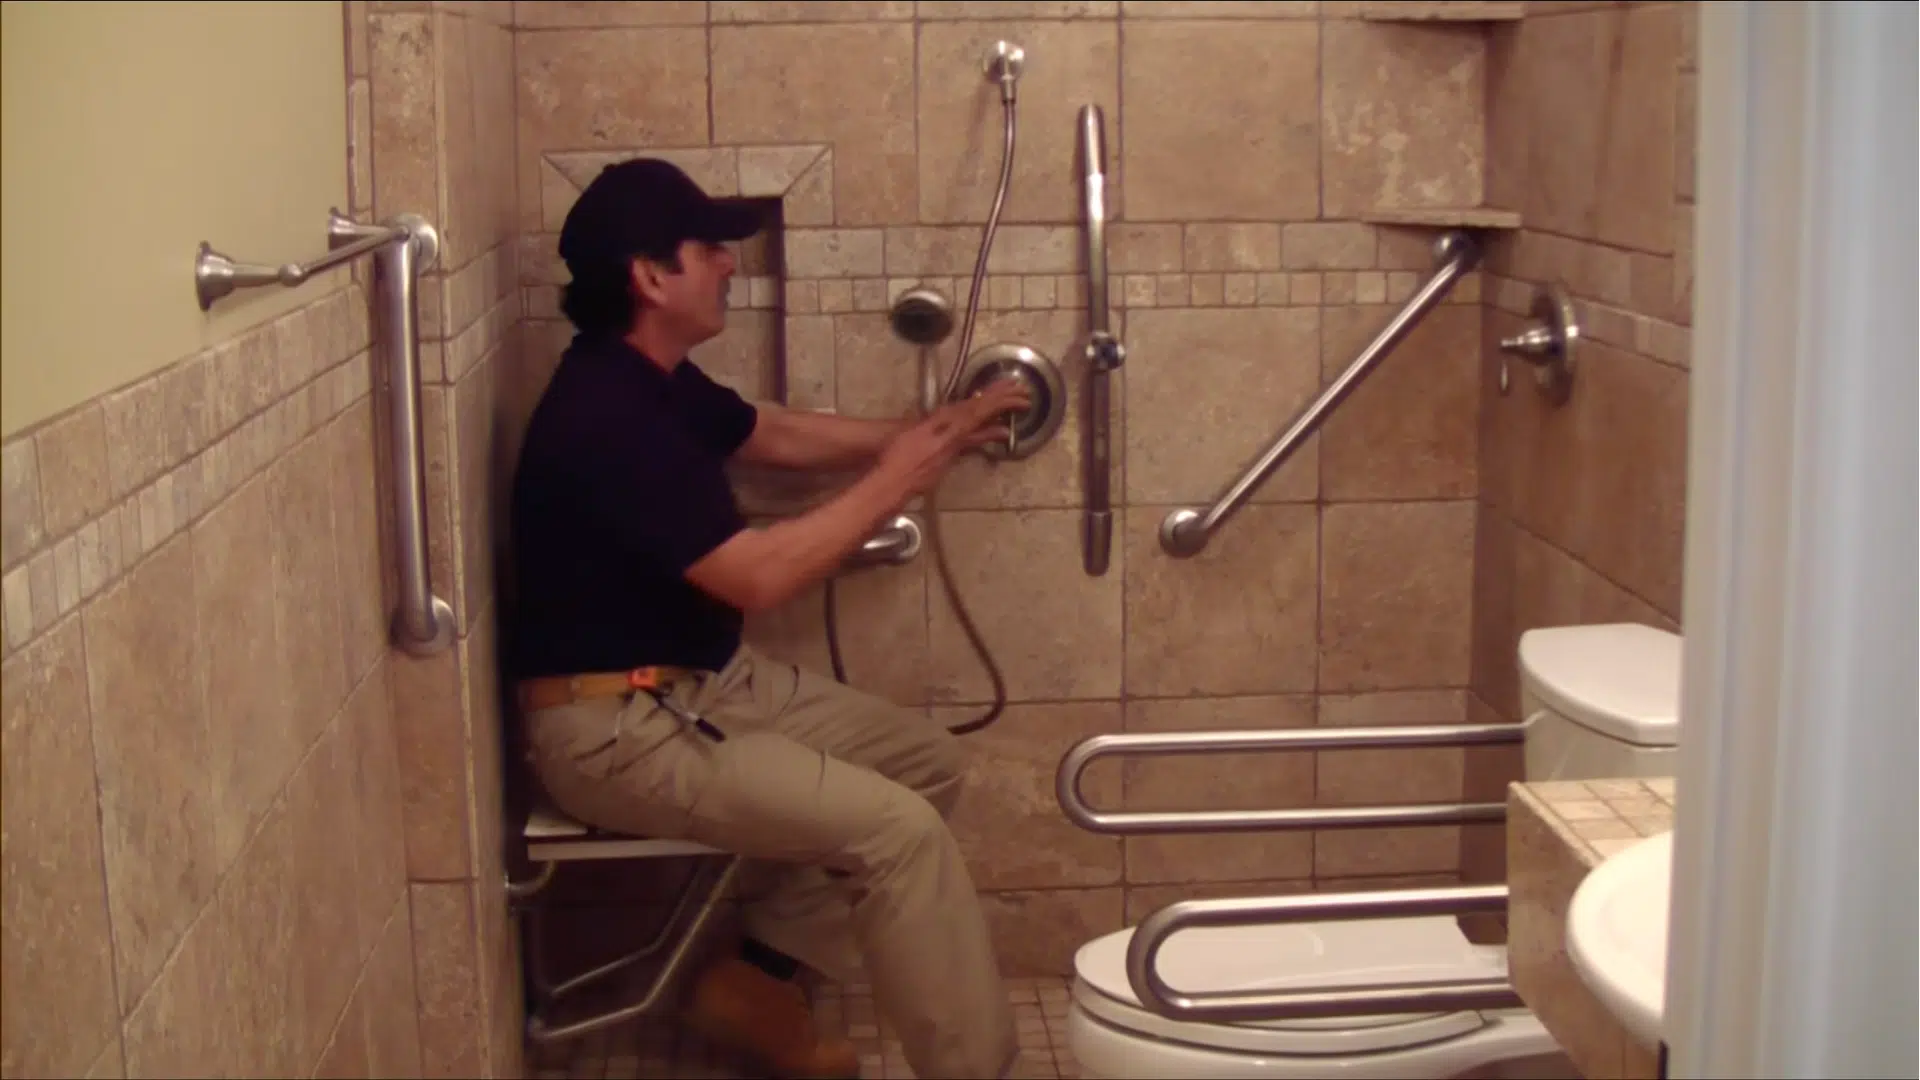
Grab bars are mounted horizontally, diagonally, and at key positions around the shower.
One is a pivot-down grab bar that swings into place when needed and folds away when not. Another bar is placed at a diagonal across a caddy corner.
ADA Guidelines:
- Bars must be placed 33–36 inches from the floor
- Must support at least 250 lbs.
- Should be installed at points of entry, seating, and along shower walls
These bars offer dependable support for users transferring from a wheelchair or simply needing extra balance.
Step 3: Add Accessible Fixtures and Sink Controls

The remodel includes a handheld showerhead with controls mounted at a reachable height, alongside a fixed overhead option.
The lavatory faucet is placed off-center with a side-mounted drain, keeping the knee area clear.
ADA Guidelines:
- All controls must be operable with one hand
- Faucets should not require tight grasping or pinching
- Maximum control height: 48 inches from the floor
This dual showerhead system makes the space usable for standing and seated users alike. It also simplifies cleaning and caregiving tasks.
Step 4: Use a Wall-Mounted Sink and Adjust Heights
A wall-mounted sink provides open space beneath for full wheelchair access.
The sink is raised slightly – about three inches – to align with ADA-recommended height. This setup avoids bending and keeps everything within reach.
ADA Guidelines:
- Max sink height: 34 inches
- Minimum knee clearance: 27 inches high and 30 inches wide
- Depth under sink: 11–25 inches
The offset drain keeps plumbing away from knees, making the space more usable and preventing accidental bumps.
Step 5: Add Functional Accessories Within Reach
Accessories like a paper towel dispenser, power bars, and robe hooks are installed within the standard reach range for seated users.
This enhances independence by ensuring that no one needs to stretch or twist awkwardly.
ADA Guidelines:
- Reachable height range: 15–48 inches
- Accessories must be operable without tight grasping or twisting
- Place frequently used items close to the sink or shower
- These additions may seem small, but they’re essential for maintaining independence.
Step 6: Use Non-Slip Materials and Unified Finishes

Throughout the space, non-slip travertine tile is used to provide traction while maintaining visual appeal.
Finishes are consistent, brushed nickel for all grab bars, curtain rods, faucets, and hardware.
Lighting includes adjustable brightness and color temperature, enhancing visibility and mood.
ADA Guidelines:
- All surfaces must be stable, firm, and slip-resistant
- 60 inch diameter turning radius should be available
- Contrasting finishes can help with depth perception and clarity
If you want to see how it all looks in action, the full “Handicap Bathroom Remodeling” video by @ezaccessbathrooms is definitely worth a watch – it walks through the install and layout step by step
ADA-Compliant Bathroom Design Ideas
Design matters, even in accessible spaces. These inspiring approaches used in ADA-compliant remodels add style without sacrificing function:
1. Coastal Bright
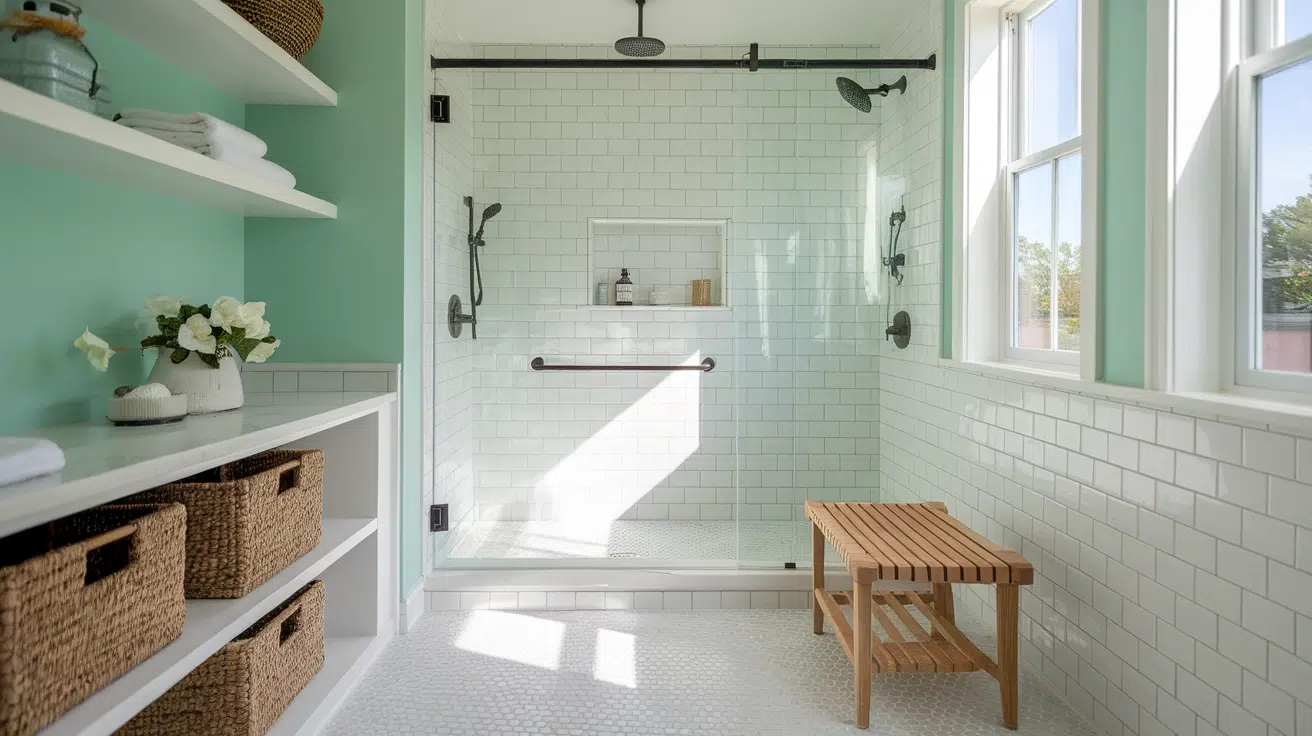
Create a light and breezy space using Sea Salt (SW 6204) or Horizon (BM OC-53) on the walls.
Pair these shades with crisp white subway tile and brushed nickel hardware for a clean, coastal look.
A roll-in teak bench, open shelving, and woven baskets add warmth, texture, and functional storage that complements the accessible design.
2. Rustic Farmhouse
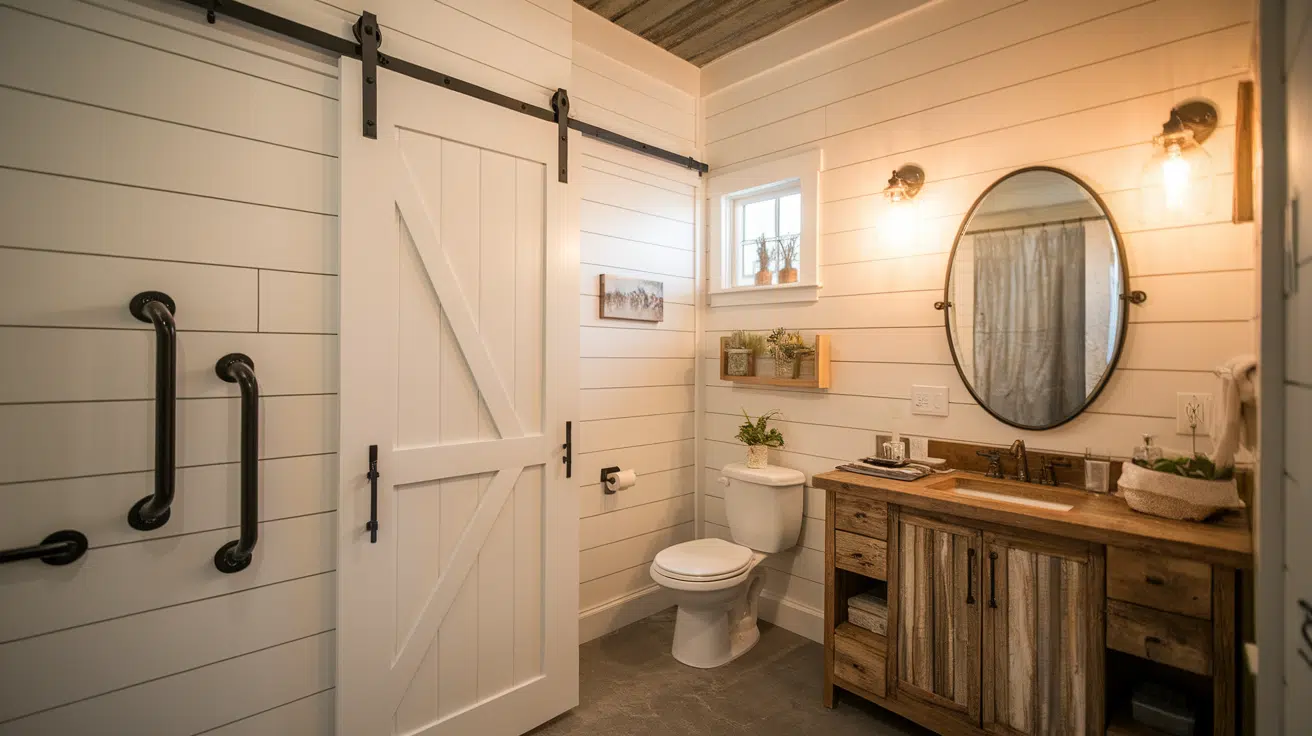
Blend charm and function with white shiplap walls, matte black grab bars, and barn-style sliding doors for easy access.
Add natural wood elements like a reclaimed vanity or shelves to soften the space.
This style delivers warmth and character while keeping the layout open, safe, and perfectly suited for mobility aids without sacrificing visual appeal.
3. Urban Chic
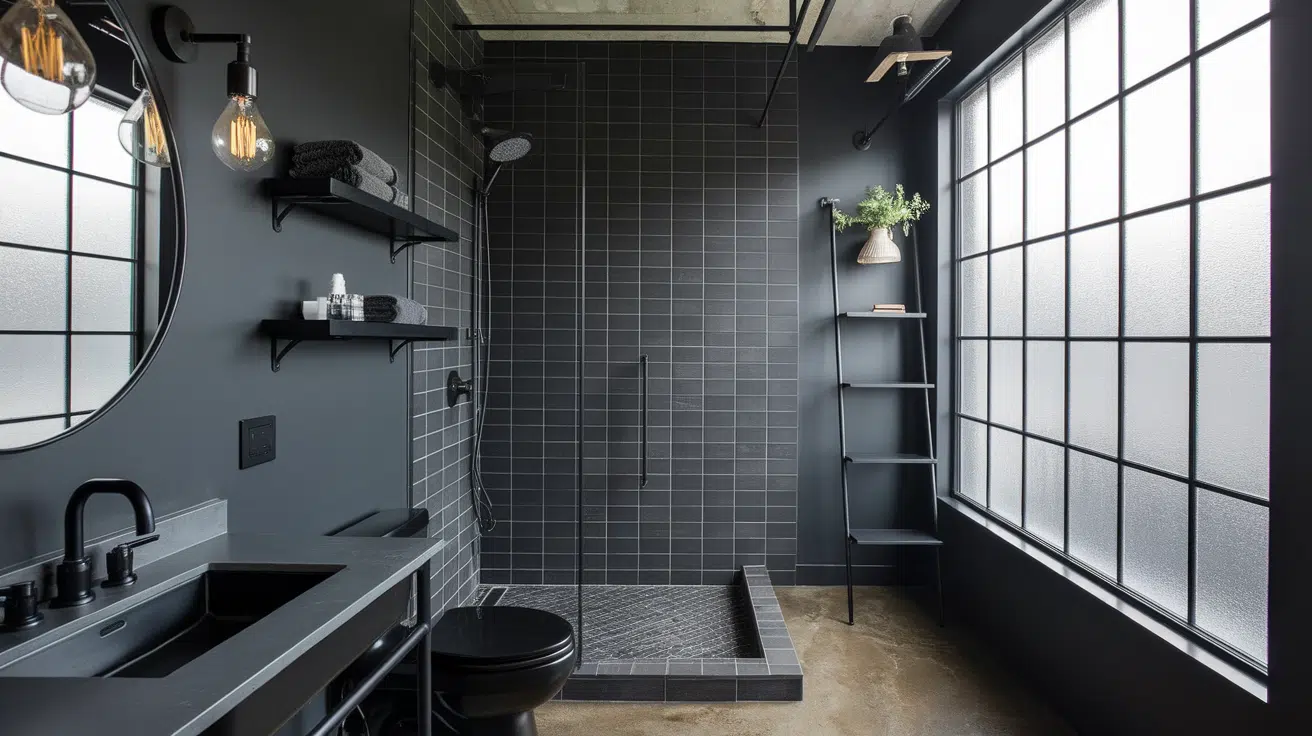
For a bold and modern feel, choose Iron Ore (SW 7069) or charcoal tones for walls or tile. Combine with slate or concrete finishes for an edgy, industrial look.
Incorporate floating shelves, black fixtures, and exposed-bulb lighting.
This style works well in compact spaces, making a statement while meeting ADA layout and clearance requirements with ease.
4. Scandinavian Calm
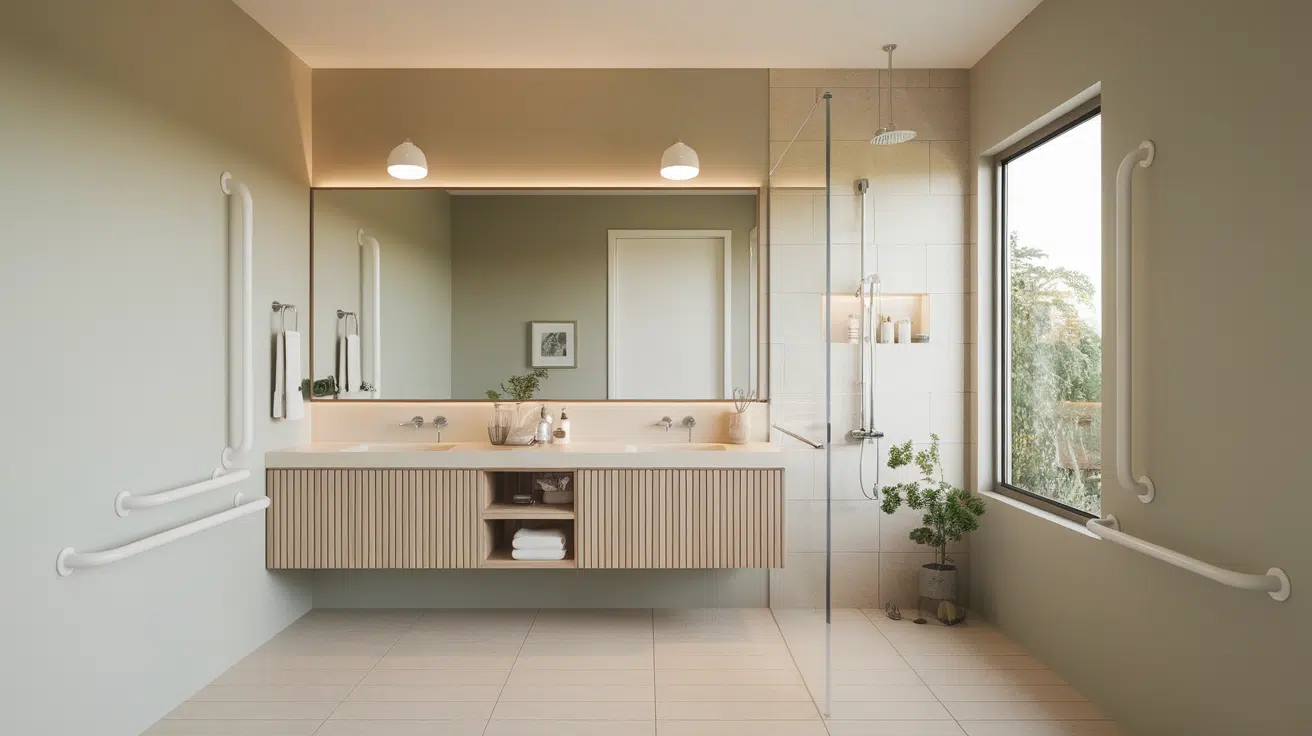
Design a soft, modern look using Balboa Mist (OC-27) on the walls and light wood accents. A floating vanity with open space beneath ensures wheelchair access.
Choose white grab bars that blend into the background, and stick to sleek, simple fixtures.
The overall effect feels airy, clean, and uncluttered, ideal for stress-free daily routines.
5. Spa-Style Serenity
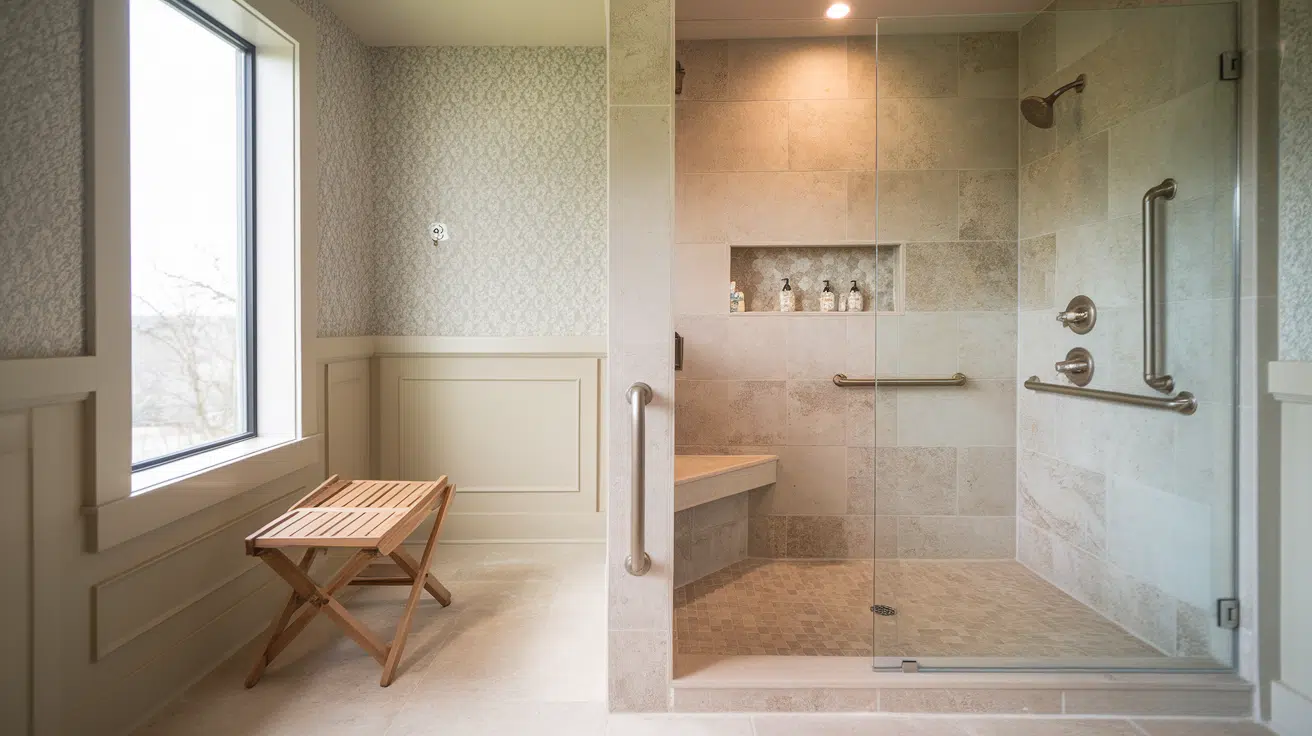
Turn your accessible bathroom into a personal spa with calming neutrals, dimmable recessed lighting, and textured stone tiles.
Include a built-in shower niche for storage and a fold-down teak seat for safety.
Use warm, muted paint tones like Accessible Beige or Pale Oak to create a peaceful, luxurious atmosphere that promotes comfort and relaxation.
6. Mid-Century Modern Warmth
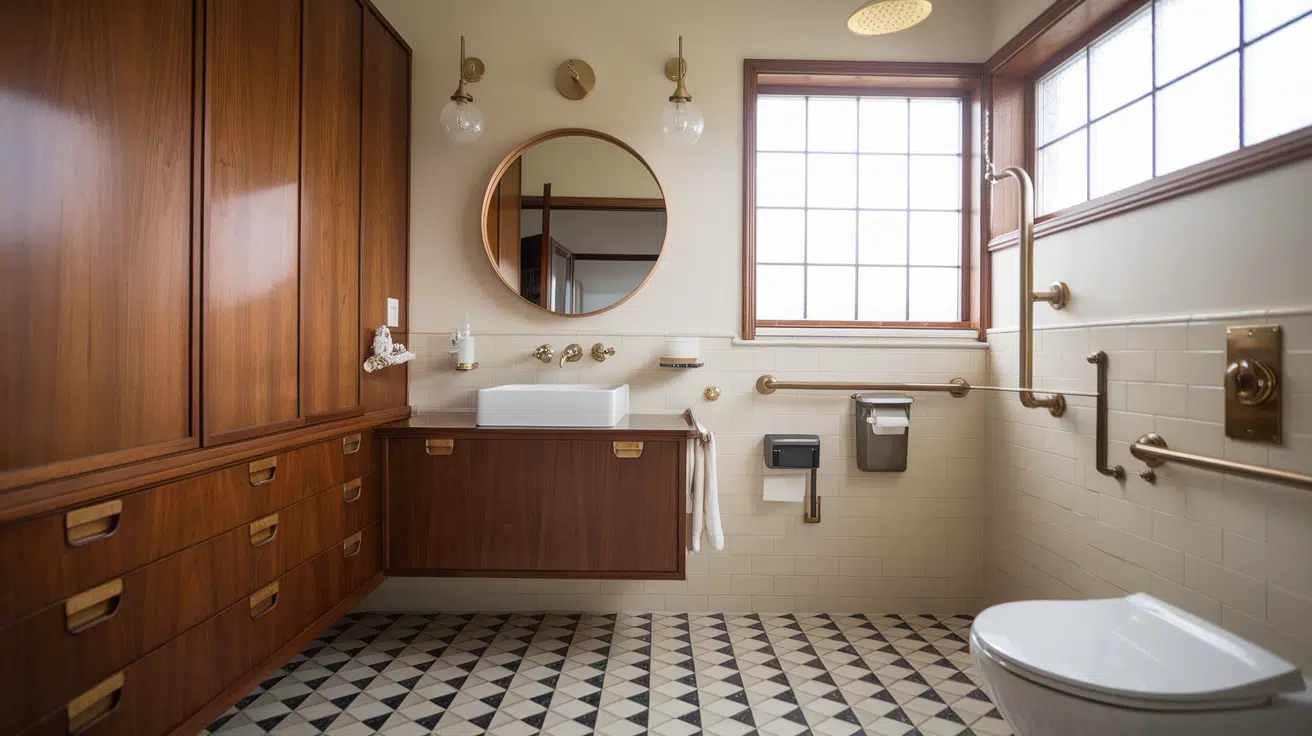
Pair walnut or teak cabinetry with retro tile patterns and brass hardware.
Install a floating vanity with clean lines and an offset drain for wheelchair access.
Use rounded-edge mirrors and globe lighting for a soft, vintage vibe that still meets ADA height and clearance guidelines.
7. Minimalist Monochrome
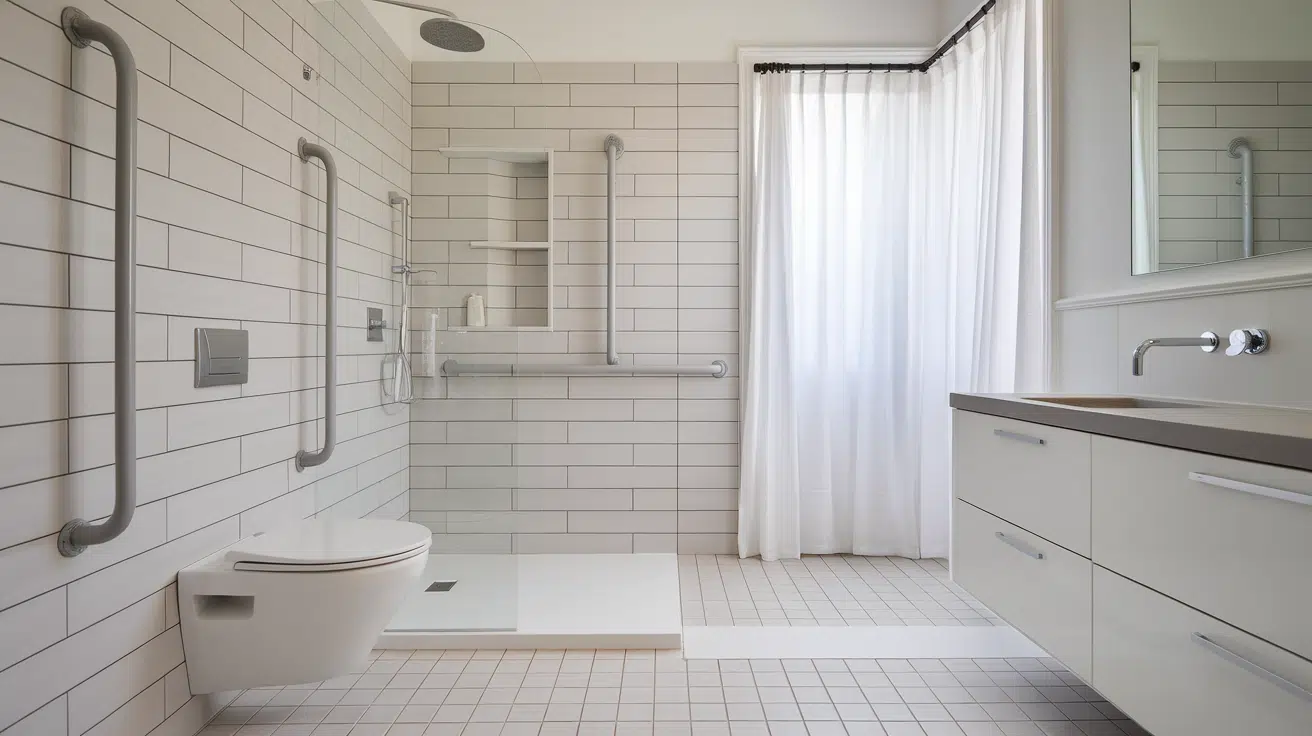
Keep the palette simple with whites and soft grays. Use large-format porcelain tiles to reduce grout lines and make rolling or walking easier.
Install sleek, low-profile grab bars that match the wall color and a barrier-free walk-in shower with frameless glass for a seamless visual.
8. Nature-Inspired Retreat
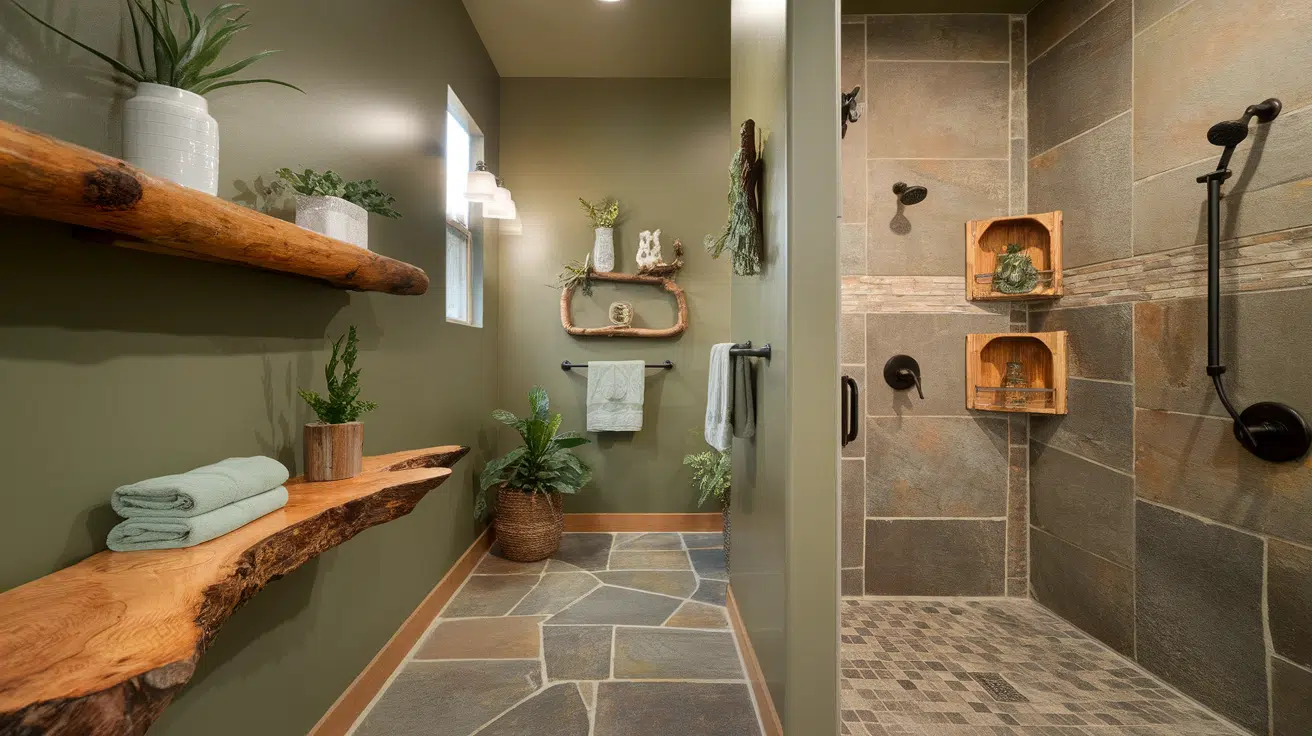
Incorporate earthy tones like sage green or warm taupe with natural stone tiles and bamboo accents.
Use textured tiles on the floor for slip resistance, and add a live-edge wood shelf for character.
Keep pathways wide and transitions flush for full ADA compliance with organic warmth.
Best ADA-Compliant Materials for Safety and Durability
Choosing the right materials can make your bathroom safer, more durable, and easier to maintain.
- Flooring: Choose textured porcelain tile, 2×2 travertine, or slip-resistant vinyl for safety and traction.
- Shower Walls: Use waterproof wall panels, sealed natural stone, or large-format ceramic for durability and easy cleaning.
- Grab Bars: Go with stainless steel, brushed nickel, or powder-coated aluminum rated for at least 250 lbs.
- Fixtures: Install lever-style faucets, touchless controls, or thermostatic mixing valves for better accessibility.
- Vanity: Pick a wall-mounted ADA sink or a floating vanity with open knee space for wheelchair users.
- Lighting: Use LED lighting with dimmer settings, adjustable color modes, and soft, non-glare finishes for comfort and visibility
Look for materials rated by the ADA or labeled “ADA-compliant” at suppliers like Home Depot, Lowe’s, Ferguson, or Build.com.
ADA Guidelines
| Feature | Requirement |
|---|---|
| Door Width | Minimum 32 inches clear opening |
| Turning Space | 60-inch diameter turning circle |
| Grab Bar Height | 33–36 inches from the floor |
| Sink Height | Maximum 34 inches high |
| Knee Clearance | At least 27 inches high, 30 inches wide |
| Shower Size | 60 x 30 inches minimum for roll-in style |
| Reach Range | Accessories between 15 and 48 inches high |
Conclusion
A barrier-free bathroom isn’t just about meeting codes; it’s about real-life function.
With thoughtful design and ADA-compliant features, you can create a space that is safe, welcoming, and stylish.
From a roll-in shower and pivoting grab bars to a wall-mounted sink and adjustable lighting, each detail adds value to the user’s daily experience.
By blending accessibility with timeless design, you can create a bathroom that serves everyone, comfortably, safely, and beautifully.

Ava Taylor, holding a Bachelor’s degree in Interior Design from the Pratt Institute, has made her mark in creating engaging and functional living spaces for over 14 years. She began her career with a New York-based design studio, where she gained a reputation for her innovative and user-centric designs. Ava joined our team in 2019, bringing a blend of artistic flair and practicality to our home improvement section. Since the she has been the lead contributor to our room transformation series, inspiring readers with her unique approach to maximizing space utility and aesthetic appeal. Beyond her professional work, Ava is a passionate collector of vintage furniture, a hobby that enriches her design perspective.