Introduction
Dealing with unpleasant odors, food spills, and stubborn stains in your oven? Don’t worry, here’s the answer to the question of how to clean an oven properly. To make your oven clean, you don’t need harsh chemicals or expensive products. A few simple DIY cleaning hacks, such as using everyday ingredients like baking soda, vinegar, and lemon, can effectively break down grime, cut through grease, and restore the fresh and sparkling shine like it was before.
If you understand the right way of cleaning an oven properly, this will not only improve its appearance but also enhance its cooking performance and prevent unwanted odors. In this complete guide, you’ll discover the best DIY methods to clean an oven, step-by-step instructions, and best tips to make the process easier, faster, and completely chemical-free.
If you’re cleaning an oven yourself or rely on professional cleaning services in Langley, this guide will help you a lot while cleaning an oven.
Why Cleaning Your Oven Matters
Before diving into the cleaning process, it’s important to understand why regular oven cleaning is important. Over time, food residue, grease splatters, and burnt spills accumulate on the oven’s surfaces. Following are the key reasons to clean the oven properly:
1. Improved Cooking Performance
A dirty oven can cause uneven heating, resulting in undercooked or burnt food. Removing grease and carbon buildup ensures heat circulates properly for consistent results.
2. Better Energy Efficiency
A clean oven doesn’t have to work as hard to reach the desired temperature. This means it uses less energy, helping reduce electricity bills over time.
3. Eliminates Bad Odors and Smoke
Burnt-on food and grease often release foul odors and even smoke when reheated. Cleaning removes these residues so your meals taste fresher and your kitchen smells pleasant.
4. Longer Appliance Lifespan
Neglecting cleaning your oven can cause corrosion or damage to heating elements over time. Regular cleaning protects your investment and keeps your oven running smoothly.
Regular oven cleaning may seem like an unimportant task, but it plays a big role in maintaining your kitchen’s overall efficiency and comfort. By keeping your oven free from grime and buildup, you’re not only improving cooking quality but also saving energy, extending the appliance’s lifespan, and creating a cleaner, healthier environment for your home. In short, a clean oven is the foundation of a fresh and enjoyable kitchen.
Preparation Before Cleaning Your Oven
Always remember that preparation is a key step. By setting up your space and ensuring safety measures, you can make the entire process more efficient and hassle-free.
1. Unplug the Oven
Safety should always come first. Always make sure to unplug it from the power source before starting. This prevents any risk of electrical shock or damage while scrubbing or wiping the appliance.
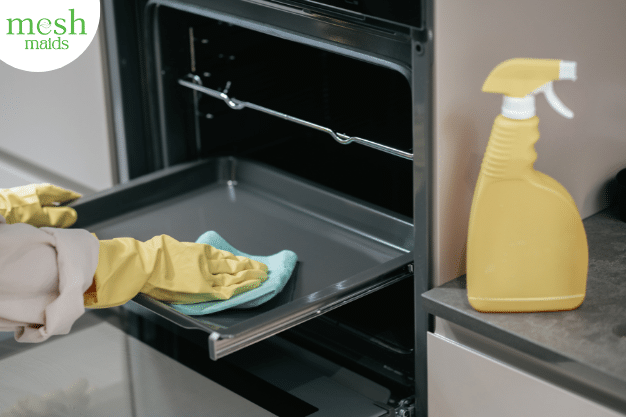
2. Remove Oven Racks and Accessories
Take out all removable parts, such as racks, trays. Cleaning these items separately ensures that every part of your oven gets proper attention. You can soak them in warm, soapy water to loosen grease and residue while you work on the oven interior.
3. Protect Surrounding Surfaces
Cleaning can get a bit messy, especially when dealing with baked-on grease and cleaning solutions. Lay down old towels, rags, or newspapers around the oven to catch any spills, drips, or debris. This makes cleanup easier once you’re done.
4. Ventilate the Area
Even when you’re using natural cleaning ingredients like baking soda or vinegar, proper ventilation is essential. Open windows, switch on your kitchen fan, or keep the exhaust running to allow fresh air to circulate and minimize any lingering odors.
Taking a few minutes to prepare your space sets the stage for a smoother, safer, and more effective cleaning experience. With the wire unplugged, everything cleared out, and protected, you’re ready to focus on removing grime and restoring your oven’s shine without any stress or mess.
DIY Oven Cleaning Methods That Work
There are several effective DIY methods to clean an oven. It all depends on you, which one is easier for you. You can try, depending on how dirty your oven is and the cleaning ingredients you prefer using. Let’s take a closer look at each method and find the one that works best for your oven.
Method 1: Baking Soda and Vinegar – The Natural Power Duo
This classic combination is one of the most popular DIY oven cleaners for a reason — it’s affordable, safe, and surprisingly effective.
What You’ll Need:
- ½ cup baking soda
- 3 tablespoons water (adjust for consistency)
- White vinegar (in a spray bottle)
- A sponge or microfiber cloth
- A plastic scraper or spatula
Steps to clean an oven with baking soda and vinegar:
- Make a Paste: Mix baking soda and water in a bowl until you get a thick paste.
- Apply to Oven Interior: Spread the paste on the oven walls, floor, and door — avoiding heating elements.
- Let It Sit: Leave the paste for at least 12 hours or overnight. The longer it sits, the easier the grime loosens.
- Wipe Off: Use a damp cloth or plastic scraper to remove the baking soda residue.
- Spray Vinegar: Lightly mist vinegar on remaining spots. It will fizz and help lift any leftover grime.
- Final Wipe: Use a clean, damp cloth to wipe the entire surface until shiny.
Pro Tip: Add a few drops of lemon essential oil to the baking soda paste for a fresh scent and extra grease-cutting power.
Method 2: Steam Cleaning with Water and Lemon
If your oven isn’t heavily soiled, a steam-clean method using lemon and water can loosen light grease and refresh the smell.
What You’ll Need:
- 1 oven-safe bowl or dish
- 2–3 cups water
- Juice of 1–2 lemons (plus peels)
Steps to clean an oven with the use of steam of water and lemon:
- Preheat the Oven: Set it to 250°F (120°C).
- Prepare the Solution: Fill the bowl with water and lemon juice, then place it on the middle rack.
- Steam: Let it heat for 30–40 minutes. The steam will loosen grime and soften baked-on residue.
- Cool and Wipe: Turn off the oven, let it cool, then wipe down the surfaces with a microfiber cloth.
Bonus: The lemon acts as a natural deodorizer, leaving your oven smelling fresh and citrusy.
Method 3: Dish Soap and Baking Soda for Oven Racks
While cleaning the oven interior, don’t forget the racks! Dirty racks can affect airflow and cooking results.
What You’ll Need:
- A bathtub or large sink
- Hot water
- ½ cup dish soap
- ½ cup baking soda
- Old towel or brush
Steps to clean oven racks with dish soap and baking soda:
- Soak the Racks: Place them in the bathtub and fill it with hot water until racks are submerged.
- Add Cleaners: Pour in dish soap and baking soda, then let soak for at least 4 hours or overnight.
- Scrub and Rinse: Use a non-abrasive brush or sponge to remove grime, then rinse thoroughly.
- Dry and Replace: Wipe dry before placing them back into the oven.
Method 4: Using Salt and Vinegar for Quick Cleanups
For light spills or fresh grease splatters, this quick DIY fix works wonders.
What You’ll Need:
- Coarse salt
- White vinegar
- A damp cloth
Steps for quick clean up using salt and vinegar:
- Sprinkle Salt: Immediately after a spill (when oven is off and slightly warm), cover the area with salt.
- Spray Vinegar: Mist vinegar over the salted spot.
- Wait and Wipe: Let it sit for 10 minutes, then wipe clean with a damp cloth.
This method prevents stubborn buildup between deep cleans and keeps your oven looking clean longer.
Method 5: DIY Ammonia Overnight Soak (For Heavy Buildup)
If your oven has heavy grease or burnt-on grime, an ammonia soak can work best to loosen it effectively.
Note: Always use ammonia with caution and proper ventilation. Avoid mixing it with other chemicals.
What You’ll Need:
- ½ cup ammonia
- Heatproof bowl
- Boiling water
- Gloves and mask
Steps for heavy buildup cleaning with Ammonia:
- Preheat oven to 200°F (90°C): Then turn it off.
- Place Bowls: Put one bowl with ammonia on the top rack and another with boiling water on the bottom rack.
- Close and Let Sit Overnight: The fumes will soften grease and grime.
- Wipe Clean: In the morning, remove bowls and wipe down the oven using warm soapy water.
With these simple DIY methods, you can tackle everything from light splatters to stubborn, baked-on grime using ingredients you already have at home. Whether you prefer the natural power of baking soda and vinegar, the freshness of lemon steam, or a quick salt-and-vinegar fix, each approach helps restore your oven’s shine while keeping it safe and chemical-free. Regular maintenance not only makes cleaning easier over time but also ensures better cooking performance and a fresher, more inviting kitchen every day.
How Often Should You Clean Your Oven?
For most households, a deep oven cleaning every three to six months is ideal. However, if you cook frequently — especially greasy, saucy, or baked dishes — you may need to clean it more often to maintain performance and hygiene.
Here’s a quick guideline to help you decide how often to clean your oven:
- Light use (baking once or twice a week): Every 6 months
- Moderate use (3–4 times a week): Every 3–4 months
- Heavy use (daily cooking or roasting): Every 1–2 months
In addition to deep cleaning, it’s a good habit to wipe up spills and splatters right after cooking. This simple step prevents buildup, keeps your oven smelling fresh, and makes future cleanings much easier. In fact, some professional cleaning companies like Mesh Maids provide deep interior cleaning for ovens as an add-on service. Hire professionals whenever you feel like your oven needs a deep clean.
How to Clean Oven Glass Door
The oven’s glass door often collects baked-on grease and food splatters, making it look dull and cloudy over time. Restoring its shine is easier than you might think and it only takes a few simple steps.
What You’ll Need:
- Baking soda
- Water
- Sponge or microfiber cloth
Steps:
- Make a Paste: Mix baking soda and water in a small bowl until you get a thick, spreadable paste.
- Apply to Glass: Spread the mixture evenly over the glass surface, focusing on greasy or stained spots. Let it sit for about 30 minutes to loosen the buildup.
- Wipe Away: Use a damp cloth or sponge to gently wipe off the paste and grime.
- Polish: Finish by buffing the glass with a clean, dry microfiber cloth for a clear, streak-free shine.
Optional Tip:
If your oven has a double-layered glass door, use a long, thin brush or a specialized microfiber tool to reach between the panels (if accessible).
A sparkling oven glass not only enhances your kitchen’s appearance but also lets you clearly see your food while it cooks. With this quick DIY method, you can keep your oven door spotless and bright while no use of harsh chemicals.
How to Maintain a Clean Oven
Once your oven is spotless, a few simple habits can help keep it that way. Regular maintenance not only saves time but also prevents the need for frequent deep cleans.
1. Wipe After Each Use
After cooking, allow your oven to cool, then quickly wipe away any spills, splatters, or crumbs. This small step prevents grease and residue from hardening over time.
2. Use an Oven Liner
Place a reusable oven liner or baking mat on the lower rack to catch drips and food particles. It makes cleanup faster and protects the bottom surface of your oven.
3. Cover Dishes While Cooking
When preparing casseroles, roasts, or saucy dishes, use lids or foil covers to reduce splatters. This helps keep your oven interior clean longer.
4. Do a Monthly Clean
Once a month, steam-clean your oven using water and lemon. The natural steam helps loosen light grease, refresh odors, and maintain that just-cleaned look between deep cleans.
5. Avoid Harsh Chemicals
Stick to DIY cleaning solutions made from baking soda, vinegar, and lemon. These natural ingredients are safe for your oven’s finish, gentle on your hands, and eco-friendly.
With just a little regular care, your oven will stay clean, fresh, and efficient for every meal. Consistent maintenance not only saves effort but also ensures better cooking results and a more inviting kitchen.
When to Call Professional Cleaning Services
Even with consistent DIY care, you may require professional cleaning for the maintenance of your oven.
Cleaning professionals use their expertise and eco-friendly products to remove tough buildup efficiently. They also clean every corner of your oven, ensuring your oven performs at its best.
If you notice smoke, persistent odors, or uneven heating despite regular cleaning, it’s a good time to schedule a professional service with Mesh Maids..
Conclusion
Knowing how to clean an oven doesn’t have to be complicated or overwhelming. With a few simple DIY cleaning methods using natural ingredients like baking soda, vinegar, and lemon, you can restore your oven’s sparkle without relying on harsh chemicals.
From quick salt-and-vinegar fixes to deep overnight soaks, these methods are safe, affordable, and highly effective. Plus, by adopting regular maintenance habits like wiping spills immediately and using oven liners, you’ll keep your oven cleaner for longer.
After all a clean oven cooks better, smells fresher, and lasts longer.

James McLaren, with a rich background in architecture from the University of Manchester, has been contributing his expertise to the world of creative construction and home innovation for over 20 years. His journey began as a project manager for a leading construction firm, where he honed his skills in bringing complex designs to life. James joined our platform as a freelancer in 2019, quickly becoming a favorite for his insightful and practical advice. He has been a pivotal force to our wing ever since, bringing our readers a blend of technical know-how and creative flair. Beyond his professional life, James is an avid woodworker and enjoys restoring vintage furniture, a hobby that complements his professional insights beautifully.