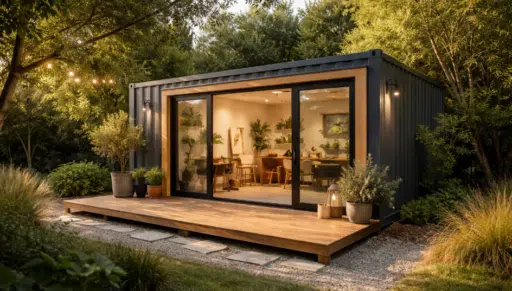
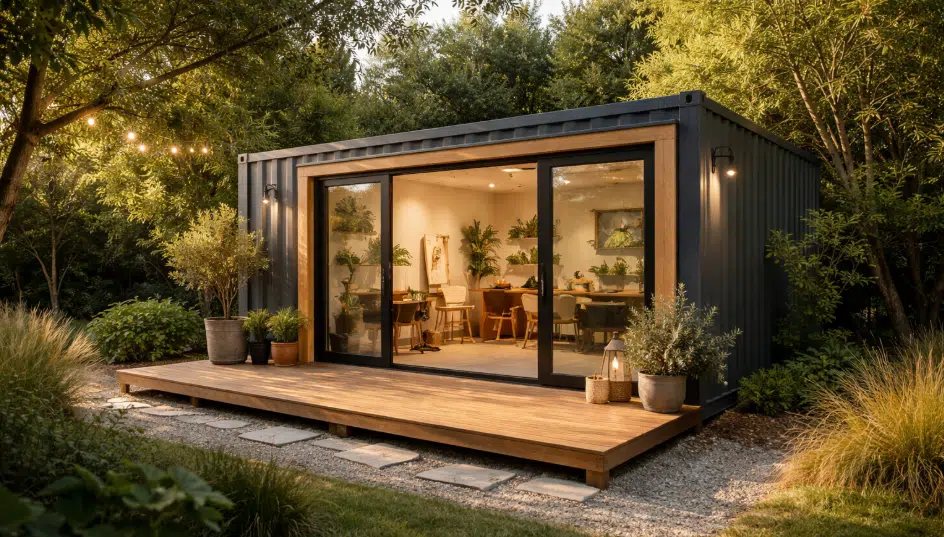
A backyard studio can solve a familiar problem: you need a dedicated place to create, focus, and store supplies, but you don’t want a full-scale home addition. Shipping containers make that goal surprisingly practical because they arrive as a ready-made shell you can customize around your craft.
If you’re aiming for a comfortable shipping container studios setup, the ideas below will help you plan a space that looks good, works hard, and fits your yard.
Why a Shipping Container Works So Well as a Backyard Studio
A container studio is essentially a compact, weather-resistant room that you can tailor to almost any hobby or business. Many homeowners like containers because they’re durable, quick to set in place, and easier to visualize than building from scratch. You’re starting with a steel structure that can handle the elements, then adding the features that make it feel like a real studio: insulation, lighting, flooring, and a layout that matches your workflow.
Just as important, a standalone backyard studio creates separation. When you can close the door on the house and step into a dedicated zone, you’re more likely to stay focused, and less likely to let your tools and materials spread into living areas.
Before You Start: Key Design Decisions That Make or Break the Space
A great container studio isn’t only about the theme, it’s about a few practical choices:
- Size and layout: A 20-foot container often suits solo work (desk, storage, small seating area). A 40-foot container can handle equipment zones, larger tables, or client seating.
- Light and comfort: Plan windows, skylights, and task lighting early. Add insulation and climate control so you can use the studio year-round.
- Ventilation: Any studio with heat, dust, fumes, or humidity needs intentional airflow (exhaust fan, mini-split, operable windows).
- Power and connectivity: Outlets where you work, not just on one wall. Consider Ethernet or a strong Wi-Fi extender for smooth calls and uploads.
- Placement: Think about sun exposure, drainage, privacy, and a clear path for delivery and installation.
- Local rules: Permits, setbacks, utility connections, and HOA restrictions vary. It’s worth checking before you commit to a design.
With that foundation, here are ten creative ways to turn a container into a backyard studio that actually gets used.
Creative Backyard Shipping Container Studio Ideas
1) The Natural-Light Art Studio
If painting, sketching, or mixed media is your focus, design around light. Add large windows or a wide glass door on the north-facing side (for softer, consistent light) if possible. Use washable wall finishes, a sturdy worktable, and vertical storage for canvases. A simple clean zone near the entrance, hooks, sink access (if available), and a small counter, helps keep paint and solvents organized.
2) A Pottery Studio With Wet and Dry Zones
Pottery thrives on separation. Map the interior into a wet area (wheel, clay prep, cleanup) and a dry area (storage shelves, glazing, finished pieces). Moisture-resistant flooring is a big win here, along with strong ventilation to manage dust and kiln heat.
If a kiln is part of the plan, prioritize electrical requirements, clearance, fire-safe surfaces, and an exhaust approach that keeps air moving.
3) A Music Practice and Recording Studio
A container can become a serious sound space with the right build-out. Start with insulation and layered wall assemblies that reduce sound transfer, then add acoustic panels to control reflections inside the room.
Create a gear wall with cable management, a workstation for recording, and a small seating area for collaboration. If you record vocals or instruments, a compact booth (even a partial one) can improve audio quality without needing a huge footprint.
4) The Video Editing and Post-Production Suite
For creators who need focus and screen time, the goal is comfort and control. Add blackout shades, glare-free lighting, and a desk setup that supports long sessions. Plan quiet cooling (a mini-split is popular) so your studio stays comfortable without a loud fan in the background. Built-in shelving for drives, camera gear, and batteries keeps the space tidy, and a tidy suite makes deadlines feel less chaotic.
5) A Photography Studio With Modular Backdrops
Container studios are naturally suited for controlled shooting. Install a ceiling track or wall mounts for backdrops, and add movable light stands with dedicated power outlets. If you also shoot with natural light, consider wide doors or a large window you can cover when needed.
A small dressing corner, mirror, hooks, a stool, makes portrait sessions smoother, even if it’s just you and a tripod.
6) A Yoga, Meditation, or Breathwork Studio
This idea is all about atmosphere. Use warm, dimmable lighting, soft flooring (cork, rubber, or cushioned layers), and a minimalist layout.
Insulation and temperature control matter more than you might think, no one relaxes in a space that’s freezing in winter or stuffy in summer. Add a mirrored wall if you want posture feedback, and include hidden storage so mats and props don’t clutter the room.
7) A Woodworking or Maker Workshop
For hands-on builders, a longer container can feel like the perfect tool hallway, if you plan dust and workflow. Put heavy equipment near the doors for easier loading. Add a durable workbench, pegboard or French cleats, and overhead storage for clamps and lumber. Dust collection and ventilation are essential, and brighter task lighting will instantly make the space safer and more enjoyable.
8) A Massage or Wellness Treatment Room
A compact container can become a private, calming studio for bodywork. Prioritize insulation, quiet climate control, and soft, indirect lighting. Design storage for linens, oils, and sanitizing supplies so the room stays professional. If clients visit, consider a small exterior deck or covered entry to create a welcoming transition before they step inside.
9) A Podcast Studio Built for Clean Audio
Podcasting needs consistency more than size. Add sound-absorbing elements (panels, thick curtains, rug layers) to reduce echo, then build a simple workstation with a mixer interface, mic arms, and organized cables.
Consider a second chair for interviews and a recording checklist corner, headphones, spare cables, spare batteries, so you’re never hunting for gear five minutes before you hit record.
10) A Design, Craft, or Home Office Studio for Deep Work
If you want a studio that supports both creativity and productivity, think calm office + flexible craft corner. Put a desk near natural light, add a pinboard or whiteboard for planning, and reserve one wall for a fold-down work surface or cutting table. Storage can be a mix of closed cabinets (visual calm) and labeled bins (fast access). This setup is ideal for graphic design, sewing, architecture, or any work that alternates between computer time and hands-on making.
Finishing Touches That Make It Feel Like a Real Studio
No matter which idea you choose, a few upgrades dramatically improve daily use:
- Insulation + moisture control for year-round comfort
- Layered lighting (ambient + task + accent)
- Built-in storage to prevent clutter creep
- A small outdoor landing (steps, deck, awning) for a polished look
- Exterior paint or cladding to match your home and landscaping
A backyard container studio can be a focused retreat, a client-ready workspace, or the most motivating room on your property, if you design it around how you truly work.
Start with comfort, light, airflow, and storage, then build the interior to support your craft instead of fighting it. When you’re ready to explore layouts and ready-to-start options, take a look at shipping container studios https://midstatecontainers.com/collections/home-studio to help you move from idea to a studio you’ll enjoy using for years.
Add simple DIY touches like a small deck, exterior lighting, or greenery to make the entrance feel welcoming and intentional. With a clear plan and phased upgrades, you can finish the basics quickly and keep refining the space as your needs grow.

With a Master in Architectural Studies from University of Pennysylvania, Marwa Haydar has pioneered living spaces since 2005. Her expertise, initially honed in a prestigious architectural firm, is evident in her approach to creating environments. Marwa became part of our team in 2019 and has since been a driving force in our home improvement section, known for her practical yet stylish solutions. She’s been spearheading our design workshops since then, infusing her passion for teaching into her work. In her leisure time, Marwa enjoys exploring historic architecture and is an enthusiastic pottery hobbyist, further enriching her understanding of form and texture.