Creating a bar cart doesn’t require specialty furniture or complex tools. With basic materials and clear steps, everyday household items can be repurposed into functional bar setups that fit different rooms and lifestyles.
These bar cart ideas focus on practical construction, easy organization, and layouts that work for daily use as well as casual entertaining.
Each idea prioritizes stability, accessibility, and efficient storage so the finished cart looks intentional and performs well over time.
If you need a compact solution for a small apartment or a mobile setup for gatherings, these projects are designed to be achievable without professional skills or permanent changes.
DIY Bar Cart Ideas and Builds
These ideas focus on simple conversions and upgrades using readily available furniture and materials. Each project emphasizes ease of assembly, smart organization, and adaptability to different spaces, from living rooms and kitchens to patios and multipurpose areas.
1) Repurposed Utility Cart

Fits modern kitchens and living rooms; compact and practical for daily use, small gatherings, and flexible storage.
Materials: Utility cart, spray paint, screwdriver, liner mats, tray
Steps
- Clean the cart fully. Spray paint in thin coats and dry thoroughly.
- Add shelf liners for grip, group bottles on the bottom shelf, and glassware on top.
- Add a small tray for tools and napkins. Check wheel tightness and roll stability before loading.
2) Wooden Crate Bar Cart

Works in farmhouse and casual spaces; open storage keeps bottles visible and easy to reach during hosting.
Materials: Wood crates, caster wheels, screws, drill, sandpaper, sealant
Steps
- Sand the crate edges to remove splinters.
- Stack two or three crates and screw them together from the inside corners.
- Attach caster wheels to the base with screws. Seal the wood with a clear coat for wipeability.
- Add a tray on top for tools and coasters.
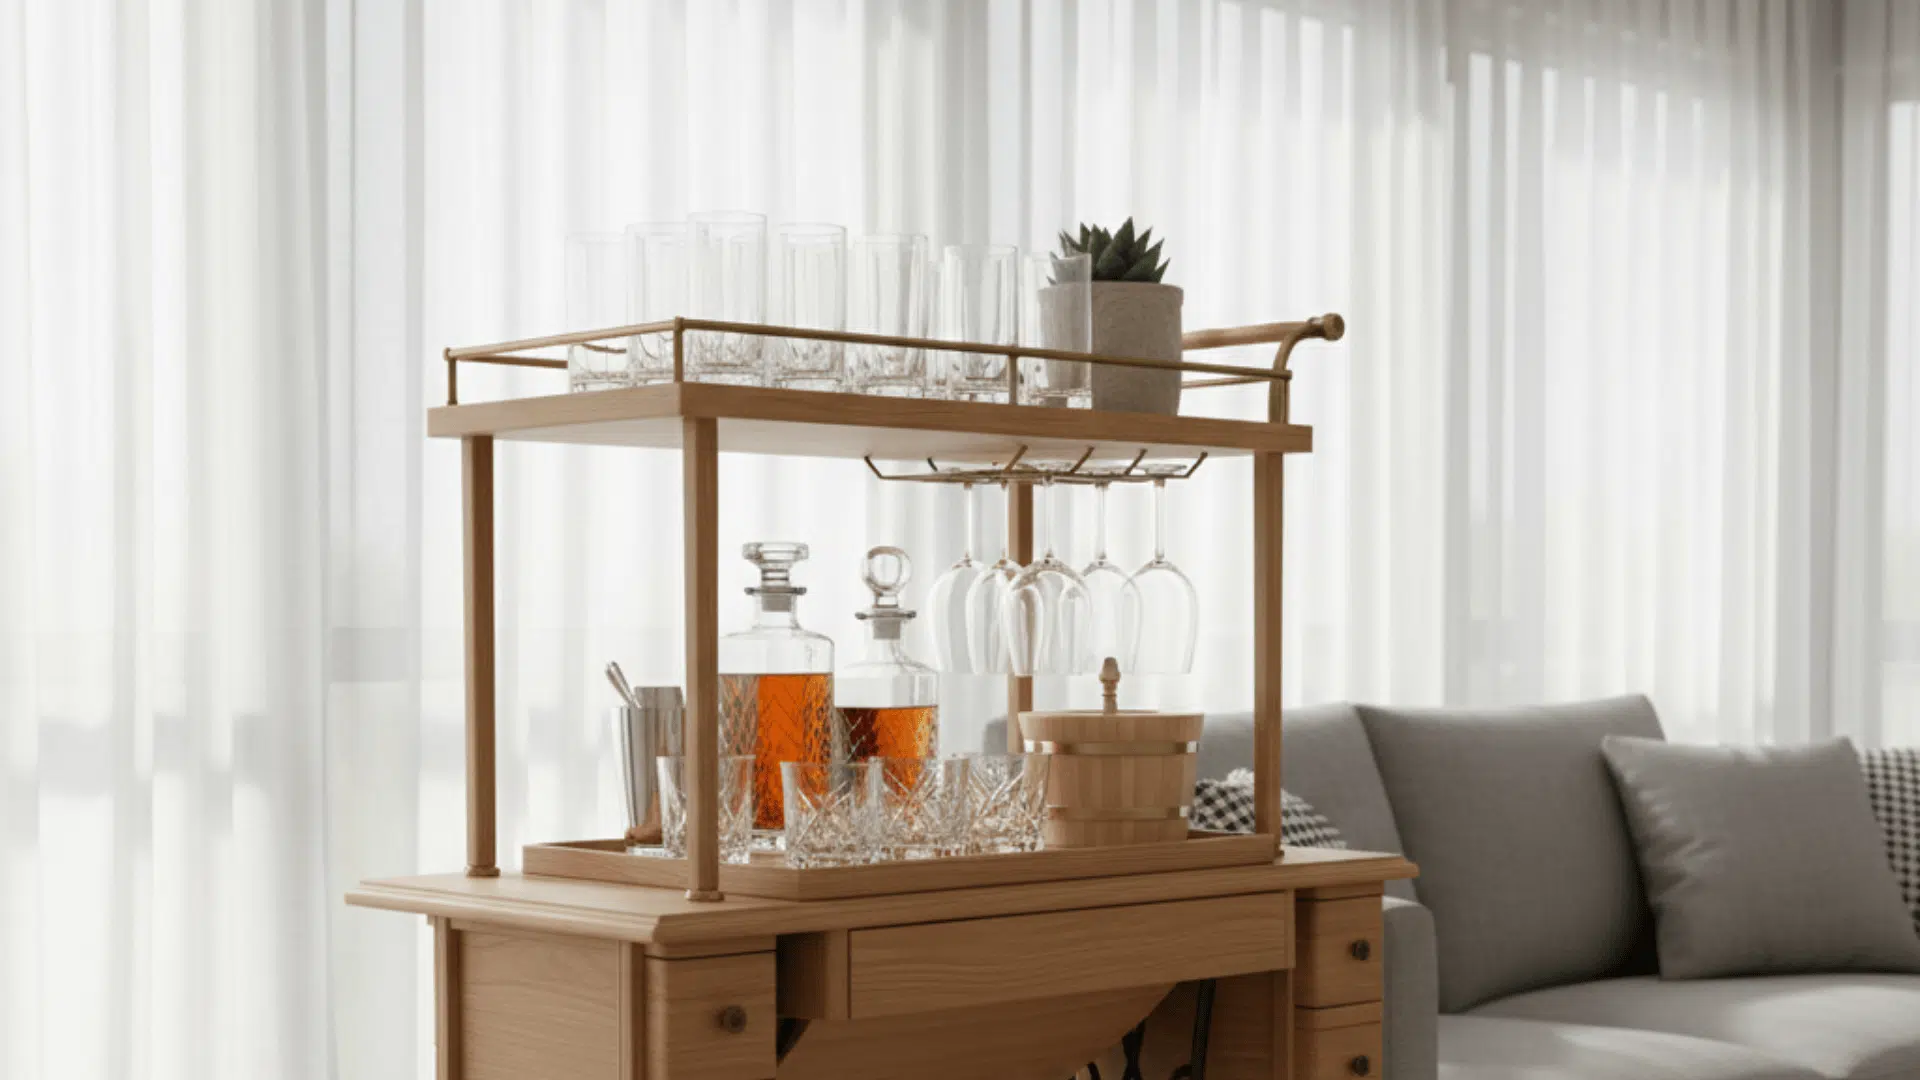
3) IKEA Cart Upgrade

Best for apartments and clean interiors; simple frame supports seasonal styling and quick changes without permanent work.
Materials: IKEA cart, peel-and-stick vinyl, handle pulls, scissors, screwdriver
Steps
- Assemble the cart per instructions. Cut vinyl to shelf size and apply smoothly, removing bubbles.
- Replace standard handles with upgraded pulls if possible. Add shelf liners for glass stability.
- Organize by zones: bottles low, mixers middle, tools and garnish top. Wipe surfaces often.
4) Vintage Suitcase Bar Cart

Suitable for living rooms and events; closed storage hides clutter and makes the bar portable between rooms.
Materials: Vintage suitcase, folding legs, screws, drill, felt liner
Steps
- Reinforce suitcase corners from the inside using small brackets if needed.
- Attach folding legs to the bottom with screws and washers. Line the interior with felt or a thin rubber mat.
- Add small dividers for tools: stock mini bottles and compact glassware to reduce movement.
5) Ladder-Style Bar Station

Fits narrow walls and small dining areas; vertical design adds storage without taking much floor space.
Materials: Step ladder, wood planks, screws, drill, sandpaper, paint or stain
Steps
- Sand the ladder and planks. Cut planks to span ladder steps, and screw planks into place to create stable shelves.
- Paint or stain and let dry. Add a tray on the top shelf for tools and garnish.
- Use non-slip liners to secure glassware.
6) Rolling Side Table Bar Cart

Works for small living rooms; simple table converts into a compact bar with minimal tools and low cost.
Materials: Side table, caster wheels, screws, drill, clear coat
Steps
- Flip the table upside down. Mark and attach caster wheels to each leg using screws.
- Tighten hardware and test rolling. Seal the tabletop for wipeability.
- Add a raised tray for bottles and a small bin for openers, napkins, and stirrers. Keep heavy items low.
7) Pipe Frame Bar Cart

Fits industrial and loft interiors; metal frame and wood shelves create a strong, durable cart for frequent use.
Materials: Metal pipes, flanges, wood boards, screws, drill, caster wheels
Steps
- Assemble the pipe frame using flanges as shelf supports. Cut wood boards to shelf size and sand edges.
- Screw boards to the flanges. Attach caster wheels to the bottom frame.
- Seal wood with a clear coat. Organize by height: tall bottles at the bottom, glassware at the top, and tools in a tray.
8) Wall Shelf “Bar Cart” Alternative

Best for tiny spaces; wall storage keeps drinks organized without using floor area or adding rolling furniture.
Materials: Wall shelves, brackets, anchors, drill, level, tray
Steps
- Locate studs or use strong wall anchors. Install two shelves vertically spaced for bottles and glassware.
- Add a small tray on the lower shelf for tools.
- Keep heavier bottles on the lower shelf for safety.
- Use matching containers to reduce visual clutter and simplify daily setup.
9) Bamboo Bar Cart

Works in coastal and natural interiors; lightweight material looks clean and handles casual indoor and patio use.
Materials: Bamboo rack, caster wheels, screws, clear sealant, screwdriver
Steps
- Assemble the bamboo rack. Attach caster wheels to the bottom using screws.
- Seal bamboo with a clear coat to protect it from moisture.
- Add liners for grip, store bottles on the bottom, glassware on the top, and mixers in baskets.
- Keep it out of direct rain if used outdoors.
10) Tray-on-Console Bar Station

Fits dining rooms and living rooms; a stationary setup looks neat and works when you don’t need a rolling cart.
Materials: Console table, large tray, small containers, coasters
Steps
- Place a large tray on the console to define the bar zone.
- Add bottles at the back and glassware at the front.
- Use small containers for openers, jiggers, and stirrers.
- Add coasters and napkins. Keep one decorative item only to avoid crowding the surface.
11) Small Dresser Bar Cart

Works in bedrooms or lounges; drawers hide tools and extra stock while the top holds daily-use bottles and glasses.
Materials: Small dresser, paint, caster wheels, screws, drill, drawer liners
Steps
- Remove hardware and clean the dresser. Paint and let it cure fully. Attach caster wheels to the base.
- Add drawer liners to prevent sliding. Use the top drawer for tools, the second for napkins and straws, and the bottom for backup bottles.
- Seal the top for easy wiping and spill resistance.
12) Wine Rack Bar Cart Upgrade

Best for wine-first setups; vertical bottle storage saves space and keeps the cart stable when rolling.
Materials: Rolling wine rack, wood board, screws, drill, sealant
Steps
- Check rack stability and tighten bolts.
- Cut a wooden board to create a flat top surface and screw it securely. Seal the wood.
- Use the wine slots for bottles and the top for glassware and tools.
- Add a small basket for corkscrews and stoppers.
13) Tiered Tray Counter Bar

Fits kitchens and small apartments; countertop setup keeps essentials in one place without extra furniture or wheels.
Materials: Tiered tray stand, small bowls, liners, bottle stoppers
Steps
- Assemble the tiered stand. Add liner pads to prevent slipping. Place tools and garnish containers on the top tier.
- Use the lower tier for mixers and small bottles. Keep glassware nearby on a shelf or cabinet.
- Reset the tray after use to maintain a clean look.
14) Wire Basket Rolling Cart

Works for casual spaces; open baskets keep items visible and easy to sort by category for fast hosting.
Materials: Wire baskets, rolling base, zip ties or screws, liners
Steps
- Attach baskets to the rolling base using screws or strong zip ties. Add liners so small items don’t fall through.
- Use the bottom basket for bottles, the middle for mixers, and the top for tools and napkins.
- Add a small tray for jiggers and openers, and test the weight before fully stocking.
15) Bookshelf-to-Bar Cart

Fits home offices and living rooms; bookshelf shape offers more storage than standard carts and keeps items organized.
Materials: Small bookshelf, caster wheels, screws, drill, paint or stain
Steps
- Paint or stain the bookshelf and let it dry. Attach caster wheels to the base corners. Seal shelves for easy cleaning.
- Store bottles on lower shelves and glassware above. Add labeled bins for tools and garnishes.
- Keep heavier items lower to prevent tipping while rolling.
16) Folding TV Tray Bar Cart

Best for temporary setups; the lightweight tray works for small gatherings and stores flat when not in use.
Materials: Folding TV tray, wood trim, glue, and clear sealant
Steps
- Add thin wood trim around the tray edge to create a raised lip.
- Glue and clamp until dry. Seal the surface to protect it from spills.
- Use a tray insert to group tools and napkins.
- Place only a few bottles to keep it stable, then fold and store them after use.
17) Tool Cart Bar Conversion

Works in garages, basements, and game rooms; durable build handles heavy bottles and frequent moving without wobble.
Materials: Tool cart, rubber liners, bins, hooks
Steps
- Clean the tool cart and line the shelves with rubber mats.
- Add small bins for tools and garnish. Use hooks for towels or bottle openers.
- Store heavy bottles on the lowest level. Keep glassware in a padded bin or rack.
- Check wheel locks so the cart stays in place.
18) Plant Stand Bar Cart

Fits balconies and small corners; vertical tiers hold bottles and mixers with a compact footprint and simple look.
Materials: Plant stand, trays, screws, drill, sealant
Steps
- Secure flat trays onto each tier using screws. Seal trays for moisture protection.
- Add non-slip pads for stability, place bottles on the lowest tier, mixers on the middle tier, and tools on the top tier.
- Keep the weight centered so the stand does not tip. Avoid outdoor exposure without cover.
19) Nightstand Rolling Bar

Works beside seating areas; small size keeps essentials close, and drawers hide clutter for a clean daily setup.
Materials: Nightstand, caster wheels, screws, drill, drawer organizers
Steps
- Attach caster wheels to the base and tighten hardware.
- Add drawer organizers for tools, napkins, and extra coasters. Seal the top surface.
- Store bottles on top with a tray to prevent rings.
- Keep glassware on a lower shelf or in a drawer with padding for safety.
20) Clear Acrylic Bar Cart

Fits modern interiors; transparent shelves keep the room open and make the bar feel lighter in small spaces.
Materials: Acrylic shelves, metal frame, screws, screwdriver, caster wheels
Steps
- Assemble the frame and attach acrylic shelves according to instructions.
- Tighten all screws to reduce wobble. Add caster wheels if not included.
- Use soft shelf liners to prevent sliding. Keep heavier bottles on the bottom shelf.
- Wipe acrylic often to remove fingerprints and watermarks.
21) Pallet Wood Bar Cart

Works for rustic and patio spaces; pallet wood creates a sturdy cart with a casual, practical look.
Materials: Pallet boards, nails or screws, drill, wheels, sandpaper, sealant
Steps
- Disassemble pallets and select straight boards.
- Sand all surfaces and edges. Build a box frame and attach two shelves, securing joints with screws for strength.
- Attach wheels to the base. Seal wood to protect from spills.
- Add a handle to move it safely when loaded.
22) Folding Table Bar Setup

Fits parties and rentals; simple folding table creates a quick bar station and stores away after events.
Materials: Folding table, tablecloth, tray, bins, non-slip mat
Steps
- Cover the table with a fitted cloth or runner.
- Add a non-slip mat under bottles. Use a tray for tools and a bin for mixers.
- Keep glassware grouped on one side. Add a small sign or menu card.
- Break down and store all pieces after use.
23) Stacked Serving Trays Bar

Works for small surfaces; stacked trays organize categories and make a compact bar setup for apartments and studios.
Materials: Two trays, risers, screws or adhesive, liners
Steps
- Secure risers between two trays to create a stable two-level stand.
- Add liners to prevent slipping, place tools and garnish on the top tray.
- Store small bottles and mixers on the bottom tray.
- Keep full-size bottles nearby. Use the setup on counters or consoles.
24) Microwave Stand Bar Cart

Fits kitchens and dining rooms; existing shelves and drawers make it practical for tools, bottles, and glass storage.
Materials: Microwave cart, paint or stain, shelf liner, baskets
Steps
- Remove any unused hardware and clean surfaces.
- Paint or stain if needed and let dry.
- Add liners to shelves. Use baskets to sort tools and napkins.
- Store bottles low and glassware higher. If it has wheels, lock them in place during use.
25) Record Stand Bar Cart

Works in music rooms and lounges; compact shelves hold bottles while the form fits entertainment corners and media setups.
Materials: Vinyl record stand, tray, shelf liner, small bins
Steps
- Add shelf liner to prevent sliding. Place a tray on top for tools and garnish bowls.
- Use lower shelves for bottles and mixers. Add small bins for openers, napkins, and coasters.
- Keep glassware in a stable section or padded bin. Avoid overloading narrow shelves.
26) Outdoor Cooler Cart Bar

Best for patios; the cooler keeps drinks cold while the top shelf holds tools and cups for outdoor hosting.
Materials: Cooler cart, tray insert, bins, cup holder, bottle opener
Steps
- Clean the cooler cart and confirm drainage works.
- Add a tray insert on top for tools and garnish.
- Place cups and napkins in bins. Mount a bottle opener on the side if possible.
- Keep ice on one side and drinks on the other to reduce spill mess.
27) Small Cabinet Rolling Bar

Works in living rooms; cabinet doors hide supplies while the top stays clean for serving and quick styling changes.
Materials: Small cabinet, caster wheels, screws, drill, shelf inserts
Steps
- Attach caster wheels to the cabinet base.
- Add shelf inserts or risers inside for bottles.
- Use the top as the serving surface and keep tools in a tray, store supplies behind doors.
- Add door catches so doors stay closed when rolling. Seal the top for easy cleaning.
28) Desk-to-Bar Conversion

Fits offices and dens; removing drawers creates open storage for bottles and tools while keeping a clean furniture profile.
Materials: Small desk, screwdriver, caster wheels, paint, shelf baskets
Steps
- Remove drawers and hardware. Paint or refinish the desk and let it cure.
- Add caster wheels to the base.
- Use baskets under the desktop to hold bottles and mixers.
- Place glassware on the top of the tray. Keep tools in a small bin to prevent clutter.
29) Sewing Table Bar Cart

Works in vintage interiors; slim table form creates a narrow bar that fits along walls and behind seating.
Materials: Sewing table, sandpaper, stain or paint, clear coat, tray
Steps
- Sand the table surface and legs.
- Refinish with stain or paint and let it dry. Seal with clear coat.
- Add a tray on top to group bottles and tools.
- Use the lower shelf for mixers and coasters. Keep the weight centered to maintain stability when moving it.
30) Wall-Mounted Rail Bar System

Best for small walls; vertical rail storage keeps drinks off the floor and creates a clean, compact serving zone.
Materials: Wall rail kit, baskets, hooks, anchors, drill, level
Steps
- Install rails into studs or use heavy-duty anchors. Attach baskets for bottles and mixers.
- Add hooks for towels and tools.
- Place a small tray on a nearby shelf or console for serving.
- Keep heavy bottles in the lowest basket. Check weight limits before stocking fully.
31) Thrifted Cart Makeover

Works in any room; repainting and new hardware modernize an old cart while keeping a practical rolling bar setup.
Materials: Thrifted cart, sandpaper, primer, paint, new handles, liner
Steps
- Clean and sand the cart surface. Prime if needed and paint in thin coats.
- Replace hardware with new handles. Add shelf liner for grip. Tighten wheels and joints.
- Organize bottles by height and group tools in one tray.
- Let the paint cure thoroughly before heavy loading.
Final Thoughts
A bar cart works best when it balances function, mobility, and storage rather than focusing only on appearance.
Repurposing existing furniture, adding wheels, and organizing items by weight and frequency of use make each setup easier to live with long-term.
Whether you choose a rolling cart, wall-mounted system, or stationary bar station, the key is stability, clear zones for bottles and tools, and finishes that handle regular cleaning.
These ideas show that a well-planned bar cart can fit into almost any room, adapt to different occasions, and remain practical without requiring a large budget or permanent installation.

James McLaren, with a rich background in architecture from the University of Manchester, has been contributing his expertise to the world of creative construction and home innovation for over 20 years. His journey began as a project manager for a leading construction firm, where he honed his skills in bringing complex designs to life. James joined our platform as a freelancer in 2019, quickly becoming a favorite for his insightful and practical advice. He has been a pivotal force to our wing ever since, bringing our readers a blend of technical know-how and creative flair. Beyond his professional life, James is an avid woodworker and enjoys restoring vintage furniture, a hobby that complements his professional insights beautifully.