Many dog owners reach a point where store-bought shelters feel limiting, either in size, durability, or suitability for their space.
Building a dog house offers more control and allows the structure to match a dog’s needs, local weather, and available materials.
With basic tools and clear planning, the process is more approachable than it may seem at first.
This guide explains how to build a dog house from the ground up, covering planning considerations, sizing, simple dog house plans, material choices, and step-by-step construction.
It also highlights insulation, ventilation, and common mistakes to avoid, helping ensure the finished structure is safe, functional, and long-lasting.
Each section focuses on practical decisions that make building a dog house manageable and effective, even for those with limited DIY experience.
Map the Dog House Plan
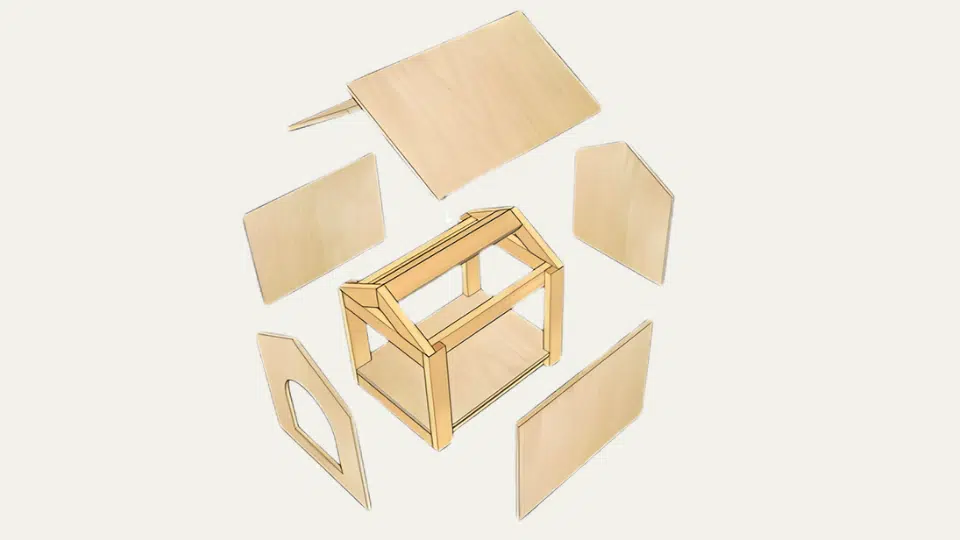
A simple dog house plan is made up of a few core structural parts. Understanding how each piece fits together makes building easier and helps avoid mistakes during construction.
1. Floor Design (Base Structure)
The floor acts as the foundation of the dog house. Most plans use a raised base built from framing lumber and plywood.
Elevating the floor helps prevent moisture buildup and improves airflow. The base should be level and strong enough to support your dog’s full weight without sagging.
2. Wall Structure (Side, Front, and Back Panels)
Walls are framed separately and then attached to the base.
Each wall panel includes vertical supports that keep the structure stable.
The front wall usually includes framing for the door opening. Keeping walls square during assembly ensures the roof fits correctly later.
3. Roof Style (Flat vs Sloped)
Roof style depends on placement. Flat roofs are simple and work well indoors or in covered areas.
Sloped roofs are better for outdoor dog houses because they allow rain and snow to run off.
Most plans include a slight overhang to protect the walls and door opening.
4. Door Opening Placement
The door opening is cut into the front wall panel after positioning it on the frame.
It is usually placed slightly off-center and sized just above the dog’s shoulder height. Proper placement helps reduce drafts while allowing easy entry and exit.
How do These Parts Fit Together?
In a complete plan, the base supports the walls, the walls support the roof, and the roof protects the interior from weather.
Viewing the structure as connected layers makes the building process more manageable and easier to follow step by step.
Materials Needed for Building a Dog House
Before starting construction, gathering all materials in advance helps keep the building process smooth and uninterrupted.
The list below covers the essential items commonly used when building a durable and weather-resistant dog house.
| Material | Purpose | Notes |
|---|---|---|
| Plywood (½″ or ¾″) | Walls, floor, and roof panels | Exterior-grade plywood is recommended for outdoor use |
| Framing lumber (2×2 or 2×4) | Base, wall, and roof frame | Size depends on the dog house scale |
| Deck screws | Structural assembly | Use exterior-rated screws to prevent rust |
| Brad nails or finish nails | Trim attachment | Helps keep edges clean and secure |
| Roofing felt | Moisture protection | Installed under shingles or roof covering |
| Roofing shingles or metal panels | Roof covering | Choose a weather-resistant material |
| Drip edge | Directs water away from edges | Prevents water damage along roof lines |
| Wood trim boards | Edge finishing | Covers exposed plywood edges |
| Wood sealant, stain, or paint | Weatherproofing | Use pet-safe, non-toxic finishes |
| Construction adhesive | Extra strength for trim | Optional but helpful for durability |
How to Build a Dog House Step by Step?
Building a dog house becomes much easier when the process is divided into clear, numbered steps.
Each stage builds on the previous one, helping ensure the structure stays strong, weather-resistant, and comfortable for your dog.
Step 1: Build the Base Frame
Start by cutting framing lumber to create a rectangular base sized to your dog’s body length and height.
The base should allow your dog to stand, turn, and lie down comfortably without excess space.
Assemble the frame using exterior-grade screws, checking that corners are square before tightening everything fully.
Raising the base slightly off the ground helps prevent moisture buildup and improves airflow beneath the dog house, which is especially useful for outdoor placement.
Step 2: Frame the Walls
Cut lumber for the side walls, back wall, and front wall separately.
Assemble each wall flat on the ground to maintain alignment. When working with smaller lumber, drilling pilot holes helps prevent cracking.
The front wall should include framing for the door opening, sized slightly wider than your dog’s shoulders.
Once assembled, attach the walls to the base one at a time, securing them firmly and checking for stability as you go.
Step 3: Assemble the Roof Frame
Create the roof frame based on your chosen roof style, either flat or sloped.
A sloped roof is recommended for outdoor dog houses because it allows rain and debris to shed easily.
Secure the roof framing to the wall tops, making sure it sits evenly and overhangs slightly at the front or sides for added protection.
This framing will support both the roof panels and the roofing materials added later.
Step 4: Attach Plywood Panels
Measure and cut plywood panels for the sides, back, front, and roof.
Attach each panel to the framing using screws, keeping edges flush and surfaces smooth.
After attaching the front panel, mark and cut the door opening directly from the mounted panel to ensure proper alignment.
Pay attention to the grain direction if appearance matters, especially if the dog house will be stained rather than painted.
Step 5: Install the Roof Covering
Cut the roof plywood slightly larger than the frame to allow space for trim and drip edges.
Secure the roof panels, then apply roofing felt to protect against moisture. Install drip edges along the roof perimeter, followed by shingles or another weather-resistant material.
Proper roof installation is essential, as it protects the interior from rain, snow, and direct sun exposure.
Step 6: Add Trim and Exterior Finish
Install trim along corners, roof edges, and around the door opening to cover exposed plywood edges.
Use brad nails or finishing nails, and apply construction adhesive where needed for added durability.
Once the trim is in place, paint or stain the exterior using pet-safe products.
Allow all finishes to fully cure before placing the dog house outdoors or allowing your dog inside.
Step 7: Inspect for Safety and Comfort
Before final placement, inspect the interior carefully.
Check for sharp edges, protruding screws, or exposed nail points. All fasteners should be flush or hidden.
Confirm that ventilation gaps exist near the roofline and that the structure feels stable when gently pushed.
A final safety check ensures the dog house is both secure and comfortable for everyday use.
Video Credit
Thanks to Lowe’s Home Improvement for sharing a detailed dog house build video that inspired this guide.
Common Mistakes to Avoid When Building a Dog House
Many issues come from small oversights during planning or construction. Avoiding these mistakes improves safety and durability.
1. Poor sizing: Guessing measurements often leads to uncomfortable spaces. Always measure your dog before building.
2. Wrong materials: Using untreated indoor wood or low-quality fasteners can cause early damage. Exterior-grade materials last longer outdoors.
3. No ventilation: A sealed dog house traps heat and moisture. Even small vents make a big difference.
4. Placing directly on the ground: Ground contact increases moisture exposure and shortens the life of the structure. Raising the dog house improves comfort and longevity.
Things to Consider Before Building a Dog House
Proper planning helps ensure the dog house fits your dog, works in your climate, and lasts longer outdoors.
Dog size and breed: Measure your dog’s length and height, and note how they usually sleep (curled or stretched). Size affects comfort and warmth.
Balanced sizing: The house should allow standing, turning, and resting without extra space. Oversized houses lose heat, while undersized ones limit movement.
Door opening height: Keep the opening just above shoulder height to reduce drafts and retain warmth.
Climate and weather: Cold areas need insulation and wind protection. Warm areas benefit from airflow and shade. Rain and snow require a roof slope and ground clearance.
Placement and ground surface: Choose a dry, level spot. Avoid placing the house directly on soil. Raised bases or gravel beds reduce moisture damage.
Indoor vs outdoor use: Indoor houses focus on comfort and appearance. Outdoor houses must handle weather exposure and temperature changes.
The Bottom Line
Building a dog house is a practical project that combines planning, basic construction skills, and thoughtful design.
When size, placement, materials, and weather conditions are considered early, the result is a structure that feels comfortable, secure, and durable.
Simple dog house plans help keep the build manageable, while careful attention to insulation, ventilation, and safety details improves everyday use.
Whether the goal is a basic shelter or a custom design, taking a step-by-step approach makes the process smoother and more rewarding.
A well-built dog house supports your dog’s comfort year-round and adds value to your outdoor space.
If you have built one before or are planning your own, share your experience or questions in the comments.

Holding a PhD from Cornell University in Ecology and Evolutionary Biology, Will Jacks has dedicated 15 years to studying and writing about biodiversity. Before becoming a pivotal contributor to our site in 2018, he served as a consultant for wildlife documentaries, blending his academic rigor with visual storytelling. His work, aimed at demystifying the lives of creatures big and small, reflects a career spent in both academia and the field. An advocate for conservation, Will’s hobbies include photography of rare species and volunteering for animal rescue organizations. His insights bring a unique blend of professional expertise and personal commitment to our readers.