Okay, let’s face it: your kids have been begging for a treehouse, and you’ve been putting it off because it seems complicated and overwhelming.
You’re not sure where to start, what materials you need, or whether you can even pull it off without professional help.
The good news? Building a simple treehouse platform is more achievable than you think, even if you don’t have advanced carpentry skills.
This guide will walk you through every step of creating a safe, sturdy treehouse platform using basic materials and tools.
You’ll learn how to assess your tree, gather the right supplies, install frame supports, assemble the structure, and finish with a platform your kids will love for years to come.
Why Build a DIY Tree House in Your Backyard?
Building a treehouse is more than just a weekend project; it’s creating a space where childhood memories are made. Here’s why taking on this DIY challenge is worth every bit of effort:
- Outdoor space for play or quiet use: A treehouse gives kids their own special retreat where they can play with friends, read a book, or just enjoy some alone time up in the branches.
- Practical use of existing trees: Instead of that tree just sitting there, turn it into a functional part of your backyard that gets used and appreciated every day.
- Personal control over design and size: Going DIY means you decide exactly how big or small to make it and can work with your specific tree to create something that fits your yard perfectly.
- Long-term backyard use with minimal upkeep: Build it right with pressure-treated lumber, and your treehouse will last for years with very little maintenance required.
- Creative DIY satisfaction: There’s something incredibly rewarding about building something with your own hands, especially when you see your kids’ faces light up as they climb up for the first time.
How to Build a DIY Treehouse Platform?

Before you start, assess your tree situation. You’ll need a sturdy tree with branches that can support weight.
In this example, a mulberry tree with a three-way fork in the trunk serves as the foundation.
The design uses multiple platforms rather than a traditional enclosed treehouse, making it easier to work with the tree’s natural structure.
Gather the materials needed for this DIY treehouse project, given below:
| Material | Specification | Purpose |
|---|---|---|
| Pressure-treated 2x4s | Cut to 4-foot sections | Floor frame and joists |
| 1×4 deck boards | 4-foot sections | Flooring |
| Heavy-duty, rugged structural screws | 7-inch | Primary structural connections |
| Exterior bolts | Standard size | Attaching to tree trunk |
| Deck screws | 3-inch | Frame assembly |
| Deck screws | 2.5-inch | Floorboard attachment |
| Hurricane ties | Standard | Joist-to-frame connections |
| Circular saw | – | Cutting and trimming |
| Level | – | Ensuring horizontal supports |
| Drill | – | Driving screws and bolts |
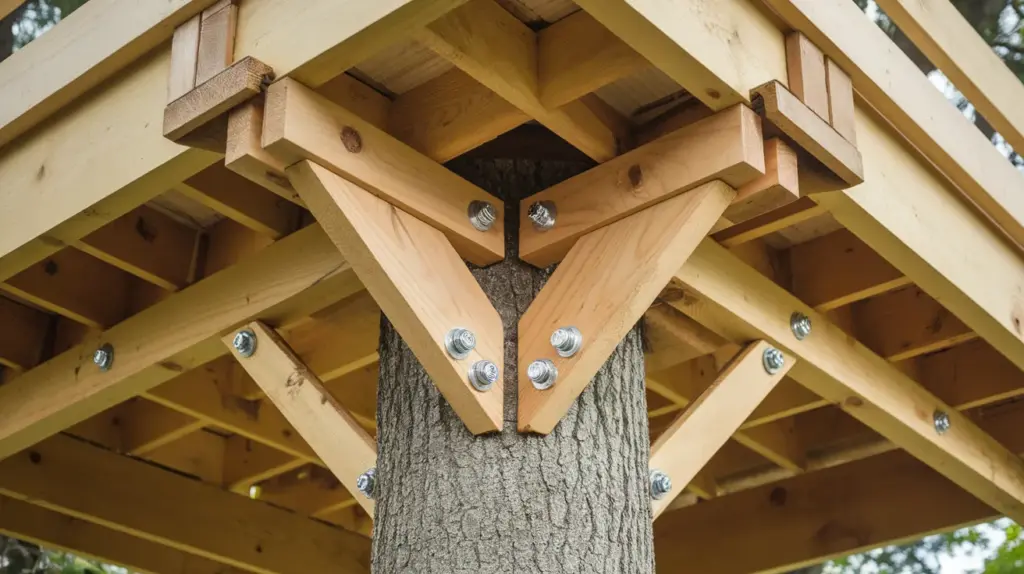
Step 1: Install Frame Supports
Start by creating level supports that attach directly to the tree trunk.
Attach small 2×4 sections to the outside of the main trunk branches, using a level to ensure they’re perfectly horizontal.
These will serve as the foundation for your floor frame. Secure them with exterior bolts.
Repeat this process on the other main trunk section, making sure both supports are level with each other.
Step 2: Add Additional Support and Lay Out Floor Joists
If your tree has a third branch fork, use it for extra stability.
Attach a small 2×4 section to the inside of this third fork, extending it to meet your frame support. Connect these pieces with deck screws.
Position your 4-foot 2x4s as floor joists across the frame supports. You may need to weigh down one side if there’s a significant overhang. Work with a helper to align the joists properly.
Step 3: Assemble the Frame
Sandwich the floor joists between front and back frame pieces (also 4-foot 2x4s).
Secure each connection with two 2.5-inch deck screws. Don’t worry too much about perfect 90-degree angles; the tree will dictate some adjustments.
Use hurricane ties and toenail each floor joist to the frame supports on both sides for maximum stability.
Step 4: Add Diagonal Support & Install Floorboards
If you have a significant overhang on one side, you’ll need additional support to prevent sagging.
Attach one floorboard underneath the end of the frame, then cut a pressure-treated 2×4 at an angle to create a diagonal brace from the ground (or lower trunk) up to the frame. Secure it at the top connection point.
Lay out your 1×4 deck boards across the joists, leaving appropriate space around the tree trunks so they can continue to grow.
Attach each floorboard to each joist with 2.5-inch deck screws. Fill in spaces around the trunks with smaller cut pieces as needed.
Step 5: Trim and Finish
Use a circular saw to trim the floorboards so there’s a slight overhang around the perimeter of the frame for a clean finished look.
Add a ladder or steps using scrap wood to provide safe access to your new platform.
Safety Considerations for DIY Treehouse Project
Before you let the kids loose on your new creation, keep these important safety points in mind:
- Always use pressure-treated lumber for outdoor projects
- Ensure all connections are secure before allowing children to use the platform
- Check the tree’s health; dead or dying trees are unsafe for treehouses
- Be mindful of property lines when positioning your platform
- Regularly inspect the structure for wear and stability
- Consider adding railings for safety, especially for younger children
Tips for Success
Here are some lessons learned that will make your build go more smoothly:
- Cut all materials to the same length (like 4 feet) to simplify construction
- Work with a helper; treehouse building is difficult alone
- Let the tree’s natural structure guide your design rather than fighting against it
- Use heavy-duty screws and bolts; this isn’t the place to cut corners on hardware
- Plan for tree growth by leaving space around trunks and branches
Conclusion
You’ve now got all the knowledge needed to change that backyard tree into a fun zone your children will treasure.
From selecting the right lumber and hardware to securing joists and laying floorboards, each element plays a vital role in creating a durable structure.
Remember to prioritize safety throughout construction and involve your kids in appropriate tasks; they’ll appreciate the final result even more.
While this first platform is just the beginning, you can expand upward with additional levels as confidence grows.
The satisfaction of watching your children play in something you built with your own hands is truly unmatched.
So grab those tools, head outside, and turn your treehouse dream into reality today!

James McLaren, with a rich background in architecture from the University of Manchester, has been contributing his expertise to the world of creative construction and home innovation for over 20 years. His journey began as a project manager for a leading construction firm, where he honed his skills in bringing complex designs to life. James joined our platform as a freelancer in 2019, quickly becoming a favorite for his insightful and practical advice. He has been a pivotal force to our wing ever since, bringing our readers a blend of technical know-how and creative flair. Beyond his professional life, James is an avid woodworker and enjoys restoring vintage furniture, a hobby that complements his professional insights beautifully.