Birdhouses look simple, yet many end up costing more than expected or falling apart after one season.
A beginner-friendly DIY birdhouse solves both problems with a design that is practical, affordable, and easy to build at home.
Using a single fence picket keeps materials minimal while still producing a sturdy shelter that can handle outdoor conditions.
The goal is not decoration. It is to provide a safe nesting space that supports local birds and adds more life to a yard or garden.
This guide covers the build steps, entrance hole sizing, weather protection choices, and common mistakes that reduce success.
With the right basics, a useful birdhouse can be built quickly and confidently.
Why a Simple DIY Birdhouse Works So Well in Any Yard?
A basic birdhouse design is often more effective than decorative versions because it focuses on what birds actually need.
The structure provides a sheltered cavity, airflow, and a dry interior, which are the conditions most nesting birds look for.
A one-board build also keeps the project accessible for beginners, since the cuts are straightforward and assembly is fast. Another advantage is flexibility.
The same layout can be adjusted for different bird species by changing the entrance size and placement height.
With fewer parts and fewer seams, the house is easier to maintain and clean, which supports repeated use season after season.
Best Entrance Hole Size Based on Bird Type
The entrance hole matters because it controls which birds can enter and helps limit unwanted visitors.
A hole that is too large can invite larger birds or predators, while a hole that is too small can prevent nesting entirely.
Many small backyard birds do well with a hole around 1¼ inches, while bluebirds typically need about 1½ inches.
Local bird varieties can vary by region, so matching the hole size to the species in the area improves results.
Placing the hole higher on the front panel also helps protect chicks by keeping them deeper inside the house.
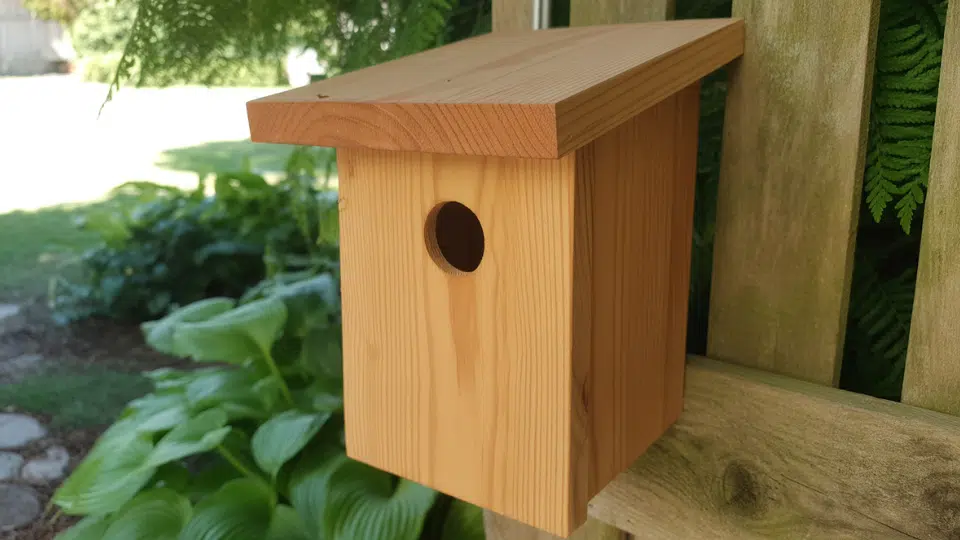
How to Build a DIY Birdhouse Using a Single Fence Picket?
This birdhouse is built from one cedar fence picket, keeping the project affordable and easy to manage.
The design avoids complex joinery and allows small gaps for airflow, which is helpful for nesting birds.
All pieces are cut first, then assembled in a simple sequence so the build stays organized.
First, gather tools and prepare the fence picket.
Start with one 6-foot cedar dog-ear fence picket. Cedar works well outdoors and holds up to weather. Gather the basic tools listed below:
| Item | Purpose |
|---|---|
| 6-foot cedar dog-ear fence picket | Main material for building the birdhouse |
| Measuring tape | Mark accurate cut lengths |
| Pencil | Mark measurements and cut lines |
| Hand saw, or power saw | Cut the fence picket into pieces |
| Drill | Create pilot holes and an entrance opening |
| Hammer or drill driver | Secure nails or screws |
| Finishing nails or exterior screws | Assemble the birdhouse |
| Drill bits/hole saw | Cut the bird entrance hole |
| Sandpaper (optional) | Smooth rough edges before assembly |
Step 1: Measure and Mark All Cuts
Make all measurements on the fence picket before cutting.
Mark the required lengths along the board, starting from the dog-ear end.
Precision is not critical for this project.
Slight gaps between pieces help with ventilation, which is good for birds.
Once all measurements are marked, double-check spacing to ensure every piece fits within the single board.
Step 2: Cut the Birdhouse Pieces
Cut along each marked line using a hand saw or power saw.
After cutting, identify each piece: the back (dog-ear piece), two side panels, the roof, the front panel, and the bottom.
Keeping pieces grouped by purpose makes assembly easier and avoids confusion.
Step 3: Angle the Side Pieces for the Roof
Take the two side pieces and mark a downward angle near the top.
This angled cut allows the roof to slope, helping rainwater run off. Cut along the marked lines.
The angled sides give the birdhouse better weather protection without adding complexity.
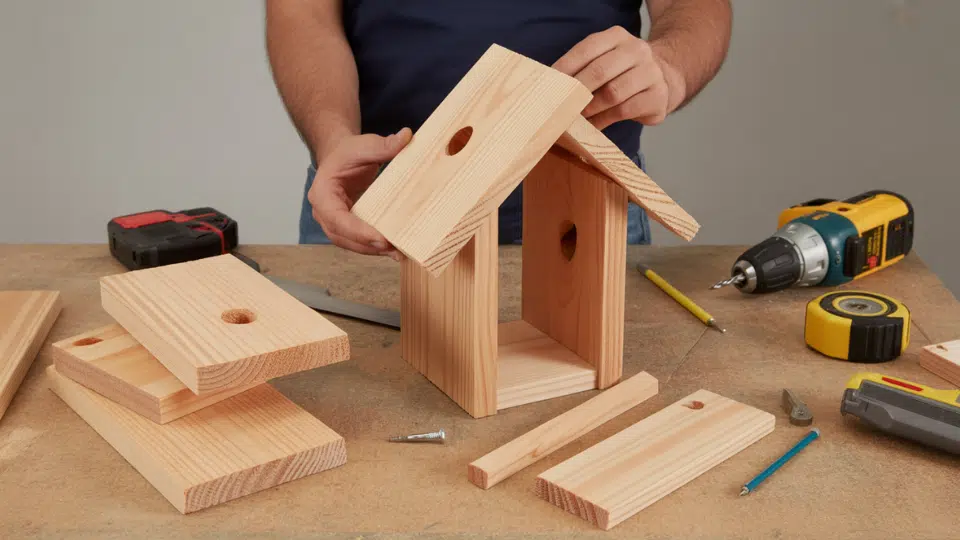
Step 4: Assemble the Front, Sides, and Back
Attach the front panel to the two side pieces first.
Align the bottom edges so any small gap appears at the top for airflow.
Secure using nails or screws, alternating angles to strengthen the joint.
Once stable, attach the back piece, keeping it slightly higher than the front to support the roof slope.
Step 5: Attach the Roof Panel
Place the roof piece on top, allowing it to overhang slightly at the front and back.
This overhang helps keep rain out. Secure it firmly, making sure it sits evenly on both side panels.
A slight backward tilt improves water runoff and helps the birdhouse stay dry inside.
Step 6: Drill the Entrance Hole
Drill the entrance hole in the front panel.
Hole size depends on the bird species you want to attract.
For example, bluebirds use an entrance about 1½ inches wide. Position the hole near the upper portion of the front panel, so chicks stay protected inside.
Step 7: Install the Removable Bottom
Attach the bottom piece last using exterior screws.
Drill pilot holes first to prevent splitting.
This removable base allows the birdhouse to be cleaned out between nesting seasons, helping keep it safe and usable year after year.
Video tutorial: This DIY birdhouse project is based on the original build shared by Earth, Nails & Tails, whose hands-on approach and clear woodworking method inspired this guide.
Painting and Weather Protection Tips That Keep Birds Safe
Simple finishing choices help the birdhouse last longer while keeping the interior safe for nesting birds.
Apply paint only to the exterior and allow it to dry thoroughly before placement.
Use neutral, natural colors so the house blends into the outdoor surroundings.
Leave the interior unpainted to avoid fumes and rough surfaces.
Let cedar weather naturally instead of using heavy sealants.
Add a roof overhang with a slight slope to direct rain away.
Include small drainage openings in the floor area to limit moisture buildup.
Outdoors Bird House Design Ideas
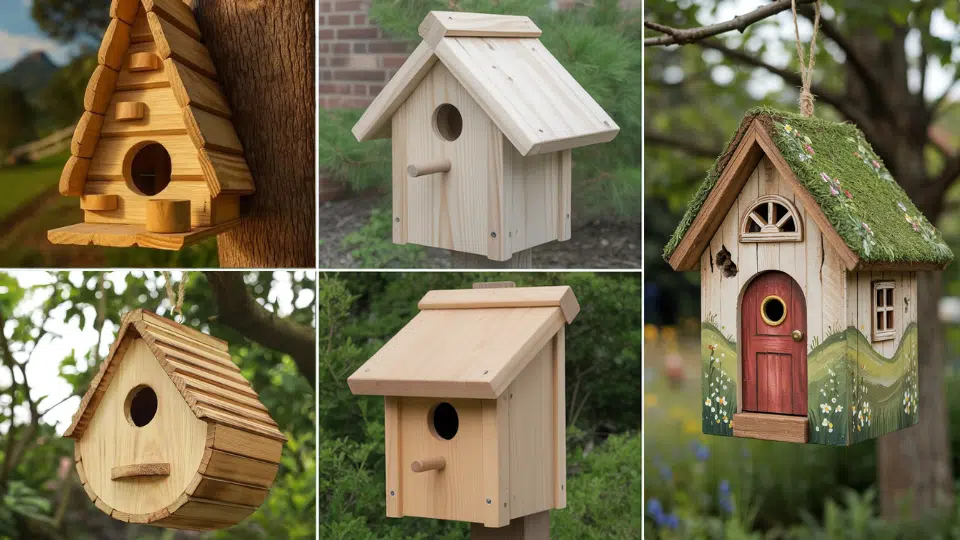
A basic box shape provides a secure nesting space and keeps construction straightforward. Straight walls give birds a comfortable interior and reduce building complexity.
1. Simple box-style structure
A basic box shape provides a secure nesting space and is easier to build than decorative designs. Straight walls help birds settle comfortably and make assembly faster.
2. Sloped roof for water runoff
A roof with a slight downward angle helps rain flow away from the entrance. This keeps the interior dry and reduces moisture-related damage over time.
3. Recessed floor with drainage gaps
Positioning the floor slightly above the bottom edge allows small gaps for drainage. This prevents water buildup and helps maintain a dry nesting area.
4. Proper entrance hole placement
A single entrance hole sized for the target bird species limits unwanted visitors. Placing it higher on the front panel adds protection for chicks inside.
5. Removable panel for cleaning
A detachable bottom or hinged roof makes seasonal cleaning easier. Regular maintenance helps keep the birdhouse usable year after year.
Conclusion
A simple DIY birdhouse can add real value to an outdoor space without requiring expensive supplies or advanced woodworking skills.
With one fence picket, basic cuts, and a sensible assembly order, the build stays manageable, and the finished house stays functional.
Choosing the right entrance hole size improves the chances of the right birds moving in, while thoughtful roof coverage and drainage reduce moisture problems.
Regular cleaning helps the birdhouse stay usable across seasons and keeps nesting conditions safer.
Small design choices matter, but the project remains approachable for beginners and families.
Build one, place it in a suitable spot, and check back during nesting season to see what arrives. Share results and any changes that worked well.

James McLaren, with a rich background in architecture from the University of Manchester, has been contributing his expertise to the world of creative construction and home innovation for over 20 years. His journey began as a project manager for a leading construction firm, where he honed his skills in bringing complex designs to life. James joined our platform as a freelancer in 2019, quickly becoming a favorite for his insightful and practical advice. He has been a pivotal force to our wing ever since, bringing our readers a blend of technical know-how and creative flair. Beyond his professional life, James is an avid woodworker and enjoys restoring vintage furniture, a hobby that complements his professional insights beautifully.