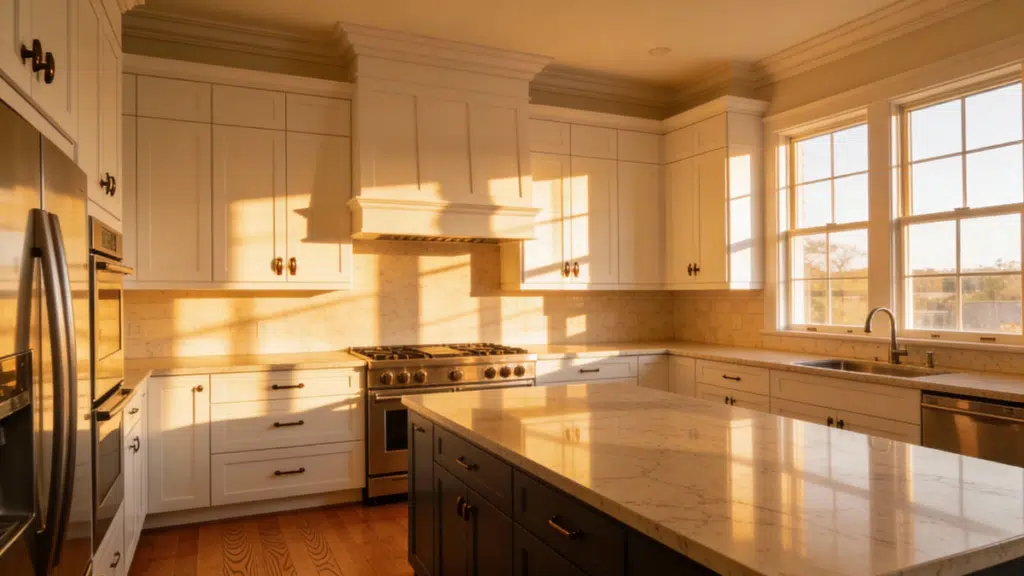
That empty space above kitchen cabinets often looks harmless, but it quietly makes a kitchen feel unfinished.
Dust collects there, visual lines stop abruptly, and cabinets can look shorter than they really are.
Extending kitchen cabinets to the ceiling solves all of that in one move.
This upgrade creates a built-in look, improves storage, and makes the ceiling feel higher without changing the footprint of the kitchen.
While it may look like a custom feature, it can be done with basic materials and careful planning.
This guide explains when cabinet extensions make sense, how to plan the project, the step-by-step process, costs to expect, and mistakes to avoid so the finished result looks intentional and clean.
Why Extend Kitchen Cabinets to the Ceiling?
Extending cabinets to the ceiling is not only about looks. It improves how the kitchen functions and how the space is perceived.
First, it removes the dust shelf above cabinets. That narrow ledge is hard to clean and often becomes a collection point for grease and debris. Closing that gap eliminates the problem entirely.
Second, the kitchen appears taller and more complete. When cabinets stop short, the eye notices the break. When cabinets reach the ceiling, the room feels more cohesive and finished.
Third, it adds storage. The upper extension is ideal for seasonal items, serving pieces, or items that are not used daily.
Finally, cabinet extensions give a custom appearance. Even builder-grade cabinets look more high-end when they reach the ceiling with proper trim.
How to Extend Kitchen Cabinets to the Ceiling?
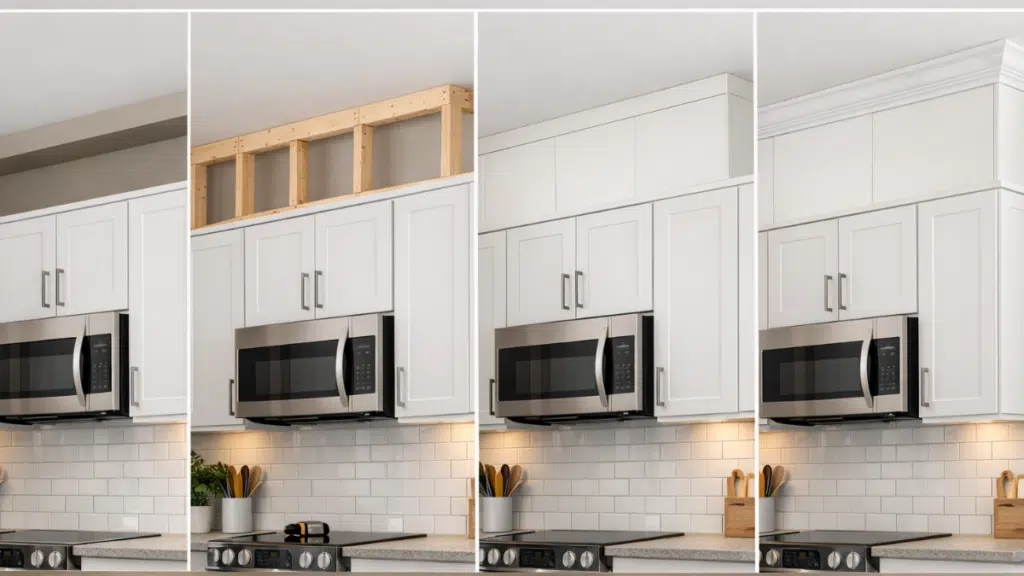
Extending kitchen cabinets works best when the structure is built first, and the finishing details are added last.
Each step builds on the previous one, so taking time here helps the final result look clean and intentional rather than patched together.
Tools and Materials Needed
Having everything ready before starting makes the process smoother and avoids delays.
| Category | Item | Purpose |
|---|---|---|
| Measuring | Measuring tape, level | Measures gaps and keeps everything straight |
| Stud location | Stud finder or magnet | Anchors framing securely into studs |
| Cutting | Miter saw, or circular saw | Cuts boards and trim to size |
| Fastening | Drill or impact driver | Secures framing and extension boards |
| Fastening | Brad nailer | Attaches trim cleanly |
| Framing | 2×2 or 2×3 lumber | Creates support above cabinets |
| Panels | Plywood or 1× boards | Fills the gap to the ceiling |
| Trim | Crown molding | Finishes the top edge |
| Finishing | Caulk, wood filler | Fills seams and nail holes |
| Painting | Primer and paint | Blends extension with cabinets |
Step 1: Remove Existing Crown Molding or Trim
If your cabinets already have crown molding or trim at the top, this needs to come off first.
Use a pry bar and work slowly, starting at one end and easing the trim away a little at a time. Rushing this step can damage the cabinet boxes or pull chunks out of the ceiling or drywall.
Once the trim is removed, scrape off old caulk and adhesive. Any leftover buildup can prevent new boards from sitting flat.
Wipe the area clean, so you are starting with a smooth surface.
Step 2: Add Framing Above the Cabinets
Most ceilings do not have joists located exactly where you need them, so you cannot rely on the ceiling alone to hold new material. This is why framing is necessary.
Start by finding wall studs above the cabinets. Attach wood blocking or small boards to those studs.
If the cabinet tops are solid, you can also secure framing directly into them. The goal is to create a sturdy framework that connects the cabinets to the wall and ceiling area.
Think of this step as creating your own support system.
Once this framing is in place, everything added above the cabinets has something solid to attach to instead of floating or relying on drywall.
Step 3: Install Extension Panels or Boards
With the framing in place, you can now close the gap between the cabinets and the ceiling. Cut extension boards or plywood strips to the height of the gap.
These boards should line up flush with the front face of the cabinets so the extension looks like part of the original design.
Attach the boards to the framing using nails or screws. Outside corners should be cut at an angle so they meet neatly.
Inside corners can overlap slightly, which makes fitting easier when walls are not perfectly straight.
Small gaps are normal at this stage. Walls and ceilings often have dips or curves, and those imperfections will be corrected later with caulk and trim.
Step 4: Install Crown Molding and Trim
Crown molding is what visually ties the cabinets to the ceiling. Before fastening anything, dry-fit each piece to check how it sits. This saves time and reduces mistakes.
Start at one end of the kitchen and work section by section. If the gap above the extension boards is larger, you can layer trim pieces or stack molding to create the right proportion.
For inside corners, coping the trim usually gives a tighter joint than simple angled cuts, especially in older homes where walls are not square.
Take your time here, since trim is what most people notice first.
Step 5: Fill, Caulk, Sand, and Paint
This final step is what makes the cabinet extension look seamless. Fill all nail holes with wood filler and let it dry completely. Sand until the surface feels smooth and even.
Next, apply paintable caulk along every seam where boards meet cabinets, trim meets walls, or molding meets the ceiling.
Caulk flexes slightly as the house settles, which helps prevent cracks over time.
Once everything is dry, prime any raw wood and paint the extension to match the existing cabinets.
When done carefully, the extension should look like it was always part of the kitchen rather than an add-on.
This tutorial is based on a helpful video by Kelsey Romito DIY. You can check out the original video on their YouTube channel here or watch it below.
Tips for Success When Extending Kitchen Cabinets to the Ceiling
Before wrapping up the project, a few practical tips can make the difference between cabinets that look DIY and ones that feel professionally finished.
- Measure from a level reference, not the ceiling or wall, since most ceilings are uneven
- Always anchor framing into wall studs for long-term stability
- Dry-fit boards and trim before fastening to catch gaps early
- Use caulk for seams instead of wood filler so joints don’t crack later
- Keep extension depth flush with existing cabinet faces for a built-in look
- Work in sections to maintain alignment across the entire run
- Prime raw wood before painting to avoid uneven sheen
- Step back often and check sightlines to ensure everything looks straight
Is Extending Cabinets to the Ceiling Right for Your Kitchen?
Not every kitchen benefits the same way from cabinet extensions. Ceiling height and cabinet style matter.
In kitchens with standard 8- or 9-foot ceilings, extending cabinets usually improves proportions and makes the space feel larger.
In very tall kitchens, especially those over 12 feet, full cabinet extensions can look overwhelming. In those cases, flat trim or soffit-style solutions may work better.
Cabinet design also matters. Simple shaker or slab cabinets extend cleanly. Highly ornate cabinet styles may require extra trim planning to avoid visual clutter.
If the kitchen already has open shelving or varied cabinet heights, a full extension may not be the best choice. The goal is balance, not filling space just because it exists.
Conclusion
Extending kitchen cabinets to the ceiling is a small structural change that makes a noticeable visual and functional difference.
It removes wasted space, improves storage, and gives the kitchen a finished, built-in appearance that standard cabinets often lack.
With proper planning, solid framing, and careful finishing, this project can be completed using basic tools and materials.
The key is patience during setup and attention to detail during trim and paint work.
When done correctly, the extension blends seamlessly with existing cabinets and elevates the entire room.
Share in the comments if you’re planning to extend your cabinets or if you’ve already done it; what worked well, and what would you do differently next time?

Tommy Hardy, an alumnus of the Georgia Institute of Technology with a degree in Mechanical Engineering, has been a go-to figure in residential upkeep and innovation for over 18 years. His career commenced in a leading home appliance manufacturing company, where he mastered the intricacies of household systems. Joining our platform in 2020, Tommy quickly became a reader favorite for his practical and easy-to-follow guides. He took the helm of our DIY section in 2019, consistently delivering content that empowers homeowners. Beyond his professional pursuits, Tommy is a passionate gardener and enjoys woodworking, skills enhancing his hands-on approach to home care.