Transform your plain concrete into an eye-catching surface with the timeless appeal of a checkered pattern.
While standard concrete surfaces often suffer from monotony, cracking, and poor traction, a well-executed checkered design offers practical and good advantages.
Beyond its striking visual impact, checkered concrete provides enhanced slip resistance and helps disguise minor imperfections that naturally develop over time.
Creating this classic pattern is surprisingly achievable for DIY enthusiasts. It requires no specialized equipment, just careful attention to surface preparation, pattern layout, and proper curing techniques.
Whether upgrading a patio, modernizing a driveway, or adding character to interior floors, the checkered pattern brings refinement to any concrete surface.
This guide will walk you through the essential steps to achieve professional-looking results while ensuring long-lasting durability and visual appeal.
Materials and Cost Maintenance
Essential Materials (Basic Installation)
| MATERIAL | PURPOSE | ESTIMATED COST PER 100 sq. ft. ($) |
|---|---|---|
| Concrete Mix | Forms the base surface for checkered design | 100-150 |
| Concrete Stains/Paint | Adds color to the checkered pattern | 30-50 |
| Concrete Sealer | Protects and enhances durability | 20-40 |
| Painter’s Tape/Stencils | It helps in creating sharp, checkered lines | 10-25 |
| Measuring Tools & Level | Ensures even and aligned pattern | 15-30 |
| Roller & Paint Brushes | Applies base and secondary colors evenly | 10-20 |
| Chalk Line & Straight Edge | Assists in accurate pattern layout | 10-15 |
| Concrete Cleaner/Etcher | Prepares surface for better adhesion | 10-20 |
| Trowel & Float | Smooths out concrete before painting | 15-25 |
| X-Acto Knife | Trim tape for precise edges | 5-10 |
| Total Estimated Cost | Complete material cost range | $185-315 |
Money-Saving Tips
Smart Bulk Purchasing
- Order concrete mix directly from local suppliers rather than buying individual bags
- Partner with neighbors planning similar projects to split bulk material costs
- Look for end-of-season sales at home improvement stores for sealers and tools
- Consider renting power tools instead of buying them for one-time use
Cost-Effective Staining Alternatives
- Create natural concrete stains using iron sulfate and water for earth tones
- Mix copper sulfate solution for blue-green patina effects.
- Use white vinegar and rust for aged, rustic coloring
- Apply coffee grounds mixed with water for rich brown tones
- Test homemade stains on sample pieces before full application
Material Storage and Preservation
- Store unopened bags of concrete mix on pallets in a dry location
- Keep partial bags sealed in airtight containers
- Transfer liquid products to smaller containers to prevent air exposure
- Label all materials with purchase dates and expected shelf life
- Protect tools from rust by cleaning thoroughly after use and applying light oil
- Store liquid materials in temperature-controlled spaces to prevent freezing or excessive heat
- These approaches can reduce project costs by 30-40%while maintaining quality results.
Checkered Pattern Options by Price Point
1. Tape Application Technique

Create crisp, clean lines using painter’s tape to form your checker pattern.
Apply 2-inch wide masking tape in a grid pattern across your cured concrete surface. Press edges firmly to prevent paint bleed.
This method costs about $10-15 for tape compared to $100+ for professional stencils.
2. Two-Tone Design Strategy

Focus on a classic light and dark contrast using just two colors.
Start with a light base coat, then apply a darker shade to alternating squares.
This simplicity reduces material waste and cuts coloring costs by 50% compared to multi-toned designs. Plan for around $40-60 for both colors.
3. Water-Based Paint Selection

Choose water-based concrete paint for its affordability and ease of application. These paints typically cost $25-35 per gallon versus $50-70 for acid stains.
They offer good coverage, simple cleanup, and low VOC emissions. One gallon usually covers 250-300 square feet with two coats.
Tips for Maximum Value:
- Complete small test areas first to perfect your technique
- Buy slightly more paint than calculated to ensure color matching
- Save leftover paint for future touch-ups
- Apply multiple thin coats rather than thick layers for better durability.
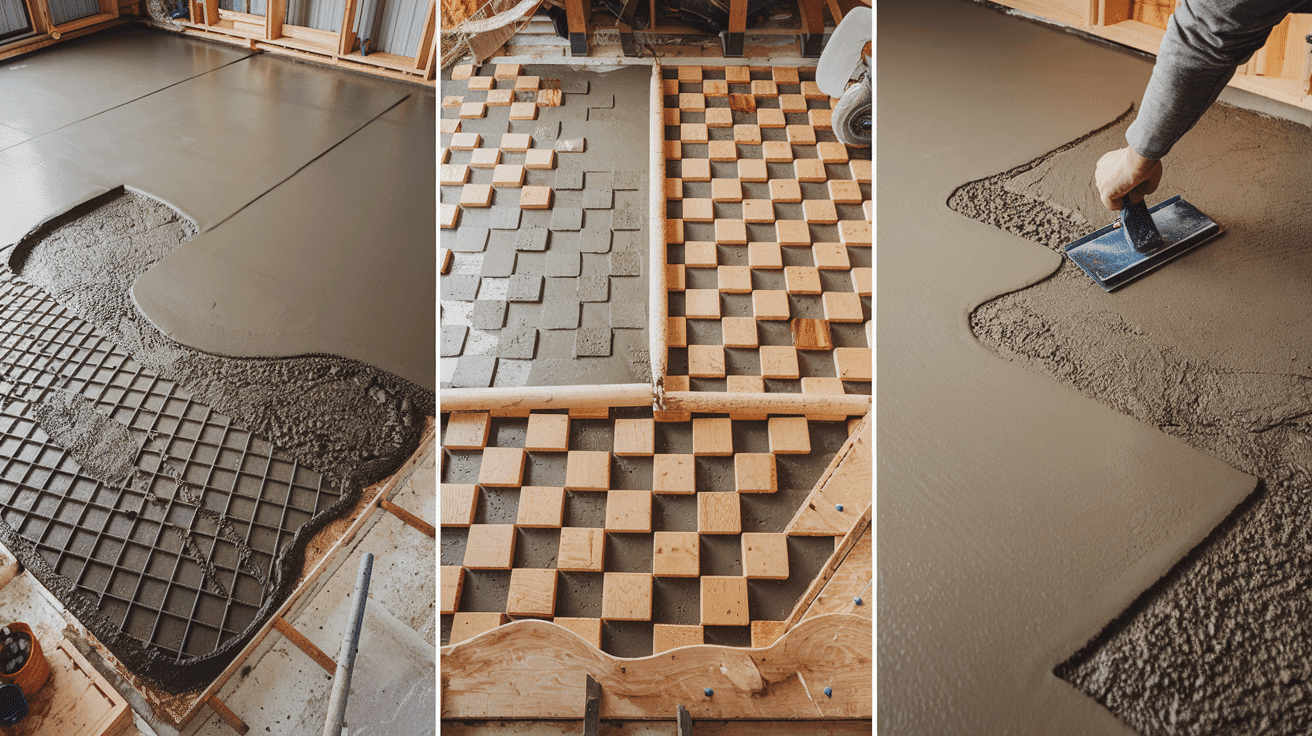
Step-by-Step Guide to Creating Checkered Concrete
STEP 1: Prepare the Concrete Surface

Before starting, thoroughly clean the concrete using a power washer or hose to remove dirt and debris. Ensure the surface is completely dry before proceeding.
If the concrete has cracks, repair them using a filler for a smooth base. A well-prepped surface helps the paint adhere properly and ensures long-lasting results.
STEP 2: Apply the Base Coat

Choose a durable porch and patio floor paint in your preferred base color. Apply at least two coats, allowing each to dry completely.
A lighter shade works best as the base for a checkered design. To avoid patchy areas, make sure the paint is evenly applied, as this will affect the final look.
STEP 3: Create the Checkered Layout

Using a chalk line, snap a straight guideline across the surface to maintain alignment. For consistency, measure and mark the squares with a stencil, foam board, or square tile.
Tape off the areas that will remain the base color, ensuring the edges align perfectly. This step is crucial for achieving a crisp and symmetrical pattern.
STEP 4: Paint the Checkered Pattern

Apply the second color using a roller or brush, ensuring even coverage. Avoid overloading the roller to prevent paint from seeping under the tape.
Carefully remove the tape while the paint is wet to reveal sharp lines. If needed, use an angled brush to clean up any imperfections.
STEP 5: Seal for Durability

Apply a clear concrete sealant using a specialized roller to protect the paint and enhance its longevity.
One coat is usually sufficient, but consider adding a second coat for high-traffic areas.
The sealant helps prevent fading and makes cleaning the surface easier. Ensuring your checkered concrete stays fresh for years.
Video Tutorial By Emhaleshome
Fixing Common Checkered Concrete Mistakes
Correcting Blurred Pattern Lines
- Carefully sand edges where colors have bled using 120-grit sandpaper
- Apply touch-up paint using a fine artist brush for precise line correction
- Create clean edges using the concrete scoring tool to redefine squares
- Use masking tape and fresh paint to reestablish straight lines
Addressing Color Variations
- Apply an additional thin coat of stain to lighter squares for color matching
- Use tinted sealer to even out minor color differences
- Buff overlapping areas with fine steel wool to blend transition zones
- For severe inconsistencies, consider applying a translucent color wash over affected areas
Repairing Surface Problems
- Fill hairline cracks with color-matched concrete crack filler
- Address peeling patterns by stripping affected areas and reapplying color
- Repair spalled areas with concrete patching compound tinted to match
- For deep cracks, use epoxy injection before surface repairs
Prevention Tips:
- Test colors on small areas before full application
- Maintain consistent mixing ratios for colored concrete
- Allow proper drying time between coats
- Apply sealer evenly under suitable weather conditions.
Tips For Maintaining Checkered Concrete

Let’s keep that beautiful checkered floor looking fresh! The key is to maintain basic maintenance—nothing complicated, I promise.
A quick sweep every few days and a gentle mop with mild soap and water once a week will do wonders. Skip those harsh chemicals—they’re just too aggressive for painted concrete.
Have you noticed a chip in the paint? Don’t panic! Lightly sand the spot, wipe it clean, and touch it up with your matching paint.
It’s easier than you think to fix a small scratch on your car. And here’s a pro tip: reapply a coat of sealant every 2-3 years. Think of it as sunscreen for your floor!
One last thing: be kind to your floor. Use furniture pads and avoid dragging heavy items across them.
Your future self will thank you for taking these simple steps to protect your artistic investment.
Conclusion
There you have it – changing your concrete floor into a checkered masterpiece isn’t rocket science!
From prepping your surface to that final coat of sealant, each step builds on the last to create something truly special.
Let’s be real – nothing quite matches the charm of a well-executed checkered pattern.
It’s like giving your space a personality upgrade that works everywhere, from cozy patios to garage floors.
Plus, it’s one of those rare design choices that never really goes out of style.
And hey, if you’re not confident about tackling it solo, there’s no shame in calling in a pro. Either way, you’re on your way to a gorgeous new floor.

James McLaren, with a rich background in architecture from the University of Manchester, has been contributing his expertise to the world of creative construction and home innovation for over 20 years. His journey began as a project manager for a leading construction firm, where he honed his skills in bringing complex designs to life. James joined our platform as a freelancer in 2019, quickly becoming a favorite for his insightful and practical advice. He has been a pivotal force to our wing ever since, bringing our readers a blend of technical know-how and creative flair. Beyond his professional life, James is an avid woodworker and enjoys restoring vintage furniture, a hobby that complements his professional insights beautifully.