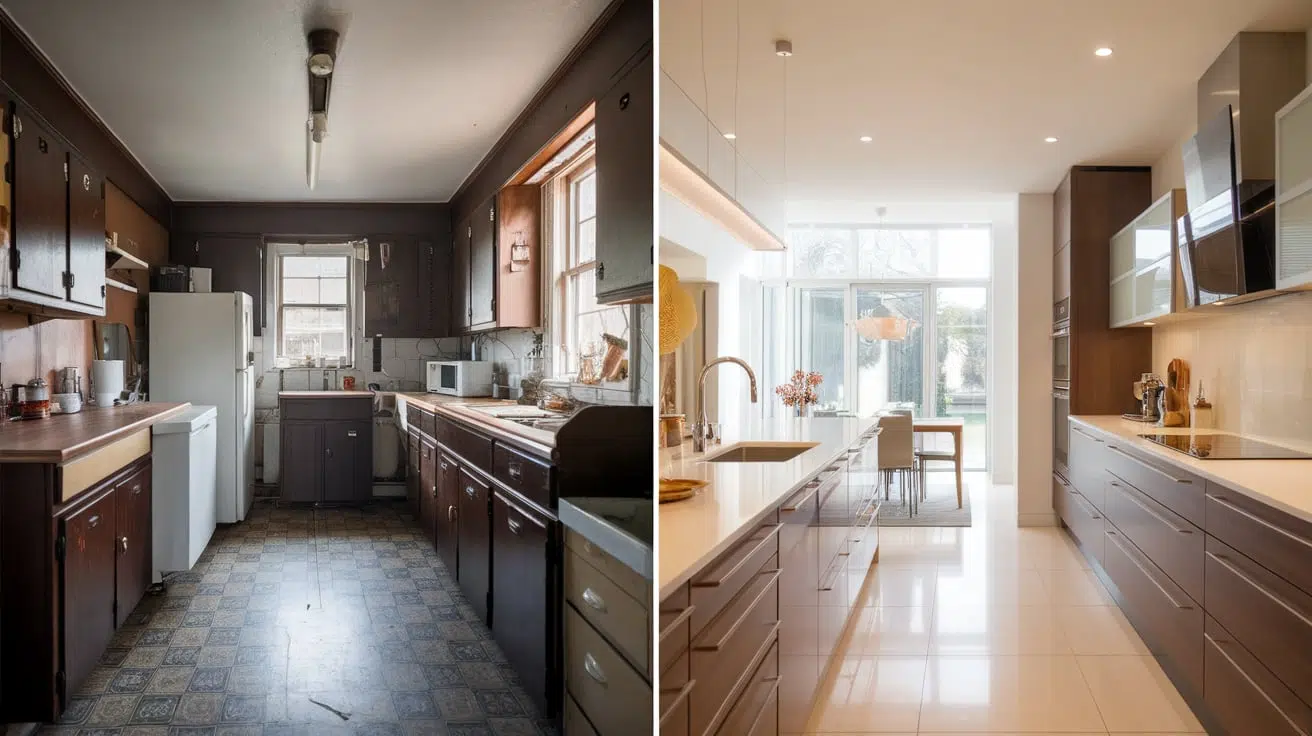
Renovating your home? Great until you’re staring at a mountain of drywall scraps, busted tiles, and that old toilet you forgot you’d ever installed. Once the paint’s dry and the tools are packed away, reality hits: all that progress comes with a mess.
The good news? You don’t have to live in the aftermath. Whether it’s leftover lumber or a pile of cracked tiles, there’s a smarter way to handle renovation waste than dragging it all to the curb.
Stick around because we’re about to break down how to clear it all out without breaking a sweat or the law.
6 Ways To Get Rid of Waste After Home Renovation
1. Sort and Separate Construction Debris for Proper Disposal
Before you think about hauling everything to the dump, take a closer look at what’s actually in your renovation pile. That heap of broken drywall, bent nails, splintered wood, and empty tile boxes isn’t just “trash,” it’s a mix of materials that all need different endings. Sorting your debris may not sound exciting, but it’s the first smart step toward responsible clean-up.
Start by creating separate areas for materials like wood, metal, drywall, and plastics. Even something as specific as tile shards or leftover grout mix should be kept apart if possible. Not only does this make disposal easier later, but some recycling centers and landfills may reject mixed loads altogether, costing you extra time and fees. For example, a pile of wood mixed with insulation might be flagged for contamination and rerouted, delaying your drop-off.
Remember to isolate anything labeled hazardous, such as paint cans, treated lumber, or old caulking tubes. These items need to follow separate disposal rules. Your local municipality’s waste guidelines will typically outline where and how to get rid of these items safely.
Lastly, if you have unused or gently used materials, such as extra tiles, lumber cuts, or intact cabinets, set them aside. Habitat for Humanity ReStores or local building reuse centers often accept these donations, helping someone else while reducing landfill waste.
2. Repurpose or Donate Usable Household Items

Renovations have a way of making the “perfectly fine” feel completely out of place. That cabinet you once loved? Doesn’t match the new backsplash. The dining table? Too bulky for your now-open concept. But before you drag it all to the curb, pause because what doesn’t fit your home anymore could be just what someone else needs.
Not everything left after a renovation needs to go to the dump. If you have usable furniture, décor, or kitchenware, consider donating household items with ease through local nonprofits or scheduled pickup services. It’s a sustainable way to declutter and help others.
There are plenty of organizations that will take gently used items, think Habitat for Humanity, Goodwill, or local shelters. You can even schedule donation pickups so you’re not adding another errand to your already long post-reno list. And if you’re up for a bit of creativity, repurposing can be just as rewarding. A coat of paint or new hardware can give tired furniture a fresh life, maybe even a new purpose.
This step isn’t just about cleaning up, it’s about giving forward. It keeps quality goods out of landfills and puts them in the hands of those who can truly use them.
3. Dispose of Hazardous Materials Safely
It’s easy to overlook that half-used can of paint or the leftover adhesive you tossed in the garage corner, but these are more than just leftovers. They’re hazardous materials, and tossing them in the regular trash isn’t just a bad idea, it’s often illegal.
Many renovation products contain chemicals that can seep into soil or water if dumped carelessly. Think paint thinners, old varnish, or even insulation that contains fiberglass or asbestos. Even a small amount of solvent down the drain can pollute thousands of gallons of water. That’s why it’s important to treat these items with care from the start.
Look for warning labels. Anything marked flammable, corrosive, or toxic needs special handling. Your county or city likely has a designated hazardous waste facility, and many host drop-off days for items like paint, batteries, or old cleaning agents. Some stores even accept returns on certain chemicals.
A good rule? If you’re unsure about a product, assume it’s hazardous until you can confirm otherwise. Proper disposal isn’t just the responsible route. It’s also the law in many places. And honestly, it’s a small effort compared to the long-term damage improper disposal can cause.
4. Hire a Professional Maid Service for Deep Clean

So, you’ve tossed the debris, sorted the scraps, and maybe even donated a few usable extras. But don’t celebrate just yet because renovation dust has a sneaky way of clinging to everything, from baseboards to light fixtures. Even after hauling out the mess, there’s usually a stubborn layer of fine dust, smudges on the windows, and gritty floors that scream “unfinished.”
This is where a professional maid service can truly shine, literally. After the heavy debris is removed, fine dust, smudges, and leftover grime can still linger. A professional maid service can be invaluable in handling post-renovation cleaning with the tools and techniques needed to make your space truly livable again.
While it’s tempting to take on this final clean yourself, the truth is, post-renovation grime isn’t ordinary dirt. It’s often made up of airborne particles that settle in tricky places like vents, window sills, and even the tops of door frames. A good cleaning crew knows exactly where to look and has the right tools to make your space feel fresh, not just look tidy.
You’ve invested time and energy into remodeling, so don’t cut corners at the finish line. A professional cleaner gives your home that “finally finished” feel, so you can relax and enjoy your upgraded space without lifting another broom.
5. Rent a Dumpster for Large or Bulk Waste
When the renovation is more of a “tear-it-down-to-the-studs” kind of project, your regular trash bin won’t stand a chance. Picture piles of drywall, chunks of tile, broken cabinetry, and flooring scraps. It adds up fast, and it’s not something your weekly curbside pickup is going to handle.
That’s where renting a dumpster comes in handy. It gives you a dedicated drop zone for all the bulk waste your renovation leaves behind. Whether you’re gutting a kitchen or redoing several rooms, a dumpster simplifies the chaos by keeping everything in one place, so you don’t need to worry about debris spilling over into the driveway or backyard.
Be sure to choose a dumpster size that matches your project. A 10-yard might do the trick for a bathroom remodel, while a full home renovation might require something bigger. Keep in mind that overfilling it can lead to extra charges or delays, so it’s worth estimating accurately.
Also, don’t treat the dumpster like a free-for-all. Separate out recyclables like metal or clean wood beforehand so they can be handled properly. Renting a dumpster makes cleanup a whole lot more manageable and helps you keep your renovation timeline moving without waste standing in the way.
6. Clean and Disinfect Surfaces After Waste Removal

Just when you think you’re done, you notice the thin film of dust clinging to your cabinets, the smudges on your brand-new countertops, and that unmistakable “construction” smell hanging in the air. It’s not over until every surface has been cleaned and disinfected.
Post-renovation cleanup isn’t just about appearances. Fine dust from drywall, sawdust, and lingering chemical residues can settle into every nook and cranny, especially in kitchens and bathrooms. These spaces see the most activity and should be spotless before anyone starts cooking or unpacking toiletries.
Start by tackling hard surfaces with a reliable all-purpose cleaner to cut through the grime. Floors, walls, counters, and even window sills shouldn’t be skipped. Then, move on to high-touch zones: light switches, cabinet handles, and doorknobs. These areas can quietly harbor germs, especially after weeks of contractors coming and going.
One detail often overlooked is air vents and filters. If the HVAC system was running during the renovation, chances are it circulated a good amount of dust. A quick wipe and a fresh filter go a long way in keeping the air clean and breathable.
Cleaning is the final polish on your renovation. It’s what turns a construction site back into a home you can relax in and breathe easily, too.
Conclusion
Renovation may bring the chaos, but clean-up doesn’t have to follow suit. With a bit of planning and the right approach, you can clear the mess without stress. From breaking down your debris pile to giving usable items a second life, each step moves you closer to a refreshed, livable space. Don’t forget the finishing touches, like deep cleaning and proper disinfecting, which make all the difference when it’s time to move back in.
Whether you’re handling it all yourself or bringing in a few helping hands, the goal is simple: wrap up your project with a home that looks as good as it feels clean, safe, and ready for whatever comes next.

With a Master in Architectural Studies from University of Pennysylvania, Marwa Haydar has pioneered living spaces since 2005. Her expertise, initially honed in a prestigious architectural firm, is evident in her approach to creating environments. Marwa became part of our team in 2019 and has since been a driving force in our home improvement section, known for her practical yet stylish solutions. She’s been spearheading our design workshops since then, infusing her passion for teaching into her work. In her leisure time, Marwa enjoys exploring historic architecture and is an enthusiastic pottery hobbyist, further enriching her understanding of form and texture.