
Leaning foundations can feel overwhelming, but I’ve helped homeowners just like you figure out what’s going on and what to do next.
If you’ve spotted cracks in the walls, doors that stick, or floors that slope, don’t panic.
I’ll walk you through what to look for, how to handle minor fixes yourself, and when it’s time to call in a pro.
I’ve learned a lot from real repair jobs, and I’m here to share it all with you. We’ll cover everything from common causes to effective repair options.
By the end, you’ll feel more confident and ready to take action.
Ready to protect your home and stop the lean from getting worse? Let’s get started and fix that foundation the smart way!
Why Does a Foundation Lean?
A leaning foundation is often the result of soil or water issues beneath your home.
When the ground shifts, settles unevenly, or becomes overly saturated, it can cause one side of the foundation to lose support.
Poor drainage, such as water pooling near the base of your home, is a common trigger.
Over time, that excess moisture softens or erodes the soil, allowing the foundation to tilt.
Expansive clay soils are also a big culprit; they swell when wet and shrink when dry, creating uneven pressure.
Other causes include tree roots disturbing the ground, nearby construction, or poor initial compaction during building.
Once a lean starts, it typically gets worse without proper repair or soil stabilization.
Cause of a Leaning Foundation

A leaning foundation doesn’t just happen; it’s the result of something deeper going wrong. The key to fixing it is understanding why it’s shifting in the first place.
1. Soil Erosion
Soil erosion occurs when water continuously flows around or beneath the foundation, gradually washing away the supporting soil.
As soil is lost, parts of the foundation begin to settle unevenly, which can cause cracks, tilting, or sinking.
Erosion is widespread near downspouts, sloped areas, or places without proper water redirection systems in place.
2. Hydrostatic Pressure
Hydrostatic pressure builds when water accumulates in the soil around a foundation, exerting steady outward force against foundation walls.
Over time, this pressure can lead to wall bowing, horizontal cracks, and inward leaning.
It is a common issue in areas with poor drainage or heavy clay soils that retain moisture for extended periods.
3. Poor Drainage
Improper drainage is a significant factor in foundation issues. When water pools near the base of a structure, it softens the surrounding soil, compromising its stability.
Without effective runoff management, such as gutters, downspouts, and proper grading, water can weaken the soil’s ability to support the foundation, increasing the risk of leaning or settling.
4. Expansive Soil
Expansive soils, such as clay-rich types, expand when wet and shrink when dry.
This constant cycle creates pressure changes beneath the foundation, which can lead to cracking or movement over time.
Buildings constructed on expansive soil require careful attention, as these ground shifts can cause long-term structural instability if not properly managed.
5. Poor Construction or Design
Foundations built without proper soil preparation, footing depth, or structural reinforcement are more prone to leaning or cracking over time.
Design flaws, such as uneven slab thickness or inadequate soil support, can lead to premature failure.
High-quality planning and construction are crucial in preventing future foundation movement or damage.
Step-by-Step Guide to Fixing a Leaning Foundation
Fixing a leaning foundation might seem overwhelming, but breaking it down makes the process manageable.
Materials You’ll Need
Having the right materials is essential for a safe and effective foundation repair.
- Steel angle irons: Used to apply horizontal force and push the wall back to vertical.
- Hydraulic jacks: Provide controlled pressure to realign and straighten the leaning foundation wall.
- Adjustable floor jacks: Temporarily support floor joists during wall straightening to relieve pressure.
- Steel I-beams (4″ or 6″): Permanently brace the wall to maintain vertical alignment after straightening.
- High-strength concrete mix: Secures the bottom of the beams into the footing for long-term support.
- Polyurethane sealant: Seal wall-floor joints and cracks to prevent moisture intrusion.
- Saw for cutting concrete floor: Creates openings in the floor slab for beam placement into the footing.
- Fasteners for joist attachment: Secure beam tops to the sides of floor joists for structural hold.
- Shovels and excavation tools: Remove exterior soil to relieve pressure and expose the foundation wall.
- Safety gear: Protects hands, eyes, and body during excavation and the handling of heavy materials.
Step 1: Exterior Excavation

Start by excavating the soil along the outside of the leaning foundation wall.
This step is critical because the weight and pressure from the surrounding soil are usually what push the wall inward.
By removing this pressure, the wall is freed up for realignment.
Dig deep enough to expose the full wall height and allow space for tools and safe access during the straightening process.
Step 2: Wall Straightening with Jacks

Once the exterior soil is removed, use angle irons and hydraulic jacks to slowly push the wall back to vertical.
Horizontal jacks are placed across the basement floor to apply controlled pressure.
Vertical jacks slightly lift the floor joists off the top of the wall to reduce structural stress.
This step must be done carefully to prevent cracks or sudden movement as the wall shifts into position.
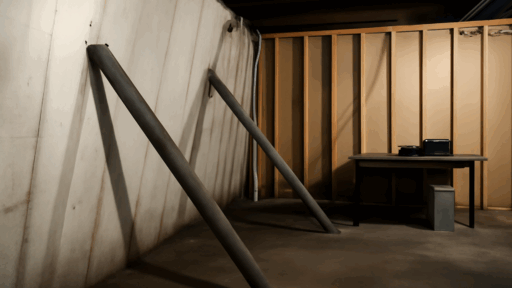
Step 3: Wall Brace Installation

After the wall is straightened, steel I-beams are installed to hold it in place permanently.
Small holes are cut in the concrete floor so the beams can be set directly onto the footing.
High-strength concrete secures the base, while the tops are bolted to the sides of the floor joists, not the underside, to prevent wood splitting.
These braces maintain the wall’s vertical and stable position over the long term.
Step 4: Pier Installation Under the Footing

Steel piers are installed beneath the foundation to stabilize the structure from below.
These piers reach stable soil layers and support the weight of the home, preventing future sinking or leaning.
Concrete is used to secure the piers in place, and proper alignment ensures they distribute the load evenly.
This deep support system reinforces the foundation and protects it from further structural movement or settlement.
Recommended: Want to see how foundation repairs are done step by step? Check out this YouTube video by @StrengthandPowerUnderControl here.
Signs Your Foundation May Be Shifting
Foundation Problems Often Begin Small, with Subtle Signs that Can Be Easily Overlooked. Over Time, these signs can develop into serious structural issues if Left Unaddressed.
- Cracks in Walls or Ceilings: Diagonal Cracks Near Windows or Doors May Signal Foundation Shifting. Check for Widening or Cracks Running Through Drywall and Brick.
- Sloping or Uneven Floors: Uneven or Dipping Floors Often Mean a Settling Foundation. Use a Level to Check for Tilt Progression Across Different Areas.
- Sticking Doors and Windows: Sticky Doors or Windows Can Indicate Frame Distortion from A Leaning Foundation, Not Just Humidity or Seasonal Swelling.
- Bulging or Bowing Basement Walls: Walls that Bow Inward or Exhibit Horizontal Cracks May Be Under Pressure from Water or Soil. Don’t Ignore This Red Flag.
- Visible Tilt or Separation:A Leaning Home May Exhibit Wall Gaps or Light Visible Through the Frames. Look from A Distance to Spot an Obvious Structural Shift.
- Exterior Brick or Siding Movement: Cracked or separated bricks and pulling siding usually point to foundation movement. These visual clues often indicate deeper problems beneath the surface.
When to DIY vs Hire a Pro?
Not all foundation issues require professional help; some minor problems can be handled on your own. But knowing where to draw the line is key.
| Category | DIY Repairs | Professional Repairs |
|---|---|---|
| Type of Issue | Minor surface cracks, basic drainage problems | Structural shifts, major cracks, leaning walls, pier, or underpinning work |
| Tools Needed | Caulking gun, crack filler, shovel, basic leveling tools | Hydraulic jacks, pier systems, wall anchors, commercial-grade materials |
| Skill Level Required | Basic home improvement knowledge | Licensed structural or foundation repair expertise required |
| Cost Range | Low (typically $20–$200) | High ($500–$10,000+ depending on severity and method) |
| Time to Complete | 1–2 hours for a weekend project | Several days to weeks, depending on the scope |
| Risk Level | Low—mostly cosmetic or surface-level | High temperatures can worsen the issue if improperly handled |
| Best For | Hairline cracks, surface sealing, gutter adjustments, and light soil grading | Wall bowing, floor sloping, foundation settling, and advanced structural damage |
| Not Recommended For | Anything affecting the load-bearing structure or showing signs of foundation failure | Any task requiring lifting, leveling, or deep foundation intervention |
| When to Call a Pro | If cracks widen, walls shift, or DIY efforts don’t hold | Immediately for safety concerns or major visible structural damage |
Post-Repair Inspection & Maintenance Tips
Regular maintenance and inspection after foundation repair help catch early warning signs and prevent future structural issues from developing.
- Check for New Cracks: Inspect walls, ceilings, and floors every few months for new or widening cracks.
- Watch for Uneven Floors: Use a level to detect any new sloping or dipping in your floors.
- Inspect Doors and Windows: Ensure they still open and close smoothly. Sticking can signal shifting.
- Monitor moisture levels by looking for water stains, musty odors, or leaks in basements and crawl spaces.
- Maintain Drainage Systems: Keep gutters, downspouts, and grading in good shape to direct water away from the foundation.
- Note Seasonal Movement: Minor shifts can occur with weather changes, but a professional should verify any major movement.
Conclusion
Fixing a leaning foundation may seem like a daunting task, but with the right knowledge and approach, you can handle it effectively.
I’ve walked you through the signs, causes, and repair options, and now it’s your turn to put that info to use.
Don’t wait until the damage gets worse. Stay alert, check your home regularly, and take action early.
You can go the DIY route for smaller issues, or bring in a pro for major repairs. Knowing what to do makes all the difference.
If you’ve already tackled a leaning foundation or have questions about what’s next, I’d love to hear from you.
Drop a comment, share your story, or reach out. I’m here to help you protect your home, step by step.

Stephanie Grace, a graduate with a degree in Fine Arts from the Savannah College of Art and Design, has been inspiring DIY enthusiasts with her creative and practical guidance for over 14 years. Her career in design and crafting began in a small artisan workshop, where she developed a passion for transforming everyday materials into beautiful and functional items. Stephanie joined our website in 2018, rapidly gaining popularity for her easy-to-follow DIY tutorials and innovative project ideas. Since then, she has been the creative mind behind our DIY section, helping readers bring their artistic visions to life. Outside her professional pursuits, Stephanie enjoys pottery and urban gardening, hobbies that showcase her love for hands-on creativity and nature.