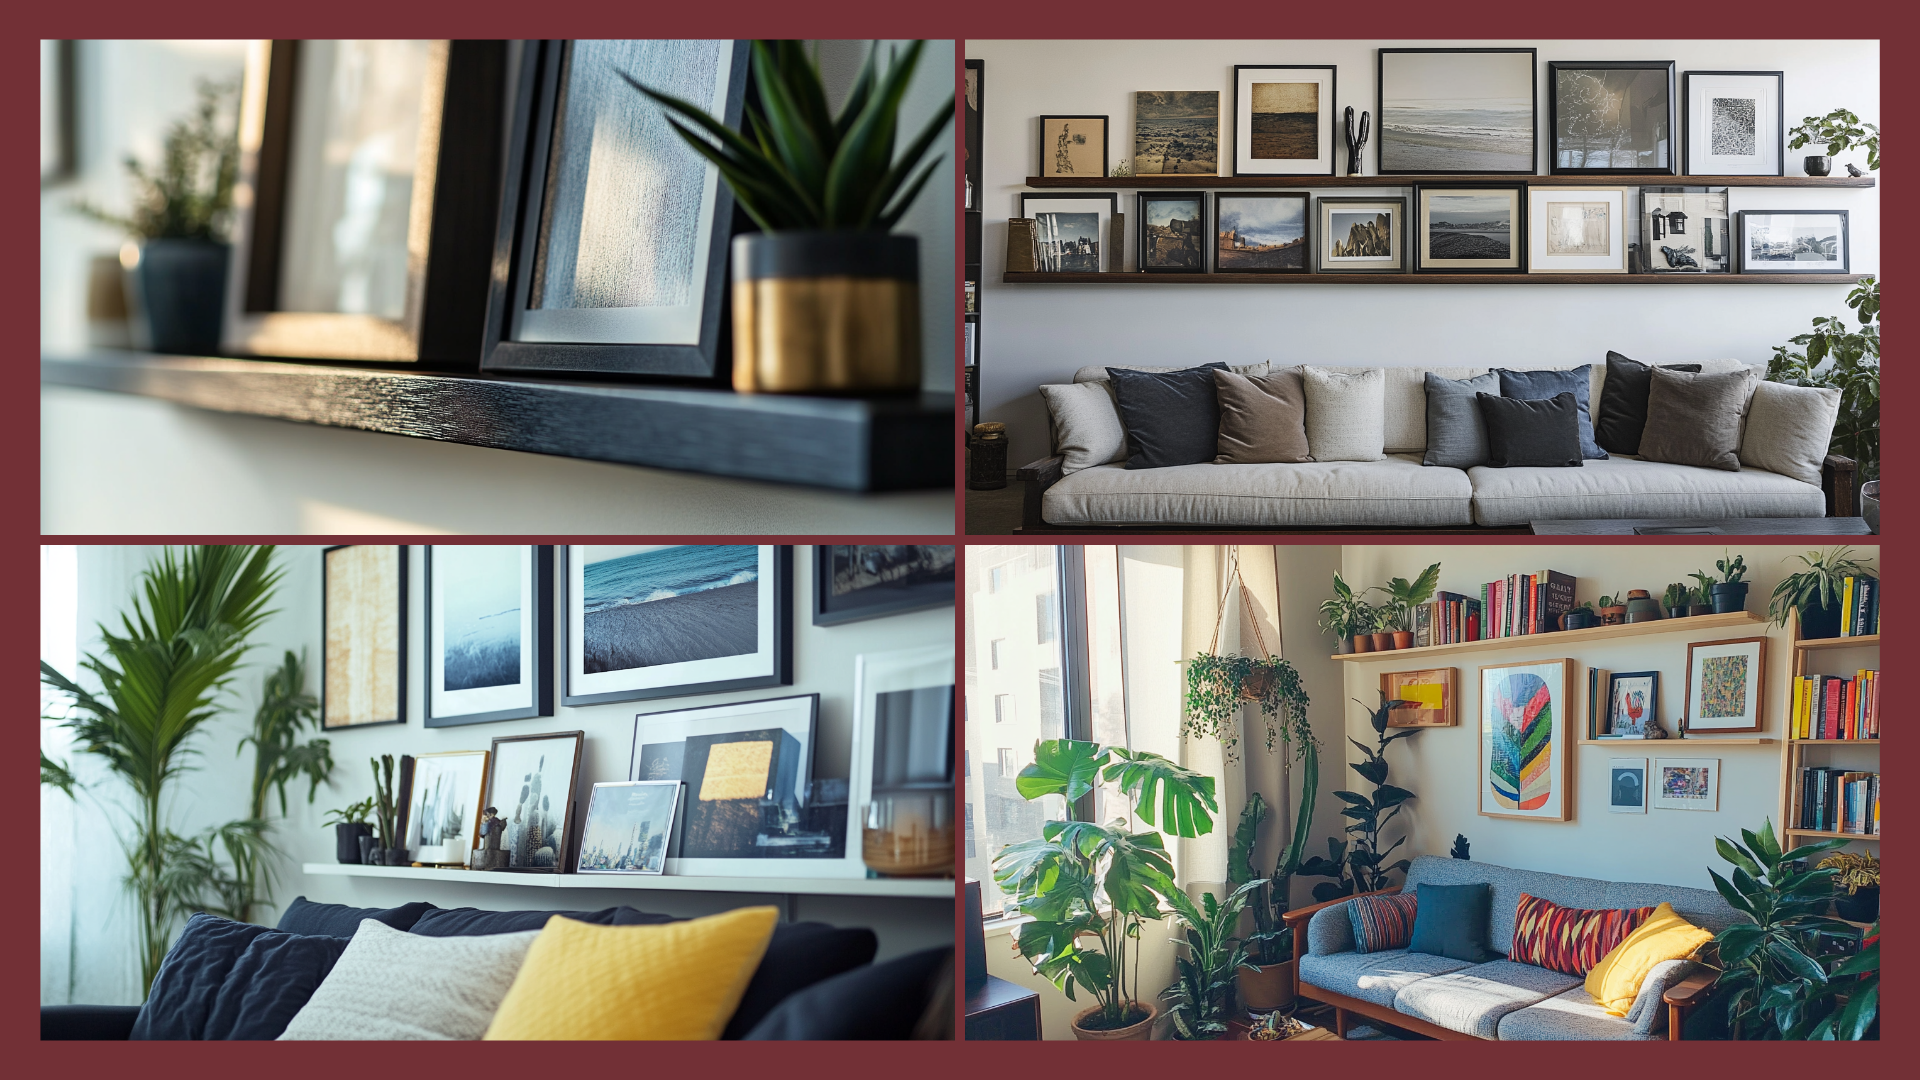
Have you ever stared at your blank walls, hesitant to commit to a traditional gallery setup? Picture ledges are the game-changing solution you’ve been looking for.
These versatile floating shelves offer endless possibilities for displaying everything from cherished artwork and family photos to flourishing plants and beloved books.
Imagine refreshing your entire look without reaching for a drill or patching wall holes. That’s the beauty of picture ledges – they’re—your museum rails, letting you swap out decor pieces on impulse.
If you’re in the mood for a seasonal change or want to shake things up, these smart platforms make it effortless.
Are you ready to learn how these simple yet creative additions can change your home decor? Let’s Get started.
Why Picture Ledges Work?
Are you ever curious why interior designers favor picture ledges? These straightforward yet imaginative solutions change blank walls into active display areas, effectively addressing the long-standing difficulty of home decor commitment.
They’re not just shelves – your canvas for creative expression that can evolve with your style.
Ease of Change

Picture ledges are a game-changer for keeping your decor fresh and exciting. Unlike traditional gallery walls, which feel permanent, these handy shelves let you change things whenever the mood strikes.
Have a rough day? Swap in some cheerful artwork. When the seasons change, you can easily rotate in holiday decorations or switch to lighter, brighter pieces for spring and summer.
Versatility

What makes picture ledges truly special is their incredible flexibility – they’re so much more than just spots for photos.
You can display everything from your favorite art prints and family photos to those cute little things you’ve collected and get some beautiful coffee table books.
Pop them up there. If you’re showcasing vintage finds, cherished mementos, or a mix of decorative pieces, these ledges adapt to whatever style you’re going for.
The possibilities are endless, and that’s what makes them such a brilliant addition to any room.
Key Tips for Styling a Picture Ledge

Ready to change your picture ledge from basic to breathtaking? These tried-and-true styling tips will help you create an effortless display.
When you’re a minimalist or maximalist, these tips will help you achieve that designer-worthy look you’re after.
1. Start with Larger Pieces
Big pieces are your best friends when starting. Begin by placing your largest artwork or mirrors first—they’ll act like anchors for your entire display.
Think of them as the stars of your show, with everything else playing supporting roles. By positioning these statement pieces first, you’ll create instant impact and give yourself a solid foundation to build around.
2. Layer and Overlap
Don’t be afraid to get a little cozy with your pieces. Overlapping frames create depth and make your display feel intentional rather than randomly placed.
Think of it like creating a collage – when pieces overlap slightly, they feel like one similar story rather than separate items. Just be sure each piece can still shine on its own.
3. Incorporate a Variety of Frames and Sizes
Mix it up. To keep things interesting, combine different frame styles and sizes. Try pairing a modern frame with something more decorated or mix horizontal and vertical orientations.
It’s like creating a visual rhythm: You want enough variety to catch the eye and consistency to feel balanced.
4. Balance Color and Texture
Think of your display as a recipe —it needs different ingredients. Balance darker frames with lighter ones, and mix smooth textures with rougher elements.
Add a little greenery here and a ceramic piece there. The key is to create contrast while maintaining harmony. It’s like conducting an orchestra, where every piece plays its part.
5. Play with Height Variation
Vary the heights of your pieces to create your skylines. Start tall on one end or gradually make mini peaks and valleys throughout.
Use books or small decorative boxes to advance certain pieces. Remember, just like a city skyline, some variation in height makes things more interesting to look at.
DIY: How to Create Your Picture Ledge

Want to add a stylish display space without breaking the bank? Building your picture ledge is easier than you might think.
With just some basic tools and materials from your local hardware store, you can create a custom floating shelf that perfectly fits your space.
You won’t have to drill multiple holes in your wall whenever you want to switch up your artwork.
I’ve built several of these in my home, and they’ve become one of my favorite ways to display everything from family photos to small plants.
Key materials you’ll need:
- 1×4 lumber for the shelf base and front lip
- 2×2 lumber for wall mounting support
- Wood screws and wall anchors
- Basic tools: saw, drill, level, and measuring tape
Pro Tips:
- Pre-drill your screw holes to prevent wood splitting
- Use a level to ensure perfect alignment
- Sand edges smooth before painting or staining
Creative Styling For Picture Ledges

Go Beyond Art
Let’s think outside the frame. Your picture ledge can be much more than just a spot for artwork.
I love adding small potted plants that add life and movement or reading a few of my favorite hardcover books for a cozy library feel.
Personal mementos and unique finds from your travels can turn a simple shelf into a story of your life. Add vintage bottles, ceramic pieces, or even small sculptures that catch your eye.
The key is creating layers of interest that reflect your personality while keeping the arrangement balanced.
Keep It Simple with a Neutral Palette
Creating a similar look doesn’t have to be complicated. Start with neutral frames and artwork in similar tones—think whites, blacks, and natural woods.
This creates a refined foundation that’s easy on the eyes. Add one or two colorful pieces that complement your room’s palette to add energy.
I’ve found that using mostly neutral pieces lets you experiment with seasonal touches without revamping the entire display.
Use the “Rule of Three”
Odd numbers in design are naturally pleasing, and three is truly the magic number. When styling your ledge, try grouping items in threes—maybe a tall frame, a medium-sized plant, and a smaller decorative object.
This creates visual interest and movement that draws the eye across your display.
Remember, these groupings don’t have to be perfectly symmetrical; varying heights and widths within your groups of three often look more natural and intentional.
A Compilation of Best Picture Ledge Styling Ideas
1. Minimalist Art Display

This smart and clean approach uses a single abstract or simple artwork on your picture ledge. The focus is entirely on the art, offering a modern, refined look that works well in minimalist interiors.
DIY steps:
- Select an abstract or simple piece that fits your style.
- Opt for a thin, neutral-colored frame to keep the focus on the art.
- Position it in the middle of the ledge for a balanced, clean look.
2. Layered Frames

Layering frames of different sizes on the picture ledge creates depth and visual interest. This style adds an active feel while maintaining a structured display, perfect for showcasing various art or photos.
DIY steps:
- Mix smaller frames with larger ones for contrast.
- Stack them so they partially overlap for a layered effect.
- Adjust the spacing to keep it visually balanced, avoiding clutter.
3. Seasonal Decor

Rotating framed prints and seasonal decorations along the ledge lets you change the look each season. Whether it’s autumn leaves, spring blooms, or holiday themes, this idea gives the space a fresh, ever-changing vibe.
DIY steps:
- Select artwork or photos related to the current season.
- Add items like fall pumpkins, spring flowers, or holiday ornaments.
- Change the decor as the seasons shift to keep the ledge fresh and timely.
4. Floating Books

Adding books to your picture ledge brings a practical yet stylish element. Stack books vertically or horizontally between your artwork for a cozy, lived-in feel that’s both functional and visually interesting.
DIY steps:
- Mix tall and short books for a varied look.
- Please place them in gaps between framed art for added visual intrigue.
- Avoid overcrowding to maintain a tidy, organized appearance.
5. Botanical Touch

Incorporating small potted plants or succulents on the picture ledge adds a natural, refreshing touch to the display. These plants bring a calming vibe and pair beautifully with artwork, blending nature with design.
DIY steps:
- Opt for low-maintenance or small potted plants.
- Position plants alongside framed pictures to create balance.
- Select pots that complement the color scheme of your artwork.
6. Vintage Finds

Displaying antique or vintage-style frames and objects adds character and charm to your picture ledge. This nostalgic style brings a timeless feel to the space while showcasing unique, one-of-a-kind pieces.
DIY steps:
- Combine aged frames with trendy items for a balanced look.
- Include small collectibles, like old postcards or pendants, for extra interest.
- Ensure the vintage pieces don’t dominate the display by harmonizing the overall arrangement.
7. Black and White Photography

Black-and-white photography offers a refined, classic style for any picture frame. The monochrome palette draws attention to the details in the photos, creating a graceful and timeless display.
DIY steps:
- Select black and white photos with strong contrasts and interesting compositions.
- Use minimal frames to let the photos stand out.
- Group photos of similar subjects or scenes for a similar look.
8. Artwork and Mirrors Combo

Pairing artwork with mirrors along the ledge creates balance and contrast in your display. The mirror’s reflective surfaces the room’s light, while the artwork brings color and depth to the space.
DIY steps:
- Select compact, circular, or rectangular mirrors to complement the artwork.
- Place the mirror near the art to create balance.
- Choose frames that match or contrast to create an engaged visual effect.
9. Monochrome Collection

Creating a monochromatic picture ledge display means sticking to one color palette for frames, art, and decor. This approach creates a calm, similar look that works beautifully in modern and minimalist spaces.
DIY steps:
- Select a single color or shades of one color for your frames and art.
- Use neutral tones or subtle variations for a soft, calming effect.
- Include different textures within the same color range, such as canvas, photos, and prints.
10. Personal Photos

Displaying personal photos on the picture ledge brings warmth and a sense of belonging to the space. It creates an individual and inviting atmosphere, making the room feel more lived-in and meaningful.
DIY steps:
- Choose images that hold sentimental value.
- Opt for frames that complement the room’s decor.
- Mix different-sized frames for visual interest but maintain a balanced layout.
11. Geometric Frames

Geometric-shaped frames add a modern, artistic touch to your picture ledge. Their sharp angles and clean lines contrast beautifully with more organic elements, making them a striking addition to stylish spaces.
DIY steps:
- Select frames in shapes like triangles, hexagons, or squares.
- Combine geometric shapes with regular rectangular frames for balance.
- Position them in clusters or singularly to create visual impact.
12. Infrastructural Prints

Incorporating infrastructural prints adds a sense of culture and structure to your picture ledge. Prints of famous buildings or designs bring an intellectual and polished vibe to the room.
DIY steps:
- Choose prints of well-known structures or cultural drawings.
- Use simple, neutral frames to keep the focus on the print.
- Arrange the prints with symmetry to produce a sense of order and grace.
13. Cultural Artifacts

Incorporating cultural artifacts, such as small sculptures, textiles, or traditional objects, adds personality and richness to your picture ledge.
These items introduce diverse textures and colors, making the display feel more global and diverse.
DIY steps:
- Select items that reflect your heritage or interests.
- Place them alongside framed artwork to create a layered look.
- Ensure the size of the artifacts complements the artwork, creating balance.
14. Nature-Inspired Designs

Framing nature-inspired artwork, such as botanical prints or nature photography, gives the room a calming vibe. This style connects the indoors with the outdoors, creating a calm atmosphere.
DIY steps:
- Choose botanical prints, landscapes, or animal photography.
- Opt for frames made of light wood to enhance the natural feel.
- Complement the artwork with small potted plants for a fully organic display.
15. Graphic Illustrations

Pairing graphic illustrations with your picture ledge creates a playful, artistic display. Bold colors and creative designs bring energy to the space, making it rich and youthful.
DIY steps:
- Select bold, graphic illustrations that pop against your wall color.
- Use thin, neutral frames to keep the focus on the art.
- Arrange multiple illustrations in a grid or scattered fashion for variety.
16. Travel Memories

Displaying travel-themed decor on your picture ledge brings experience into your home. Framing maps, tickets, or souvenirs gives the space a personal touch and reminds you of your travels.
DIY steps:
- Frame postcards, maps, or tickets from past trips.
- Consider frames with a vintage or rustic feel for added character.
- Pair travel mementos with photographs from the same destination for a cohesive look.
17. Floating Shelves with Artwork

Incorporating floating shelves and framed art creates an engaged and versatile picture ledge. The shelves add depth, allowing you to mix art with other decorative items like books and small sculptures.
DIY steps:
- Mount floating shelves above or below the artwork for added storage and display space.
- Place small books or decorative objects between the frames.
- Ensure the arrangement doesn’t overwhelm the ledge by limiting the number of items.
18. Neutral Color Scheme

Using a neutral color scheme for your picture ledge creates a calming, balanced look that fits almost any decor style. This subtle approach brings peace to the space while allowing other elements to shine.
DIY steps:
- Opt for black, white, or wood-colored frames to maintain a soft palette.
- Choose artwork with subdued tones to enhance the peaceful vibe.
- Limit the number of items to maintain a calm, clean look.
19. Statement Artwork

Focusing on a single large artwork as the centerpiece creates a bold, impactful statement on your picture ledge. This approach allows the art to take center stage, surrounded by smaller decor items to enhance the overall display.
DIY steps:
- Select a bold, eye-catching artwork that draws attention.
- Use a simple frame to avoid competing with the artwork.
- Place smaller objects or frames around it to complement the piece without overpowering it.
20. Natural Wood Frames

Using natural wood frames for your pictures brings warmth and texture to the space. This earthy, organic touch enhances rustic or farmhouse decor while adding a timeless and cozy element to your picture ledge.
DIY steps:
- Opt for frames made from natural wood or those with a rustic finish.
- Pair the wood frames with other natural elements like plants or woven baskets.
- Use neutral tones to keep the display calming and balanced.
21. Mixed Media Display

Combining different forms of artwork and decor, like photographs, paintings, and sculptures, creates a layered, active look on your picture ledge. This approach gives the display depth and interest, making it visually engaging.
DIY steps:
- Mix paintings, photographs, and small sculptures to create a varied display.
- Position each piece at different angles and heights for visual effects.
- Keep a similar color palette or theme for balance while mixing media.
22. Colorful Abstract Art

Introducing deep, colorful abstract art to your picture ledge adds energy and excitement to the space. Bold and expressive, these art pieces become the room’s focal point and brighten any decor style.
DIY steps:
- Select artwork with striking colors and patterns.
- Use smart, neutral frames that allow the artwork to stand out.
- Let the art be the primary focus by keeping other items subtle.
23. Hanging Plants

Incorporating hanging plants alongside your picture ledge adds a fresh, natural touch. The greenery brings life and color to the display, complementing the artwork and creating a peaceful atmosphere.
DIY steps:
- Select plants that can easily hang from the ledge, such as ivy or small ferns.
- Opt for stylish pots that match the vibe of your room.
- Hang plants at varying heights to add depth and interest to the display.
24. Vintage Posters

Framing vintage posters brings a retro, nostalgic vibe to your picture ledge. These prints often feature bold graphics and typography, making them a standout decor for a unique and deep display.
DIY steps:
- Choose classic or retro posters, such as old movies or concert posters.
- Use simple black or wooden frames to allow the poster design to shine.
- Arrange multiple posters in a grid pattern along the ledge for a look.
25. Mixing Metal Frames

Combining different metal frames, like gold, silver, or bronze, creates a refined and stylish display on your picture ledge. The metallic finishes add grace while making the space visually interesting.
DIY steps:
- Mix gold, silver, or bronze for a modern, refined look.
- Combine large and small frames for contrast and depth.
- Ensure the metals don’t clash by keeping the overall arrangement the same.
26. Travel Themed Collage

Creating a travel-themed collage on your picture ledge is a great way to showcase memories from your experiences. You can make a personalized and nostalgic display by framing maps, photos, and souvenirs.
DIY steps:
- Frame photos, maps, and souvenirs like postcards or travel tickets.
- Use various frame styles for a dynamic look.
- Position the items in a balanced, collage-like fashion for a mixed vibe.
27. Children’s Artwork

Framing and displaying your children’s artwork on the picture ledge adds a fun and personal touch to the space. This display honors their creativity while adding colorful, playful elements to the room.
DIY steps:
- Choose a variety of your child’s artwork to display.
- Opt for fun, colorful frames that match the energy of the artwork.
- Mix the layout by layering frames or playfully arranging them.
28. Sculptural Objects

Adding sculptural objects alongside your framed art on the picture ledge creates visual interest and texture. These three-dimensional pieces bring depth to the display and add an artistic touch to the room.
DIY steps:
- Select abstract, modern, or vintage, depending on your style.
- Place sculptures next to or between framed artwork for variety.
- Ensure the sculptures don’t overwhelm the frames, maintaining a harmonious display.
29. Inspirational Quotes

Incorporating framed inspirational quotes into your picture ledge brings positivity and motivation to the space. These quotes can reflect your values and add a thoughtful, uplifting touch to the room.
DIY steps:
- Choose quotes that resonate with you or match the room’s vibe.
- Opt for smart, minimal frames that don’t distract from the message.
- Position the quotes among other framed pieces to create a balanced display.
30. Black Frames With White Mats

Using black frames with white mats creates a timeless, cultured look for your picture ledge. This classic combination adds contrast, making your artwork pop while maintaining a smart and clean look.
DIY steps:
- Choose artwork with bold colors or black-and-white images. These styles complement the classic black-and-white combo.
- Stick to simple black frames with wide white mats for a clean presentation.
- Keeping it minimal for a graceful look.
31. Vintage Magazine Covers

Framing vintage magazine covers adds a touch of nostalgia and retro flair to your picture ledge. These covers often feature bold typography and imagery, making them unique conversation pieces.
DIY steps:
- Choose from vintage magazines that reflect your interests, such as fashion, art, or music.
- Frame the covers in neutral frames to keep the focus on the artwork.
- Arrange the magazine covers in a neat grid for a polished look.
32. Gold and Glass Frames

Gold and glass frames create a luxurious, soft look for your picture ledge. They add a refined, graceful touch while keeping the focus on the artwork without overwhelming the display.
DIY steps:
- Opt for thin gold borders and glass fronts.
- Pair the frames with neutral-toned artwork to enhance the grace.
- Place a few carefully selected pieces in a balanced way to maintain a clean look.
33. Framed Fabric or Textiles

Framing fabric or textiles, like vintage embroidery or patterned fabric, offers an artistic and unique approach to styling your picture ledge. This adds texture and visual interest to your display.
DIY steps:
- Choose textiles with unique patterns or rich textures like linen or embroidery.
- Use fabric-friendly frames that make the texture stand out.
- Arrange several framed textiles for a layered look.
34. Sculptural Wall Hooks

Incorporating sculptural wall hooks into your picture ledge adds both functionality and style. These hooks allow you to hang small items like hats, bags, or keys while complementing your artwork.
DIY steps:
- Select stylish hooks that match the vibe of your room.
- Position the hooks at the edge of the picture ledge for easy access.
- Only display a few functional items to avoid overcrowding the ledge.
35. Ceramic Vases with Art

Pairing ceramic vases with framed art creates a stylish and artistic feel. The vases add a soft, organic element that beautifully contrasts with the sharp lines of the framed artwork.
DIY steps:
- Select vases with minimalistic designs that complement the art.
- Position the vases next to or between the artwork for a balanced display.
- Keep the vases’ size moderate to prevent them from overpowering the frames.
36. Framed Quotes with Polaroids

Pairing inspirational quotes with Polaroid photos on your picture ledge creates a nostalgic and personal display. This combination adds a warm, intimate touch to the space while offering positive messages.
DIY steps:
- Choose quotes that resonate with you or fit the room’s mood.
- Add a few Polaroid photos from special moments for a personal touch.
- Keep the frames minimal to highlight the content without distraction.
37. Family Tree Display

A family tree display on your picture ledge showcases family photos in a meaningful and personal way. This unique display celebrates your heritage and brings the room a sense of connection and warmth.
DIY steps:
- Select a series of family portraits or special moments.
- Opt for frames that complement your room’s decor for a similar look.
- Position the photos in a branching arrangement to resemble a family tree.
Conclusion
Creating an eye-catching picture ledge display isn’t about following rigid rules but finding what speaks to your style.
Remember to start with anchor pieces, play with layering, and mix different heights to create visual interest.
The key is balancing your arrangement with varied textures, sizes, and personal touches that tell your unique story.
But here’s the best part: there’s no wrong way to style your picture ledge. Let your creativity guide you, and don’t be afraid to experiment.
Change things up with the seasons, rotate in new pieces, or completely reimagine your display whenever inspiration strikes. Your picture ledge is more than just a shelf—it’s a living gallery that grows and changes with you. For more inspiration, you can explore creative photo wall ideas from FixThePhoto to refresh your space in unique ways.”
So start arranging, rearranging, and making your space uniquely yours. The perfect display is the one that makes you smile every time you see it.

Ava Taylor, holding a Bachelor’s degree in Interior Design from the Pratt Institute, has made her mark in creating engaging and functional living spaces for over 14 years. She began her career with a New York-based design studio, where she gained a reputation for her innovative and user-centric designs. Ava joined our team in 2019, bringing a blend of artistic flair and practicality to our home improvement section. Since the she has been the lead contributor to our room transformation series, inspiring readers with her unique approach to maximizing space utility and aesthetic appeal. Beyond her professional work, Ava is a passionate collector of vintage furniture, a hobby that enriches her design perspective.