Nowadays, more homeowners are recognizing the vital role of sewer inspection cameras in home maintenance. The global sewer inspection camera market reached approximately $380 million in 2023, with projections edging toward $510 million by 2032, growing at around 3–6% annually.
According to Angi, the average American homeowner pays $999 per session, with typical costs falling between $270 and $1,734. With prices like these, it’s easy to see why many are opting to buy their sewer camera, turning what was once a professional-only tool into a practical DIY investment.
In this guide, we’ll show you what a sewer camera is, how to use it safely and effectively, and pro tips for getting the best inspection results.
What Is a Sewer Camera?
A sewer camera is a waterproof, high-definition camera used to inspect small pipes. It’s usually attached to a cable and plugs into a drain or sewer line, sending live footage from inside the pipe to a display.
A sewer camera can detect the following:
- Blockage
- Cracks
- Root intrusion
- Corrosion, etc.
It allows you to see what’s going on inside the pipe without a lot of digging, which is very convenient and efficient.
What You Need Before Starting
Before beginning the inspection, prepare the following:
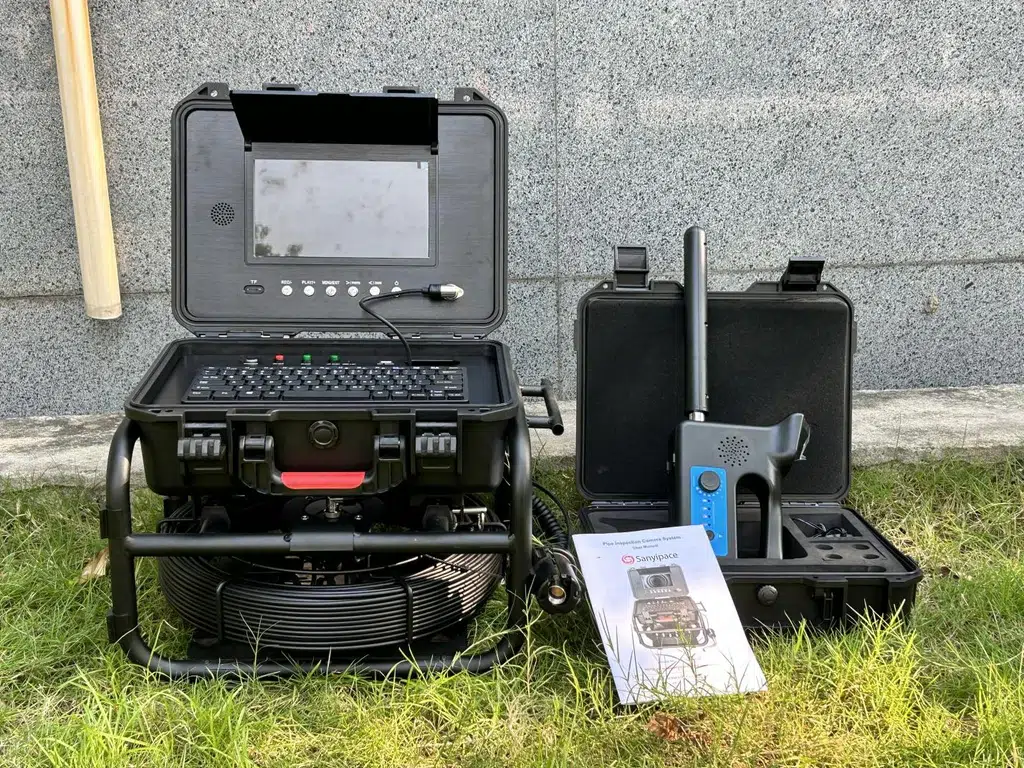
- Your sewer inspection camera (e.g., Sanyipace 100FT Sewer Camera with DVR)
- Access to a cleanout or pipe opening
- Protective gloves (and optionally goggles)
- A clean cloth for wiping down the cable
- Optional: flashlight, measuring tape, pen, and notepad
How to Use a Sewer Camera: Step-by-Step
Step 1: Identify the Access Point
The first step is very simple: find the best entry point to the pipe/drainage system and open it. If you can’t find it, check the following common entry points:
- Outdoor cleaning (usually a closed PVC pipe near the residence)
- Basement or storage room floor drain
- Roof vent pipe
- Toilet drain pipe (requires removal of the toilet)
Step 2: Power On and Test the Sewer Camera
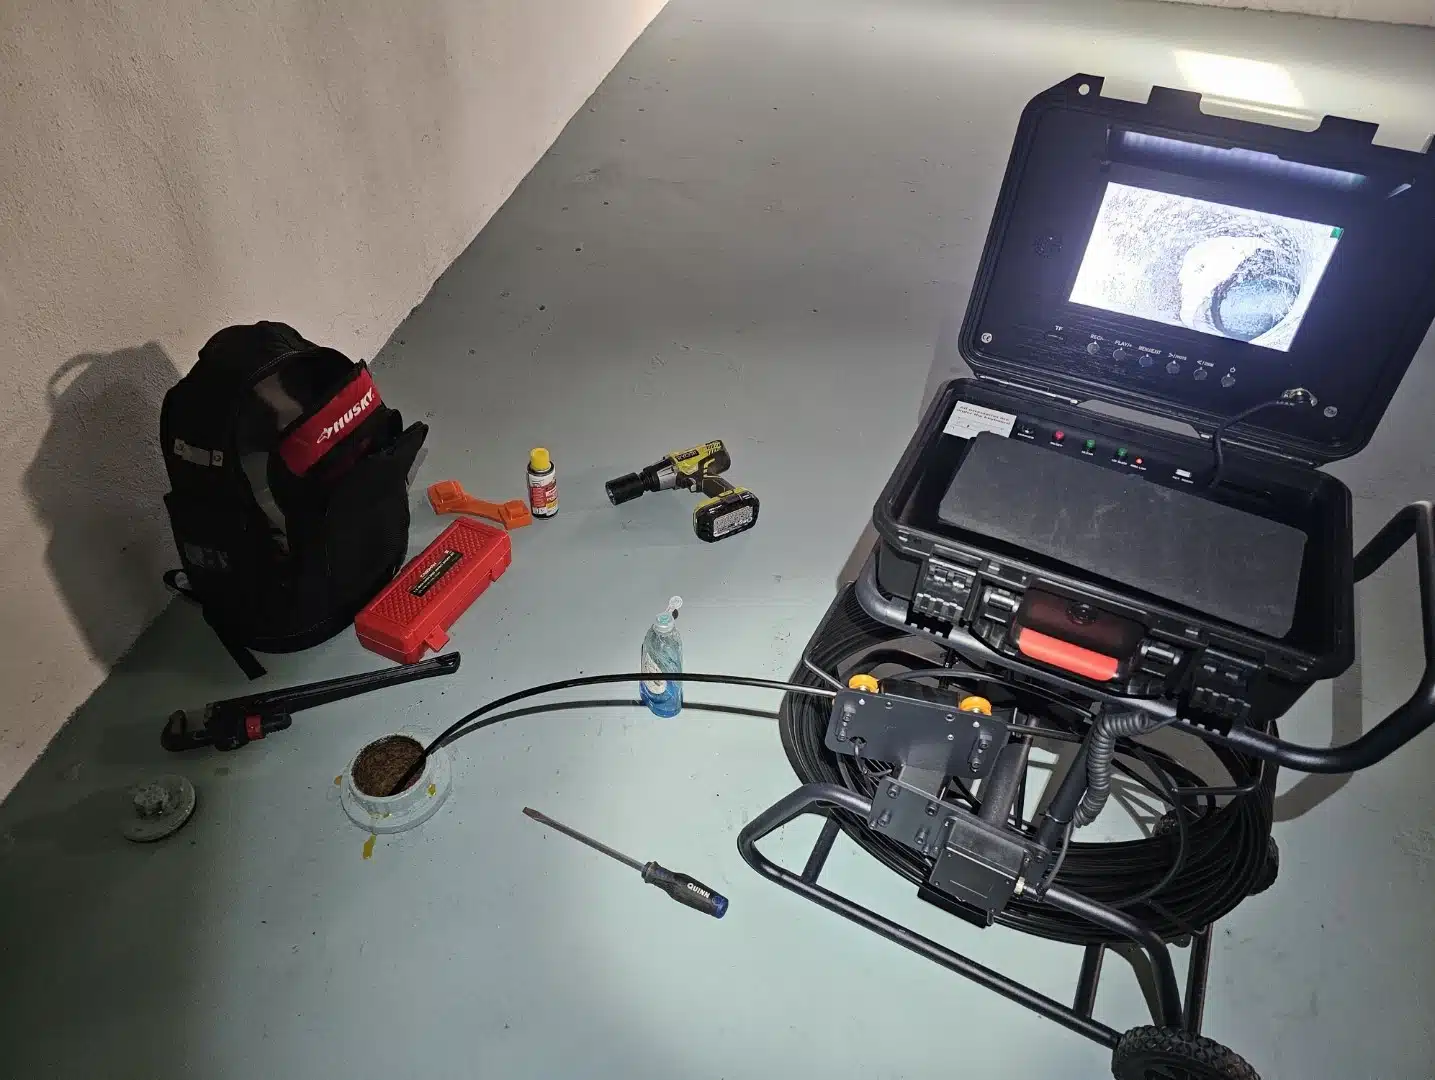
Once the access point is open, turn on the monitor to make sure the camera powers up and is working properly. Check the LED lights to ensure they’re bright enough for clear visibility, and confirm that the video feed is sharp.
If your camera includes a distance counter or recording feature, double-check that those functions are working before inserting the camera into the pipe.
Step 3: Insert the Camera Slowly
Carefully insert the camera into the drain line. Use slow, steady pressure to guide it through bends and elbows. Avoid forcing the cable—if you feel resistance, gently twist or pull back slightly, then try again. Patience here helps prevent damage to both the camera and the pipe.
💡 Tip: If you purchased a Sanyipace sewer camera, the 5 mm cable is more flexible and ideal for pipes with multiple bends, while the 9 mm cable is better suited for long, straight pipes.
Step 4: Monitor the Video Feed
As the camera moves through the pipe, keep an eye on the monitor for signs of trouble—like grease buildup, hair clogs, foreign objects, cracks, holes, root intrusion, corrosion, or standing water. Misaligned joints are another thing to watch for.
If you spot anything unusual, feel free to pause and snap a photo or record a quick video for documentation or future reference.
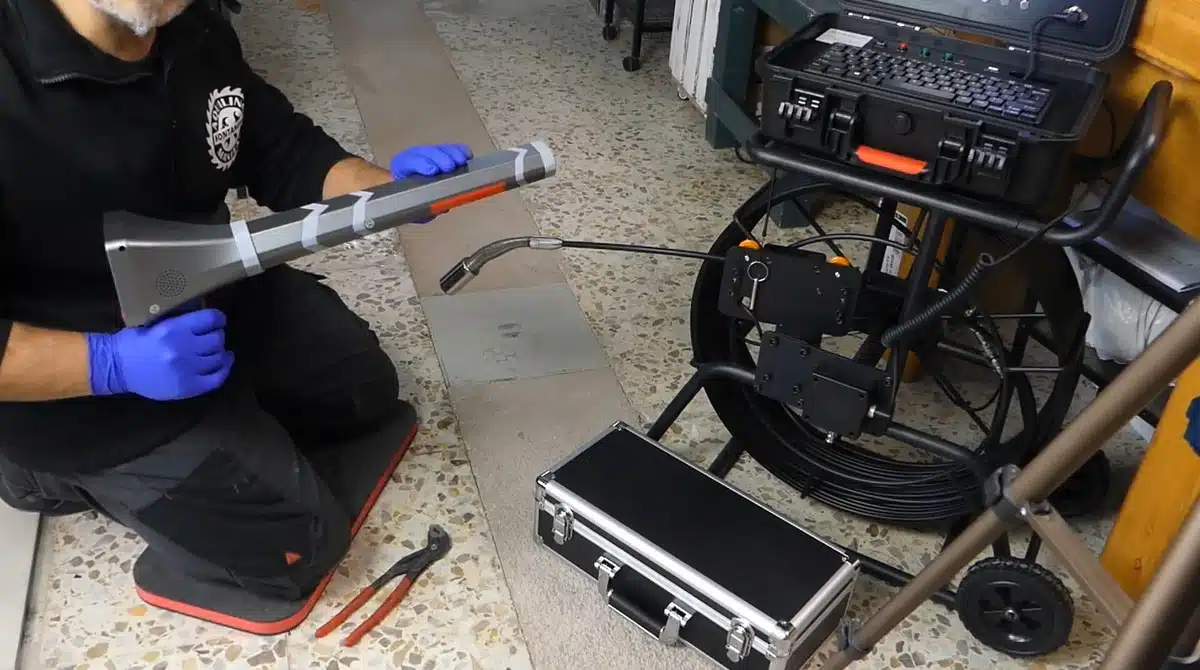
Step 5: Use the Locator (If Equipped)
If your camera has a built-in transmitter, grab your handheld locator to pinpoint the camera’s exact location underground. This comes in especially handy when you need to:
- Mark a dig or repair spot
- Map out the layout of the pipe
- Locate a blockage behind walls or under concrete
Step 6: Retrieve and Clean the Camera
Once you’ve finished the inspection, slowly pull the cable back out—keep an eye on the monitor as you do, in case anything new shows up.
Wipe the cable down with a cloth as it comes out to prevent buildup and odors. After that, disinfect the camera head and neatly wind the cable back into its case.
When and Where to Use a Sewer Camera
A sewer/pipe camera is a versatile tool that can be used in many situations to help diagnose and prevent plumbing problems. Routine inspections every 1 to 2 years can catch early signs of damage or buildup before they become costly repairs.
They’re also highly recommended before buying or selling a home, giving you peace of mind and preventing surprises. After events like clogs, backups, or overflows, a camera can help identify the root cause of the issue.
It’s also useful for verifying the success of recent cleaning or repair work, ensuring everything was done properly. And in some cases, it can even be used to locate lost items accidentally washed down the drain—yes, it happens more often than you’d think!
Sewer cameras are suitable for use in a wide range of plumbing systems, including main sewer lines, kitchen and bathroom drains, basement floor drains, roof vent stacks, and even commercial or industrial pipelines. With the right timing and setup, a sewer camera can be your best tool for solving problems before they turn into emergencies.
Pro Tips for Best Results
- Don’t rush: Slow, careful feeding of the cable gives clearer footage and prevents damage.
- Use gloves: The cable can get dirty and slippery quickly.
- Record inspections: Especially if you’re working with clients or dealing with repeat issues.
- Label your footage: For long inspections, it helps to note footage timestamps or pipe locations.
FAQ: Using a Sewer Camera
1. Can I Use a Sewer Camera Even if I’m Not a Plumber?
Yes, SANYIPACE sewer cameras are designed to be very user-friendly and easy to use for a novice.
2. Can the Camera Go Around Sharp Pipe Turns?
It depends on the cable diameter. A 5mm push rod is more flexible for tight bends; thicker rods are better for long distances but less flexible.
3. Will the Camera Help Clear the Clog?
No. It only provides visual diagnostics. You’ll need a snake or a hydro-jet to physically remove the blockage.
4. Can I Use It in Standing Water?
Yes—most camera heads are waterproof and designed for wet environments. Just make sure your model is rated IP67 or higher.
Final Thoughts
Learning how to use a sewer camera is surprisingly simple—and incredibly useful. Whether you’re tackling a stubborn clog or inspecting your home’s plumbing system for peace of mind, the right sewer camera can save you time, money, and guesswork.
If you have any questions during use, please leave a comment, and we will answer your questions.

Holding a Master’s in Construction Management from Purdue University, William Ray has dedicated more than two decades to studying and applying construction principles. His professional journey includes a tenure with a prominent construction firm, where he specialized in project management and building technologies. William brought his knowledge to our team, providing in-depth insights into practical construction techniques. As the leader of our beginner’s guide to building since 2019, he has a knack for breaking down intricate processes into easily digestible content. When not involved in writing or onsite consultations, William enjoys woodworking and volunteering in community building projects, which aligns with his passion for hands-on construction and community service.