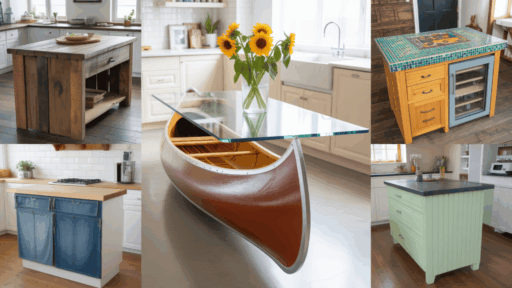
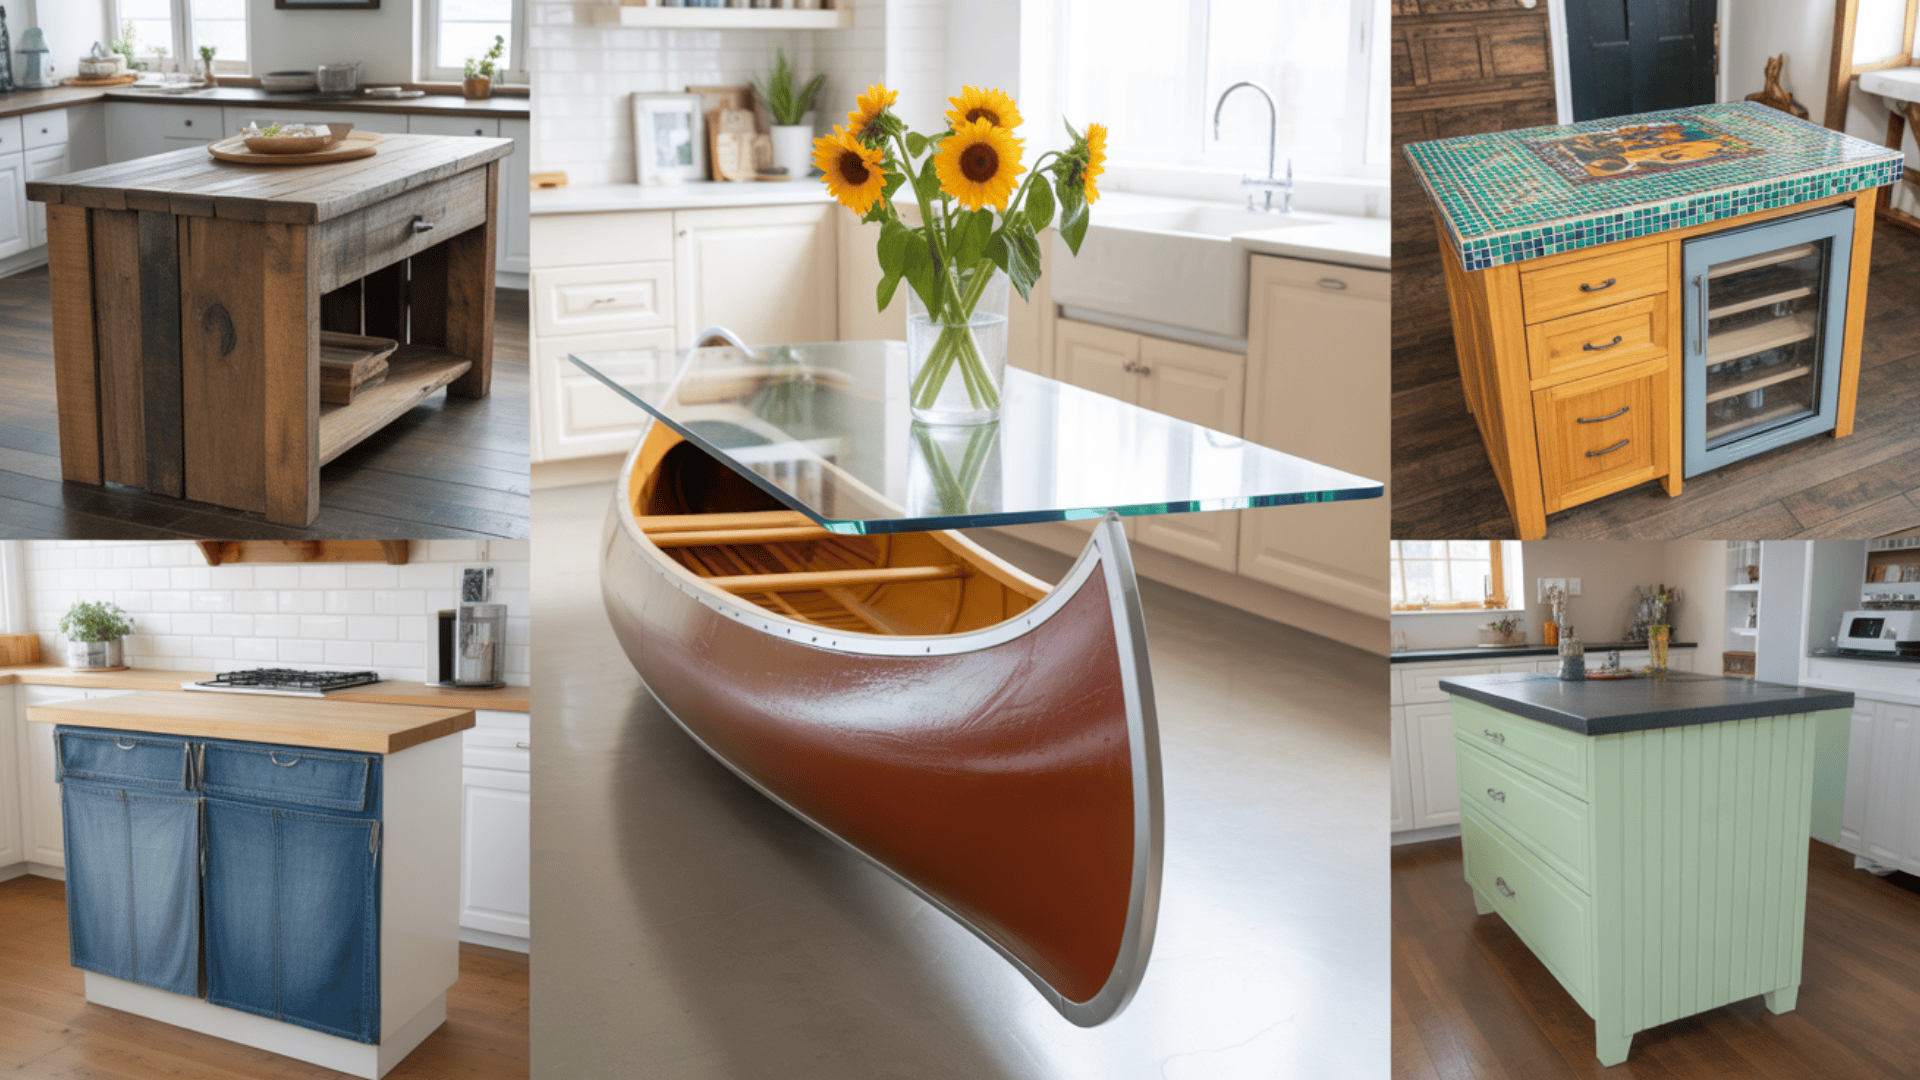
A kitchen island isn’t just a place to prep meals; it’s a centerpiece that can shape how you cook, eat, and gather.
From charging stations and storage to bold styles using items like canoes and filing cabinets.
These ideas give your island a fresh purpose.
Some are easy DIY projects, while others offer more detailed builds with long-term value.
You’ll find eco-smart options, clever tech upgrades, and pieces full of charm and personality.
Each idea comes with clear instructions, helpful tips, material lists, and fun insights to guide your planning.
Cook Up Some Charm: Creative Kitchen Decor Ideas
Your kitchen is more than just a place to cook. It’s where families gather, stories are shared, and favorite meals come to life.
Big or small, every kitchen can feel warm and useful with the right design choices.
A few small changes can make a huge difference, while larger updates can give it a brand-new look.
This list has tons of simple and creative ideas to fit any style or budget.
1. Voice-Controlled Island Console

This kitchen island can listen and respond to your voice.
It uses a smart speaker, placed inside a hidden space, to control lights, timers, and music.
The wires are tucked away under the surface, keeping everything neat.
It’s a helpful, hands-free way to make cooking and cleaning faster and more fun.
Materials:
- Smart speaker
- Integration kit
- Quartz top with embedded audio vents
2. Inductive Charging Station Island

You can charge phones on the island without any cords.
Wireless charging pads are hidden under the surface, which should be no thicker than 1.5 inches.
Phones placed on the marked spots will charge through the top.
The pads stay safe and dry while working well.
Guests and family can charge their phones while cooking or eating.
Materials:
- Bamboo or Granite
- Integrated charging modules
3. Retractable Touchscreen Command Panel

This island has a hidden screen that pops up when needed.
It’s great for looking up recipes, making shopping lists, or controlling other smart devices.
The screen is mounted on a motor that hides it when not in use.
This makes cooking easier and more fun while keeping your kitchen tidy and high-tech.
Materials:
- Smart screen
- Mechanical lift
- Tempered glass countertop
4. Thermal-Control Counter Zones
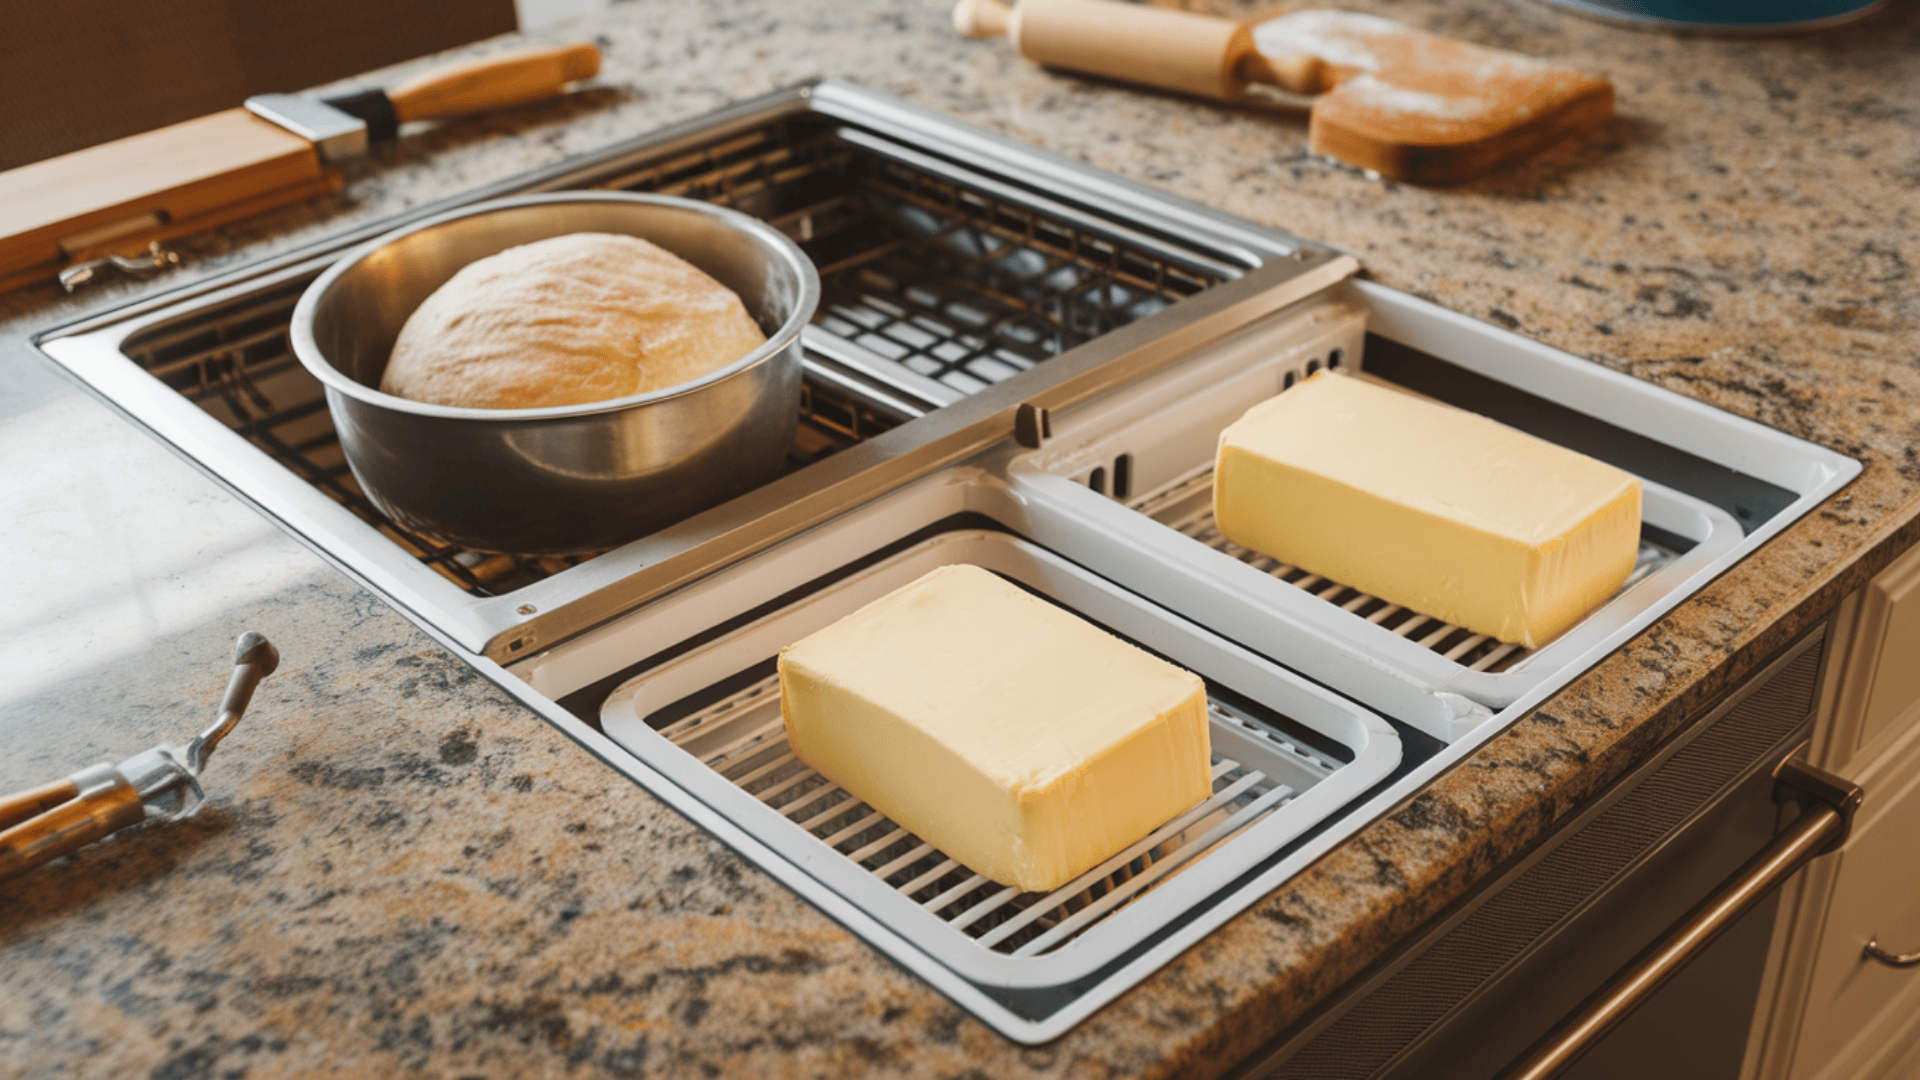
Parts of this counter can heat up or stay cool, which is helpful for baking, like warming dough or keeping butter cold.
Heat and cool pads are installed under the surface and are controlled with a switch.
Marble or granite helps hold the temperature longer.
They’re also great for people who bake often.
The top stays flat and easy to clean, just like a regular island.
Materials:
- Thermoelectric modules
- Dual-surface granite
5. French Butcher’s Block Island
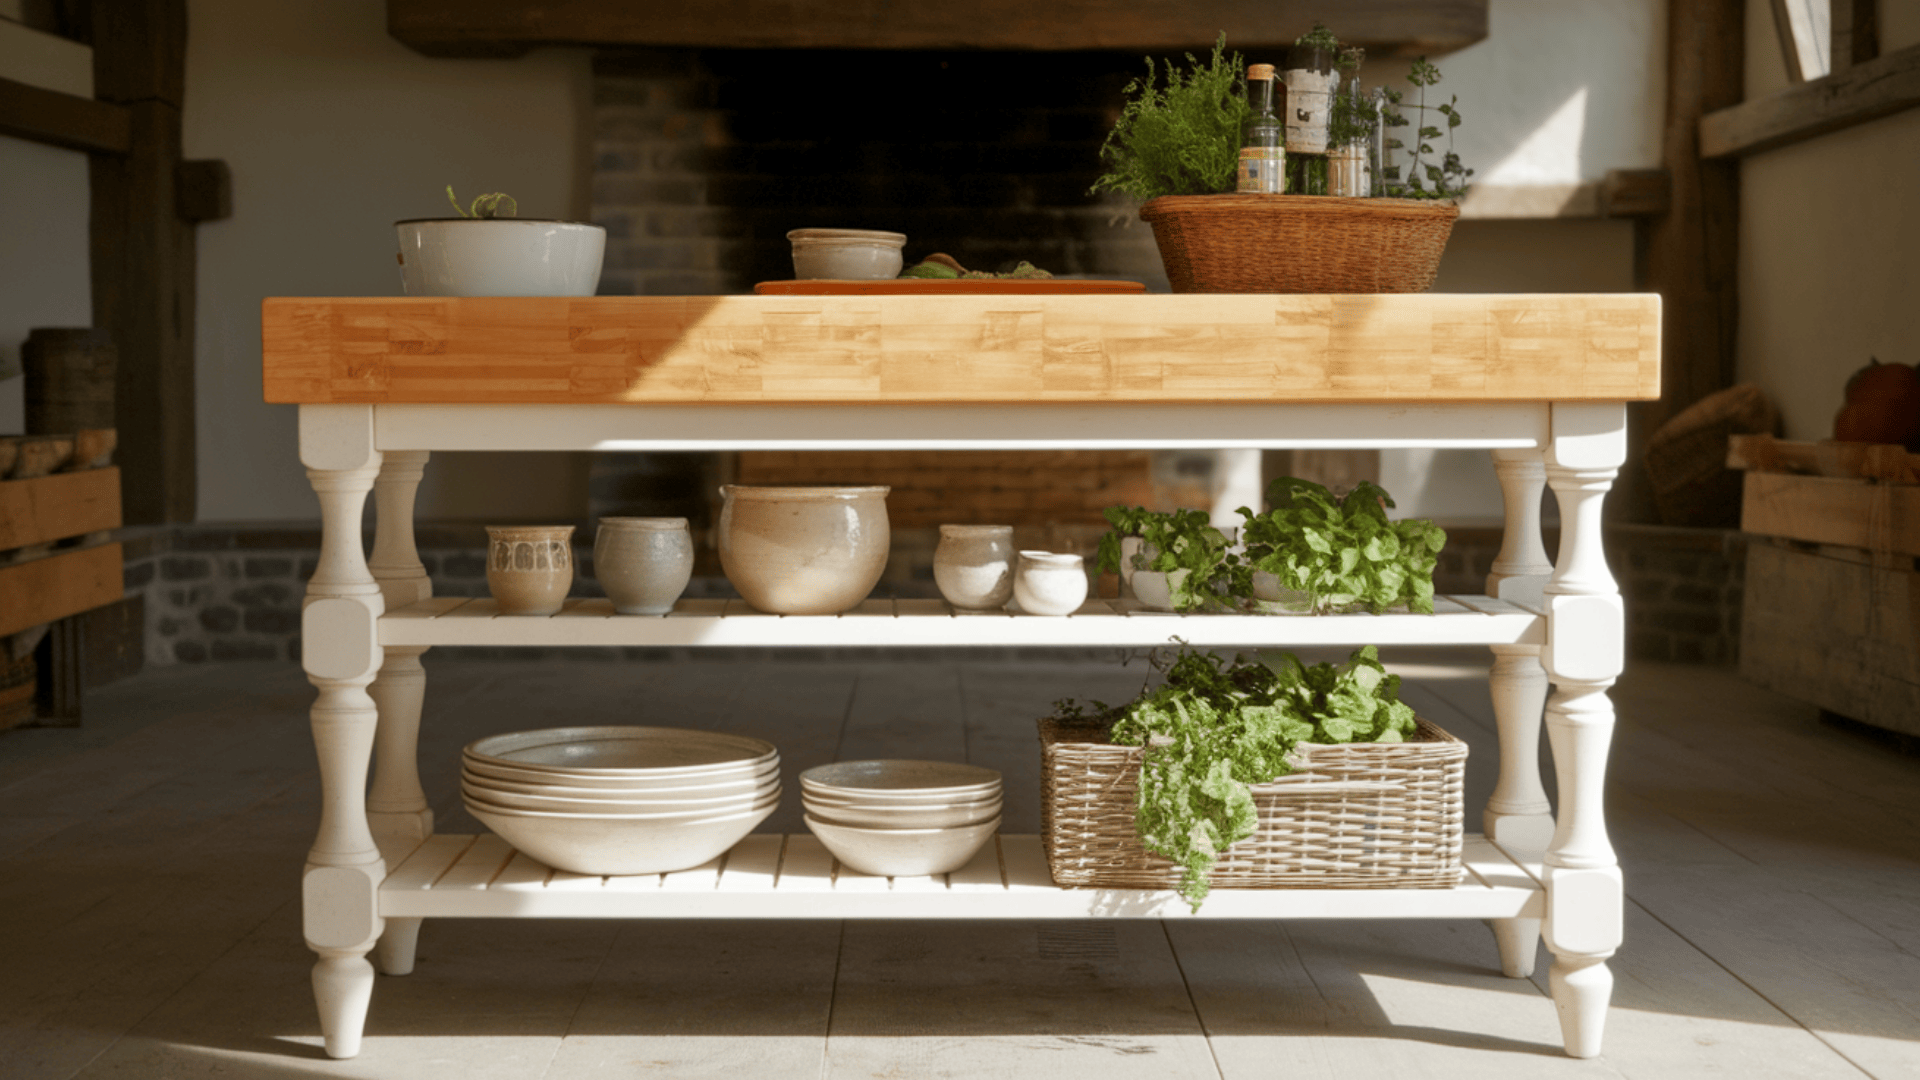
Begin by choosing sturdy wood with natural heft, maple, walnut, or reclaimed oak all work well for the top.
Craft the block-style countertop by laminating end-grain wood segments for that classic checkerboard butcher’s block look.
This surface resists cuts and is ideal for daily chopping and food prep.
To achieve a French aesthetic, build a painted or stained base with carved legs, open shelving, and detailed corner brackets for Old World charm.
Top off with a food-safe mineral oil finish for a practical yet polished final touch.
Materials:
- Maple or walnut (for butcher block)
- Hardwood or reclaimed oak (for base)
- Wood glue and clamps
- Food-safe mineral oil
- Decorative corbels or legs (optional for French detail)
6. Paper Composite Countertop Island
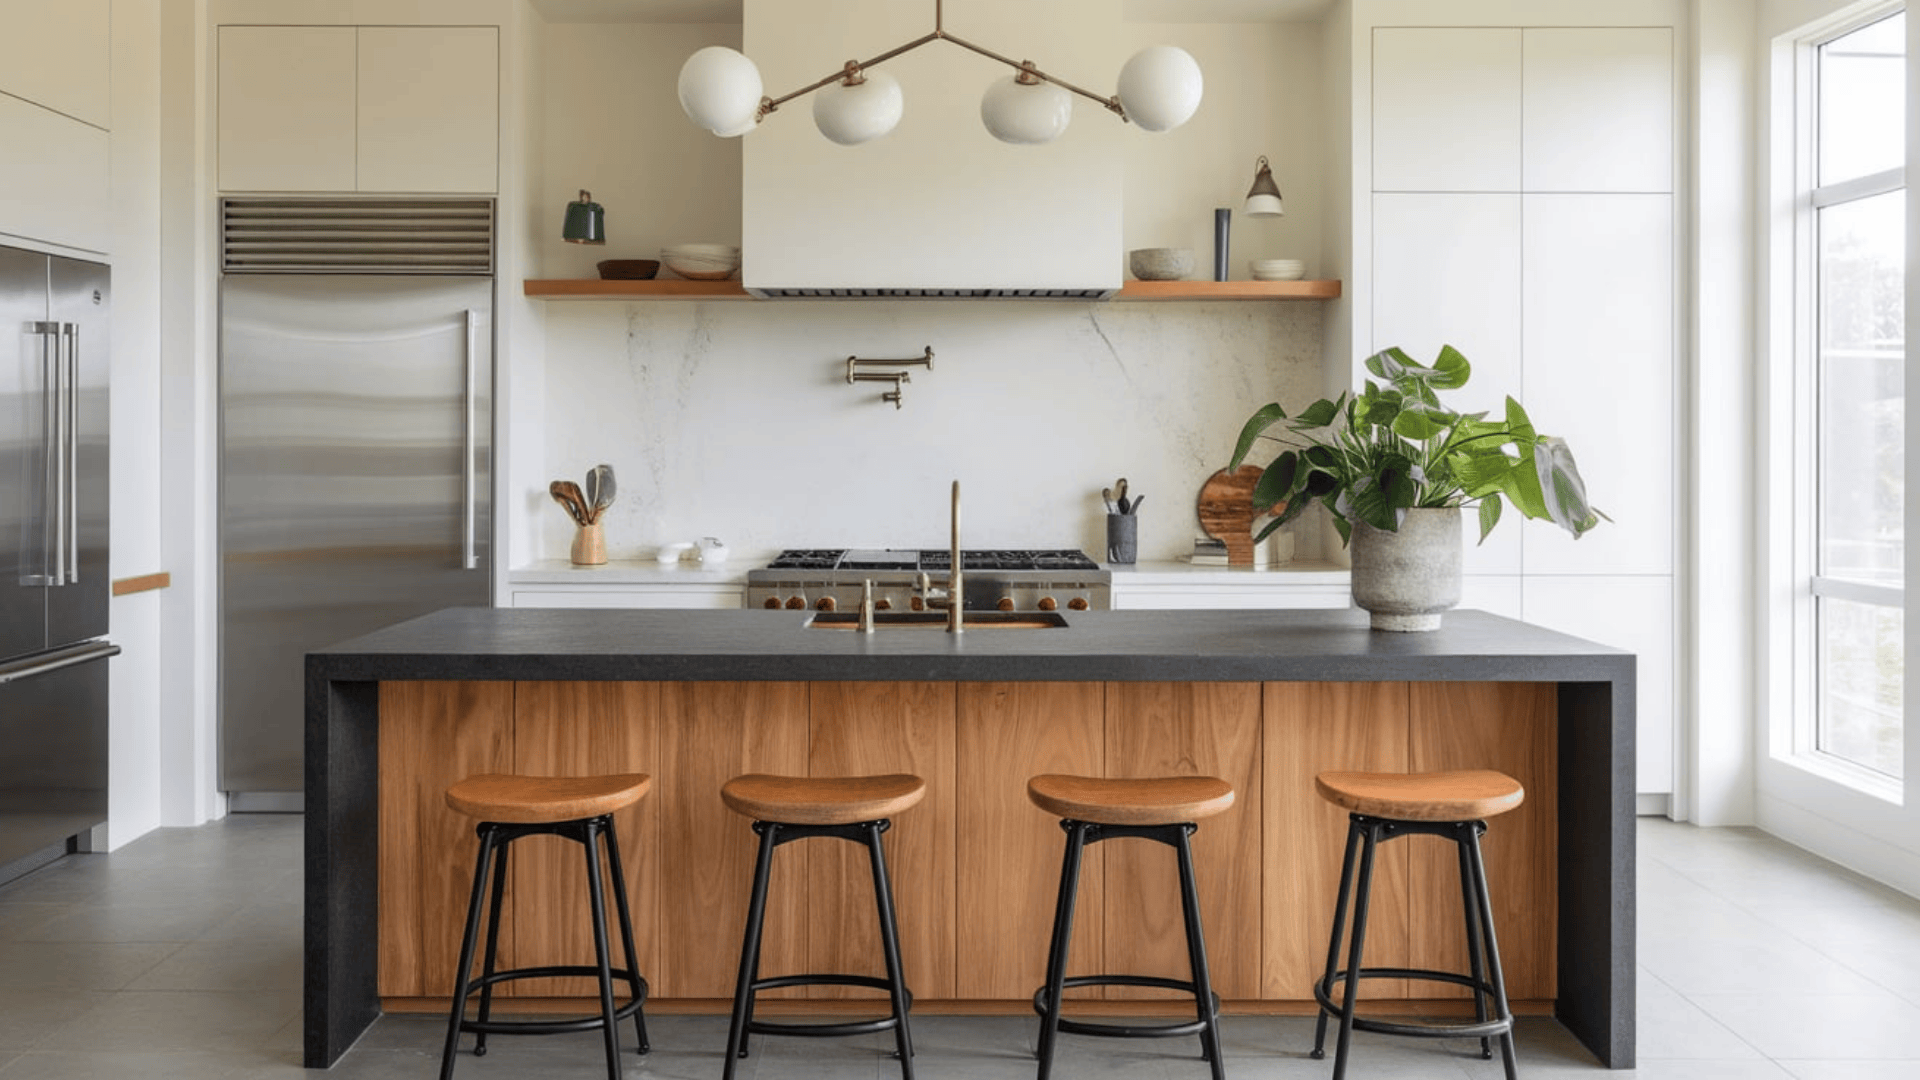
To construct a sustainable island using paper composite countertops, begin with a standard cabinet base—either FSC-certified plywood or salvaged wood.
The countertop will be the highlight, made from compressed recycled paper mixed with natural resin.
Brands like PaperStone or Richlite offer slabs that mimic the sleekness of stone while being more sustainable.
Cut and install the composite top just like any other surface, ensuring it’s well supported underneath.
Materials:
- Richlite
- PaperStone panels
7. Island with Transparent Acrylic Drawers
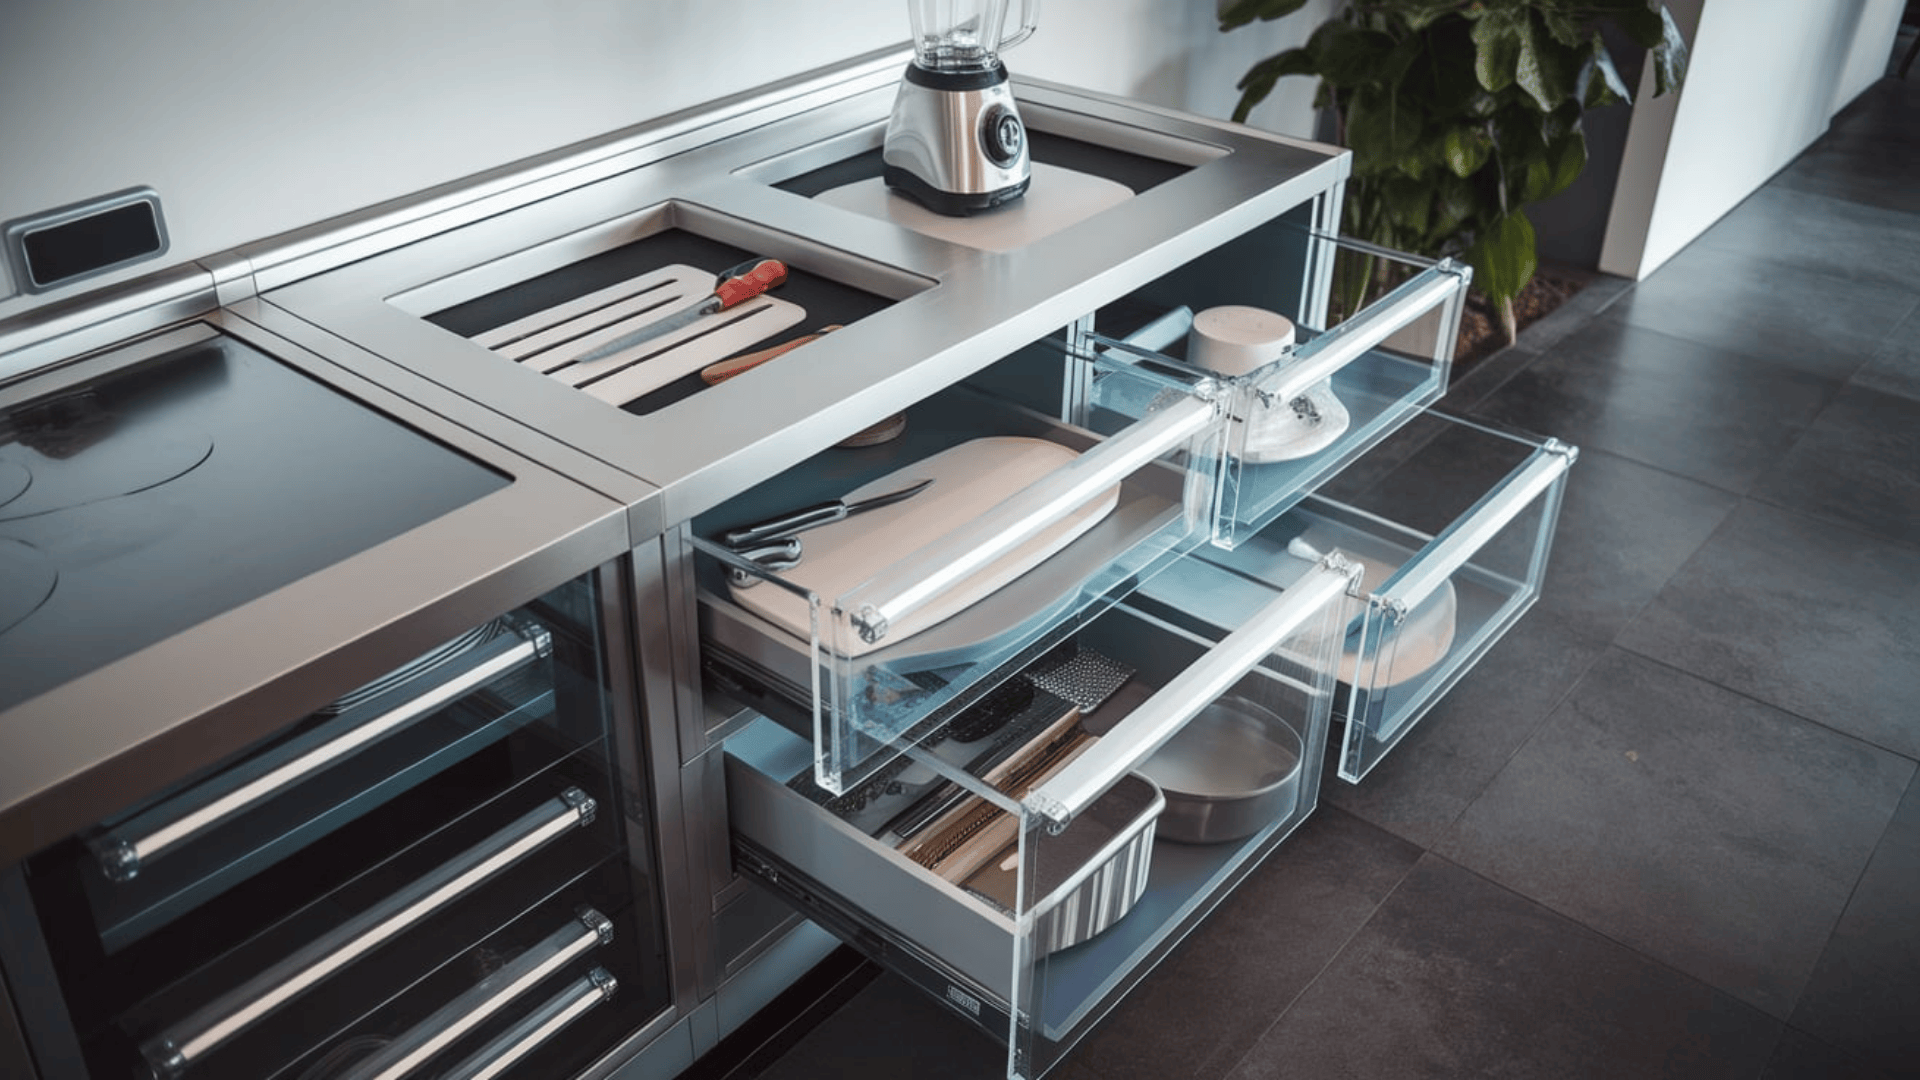
Use see-through acrylic drawers to give your island a clean, modern touch.
These drawers let you view the contents without opening them.
Choose clear or frosted panels and mount them with a metal frame.
Acrylic is lightweight but strong, so it handles daily use.
Materials:
- Acrylic panels
- Drawer slides
- Aluminum frame
8. Island Made from a Canoe Base
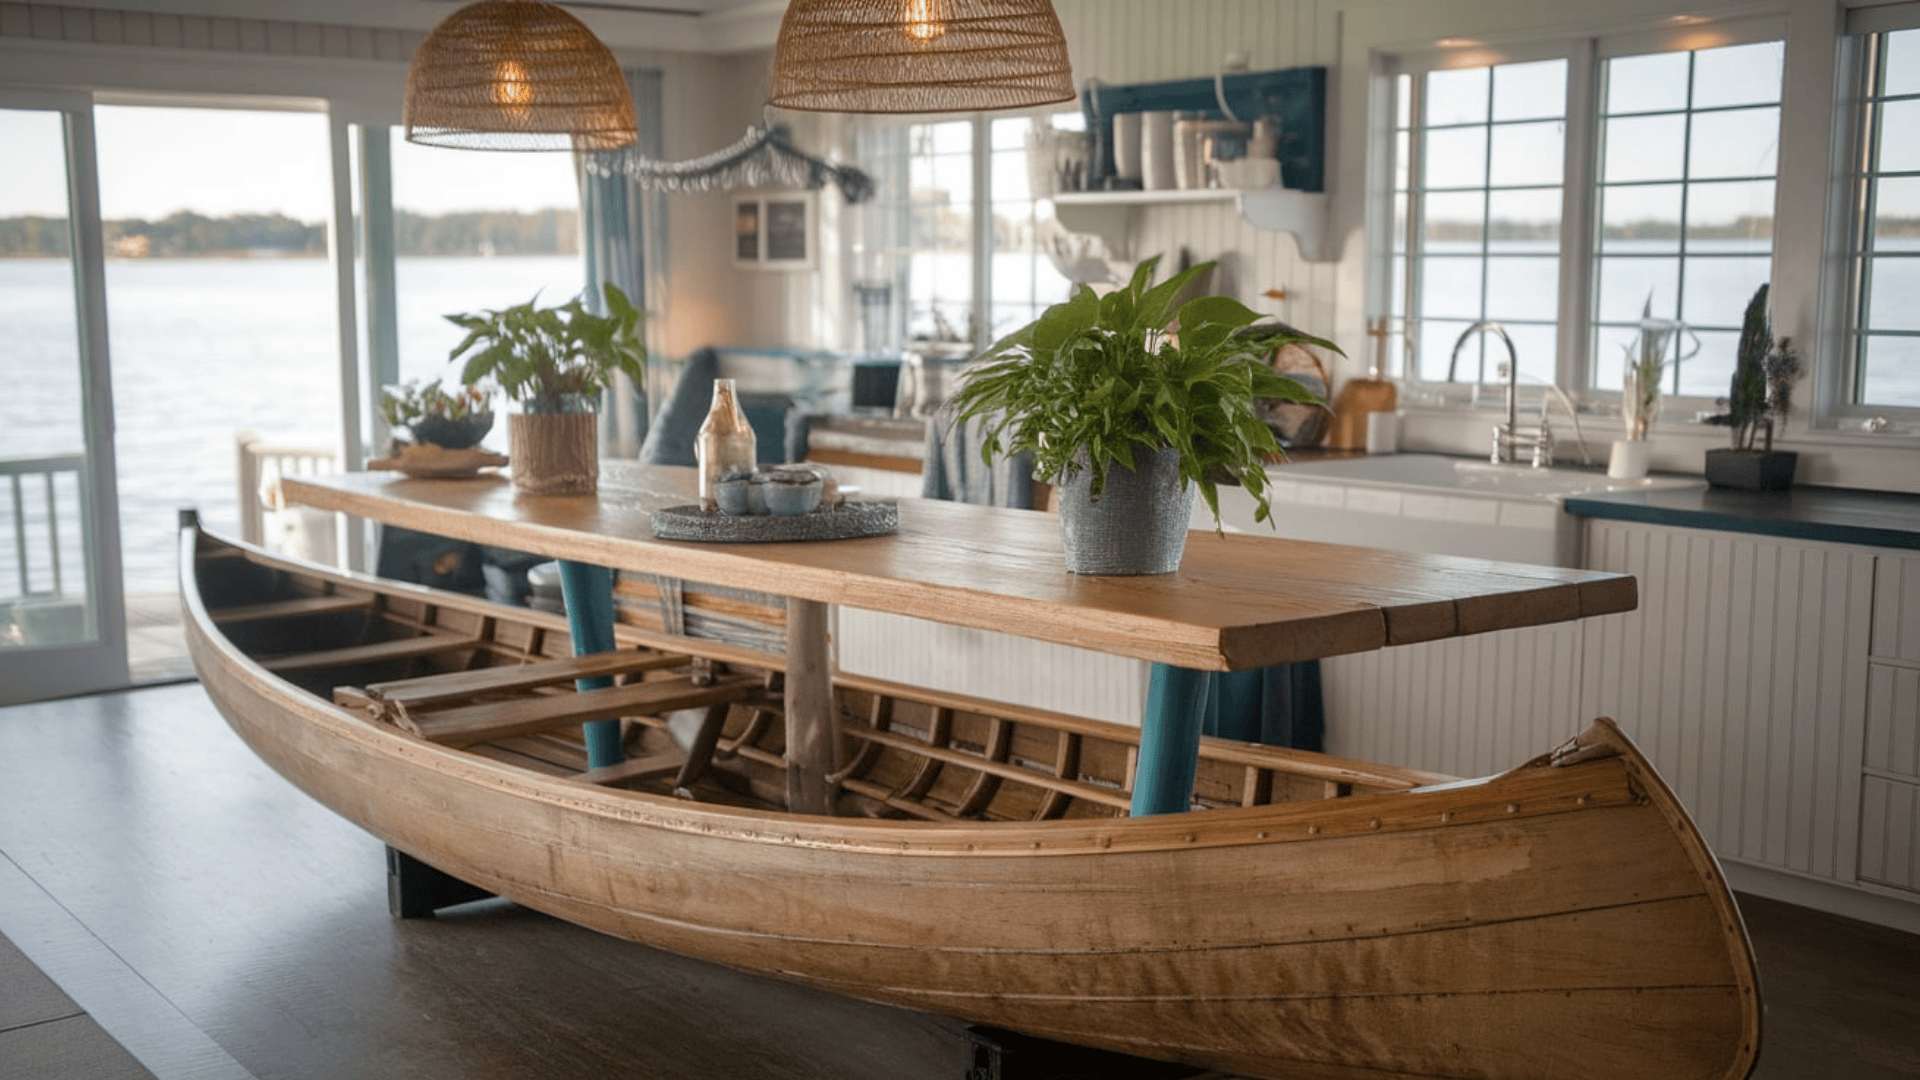
Turn an old canoe into a bold island base.
Clean the canoe shell and mount it upright or cut it lengthwise.
Build a sturdy wood frame to hold the shape, then place a tempered glass or reclaimed wood top across it.
Use wood stain or paint to match your kitchen style.
This idea brings fun and storytelling into the space while offering practical features, too.
Materials:
- Canoe shell
- Base frame
- Top slab
9. Storyboard Island with Interchangeable Art Panels
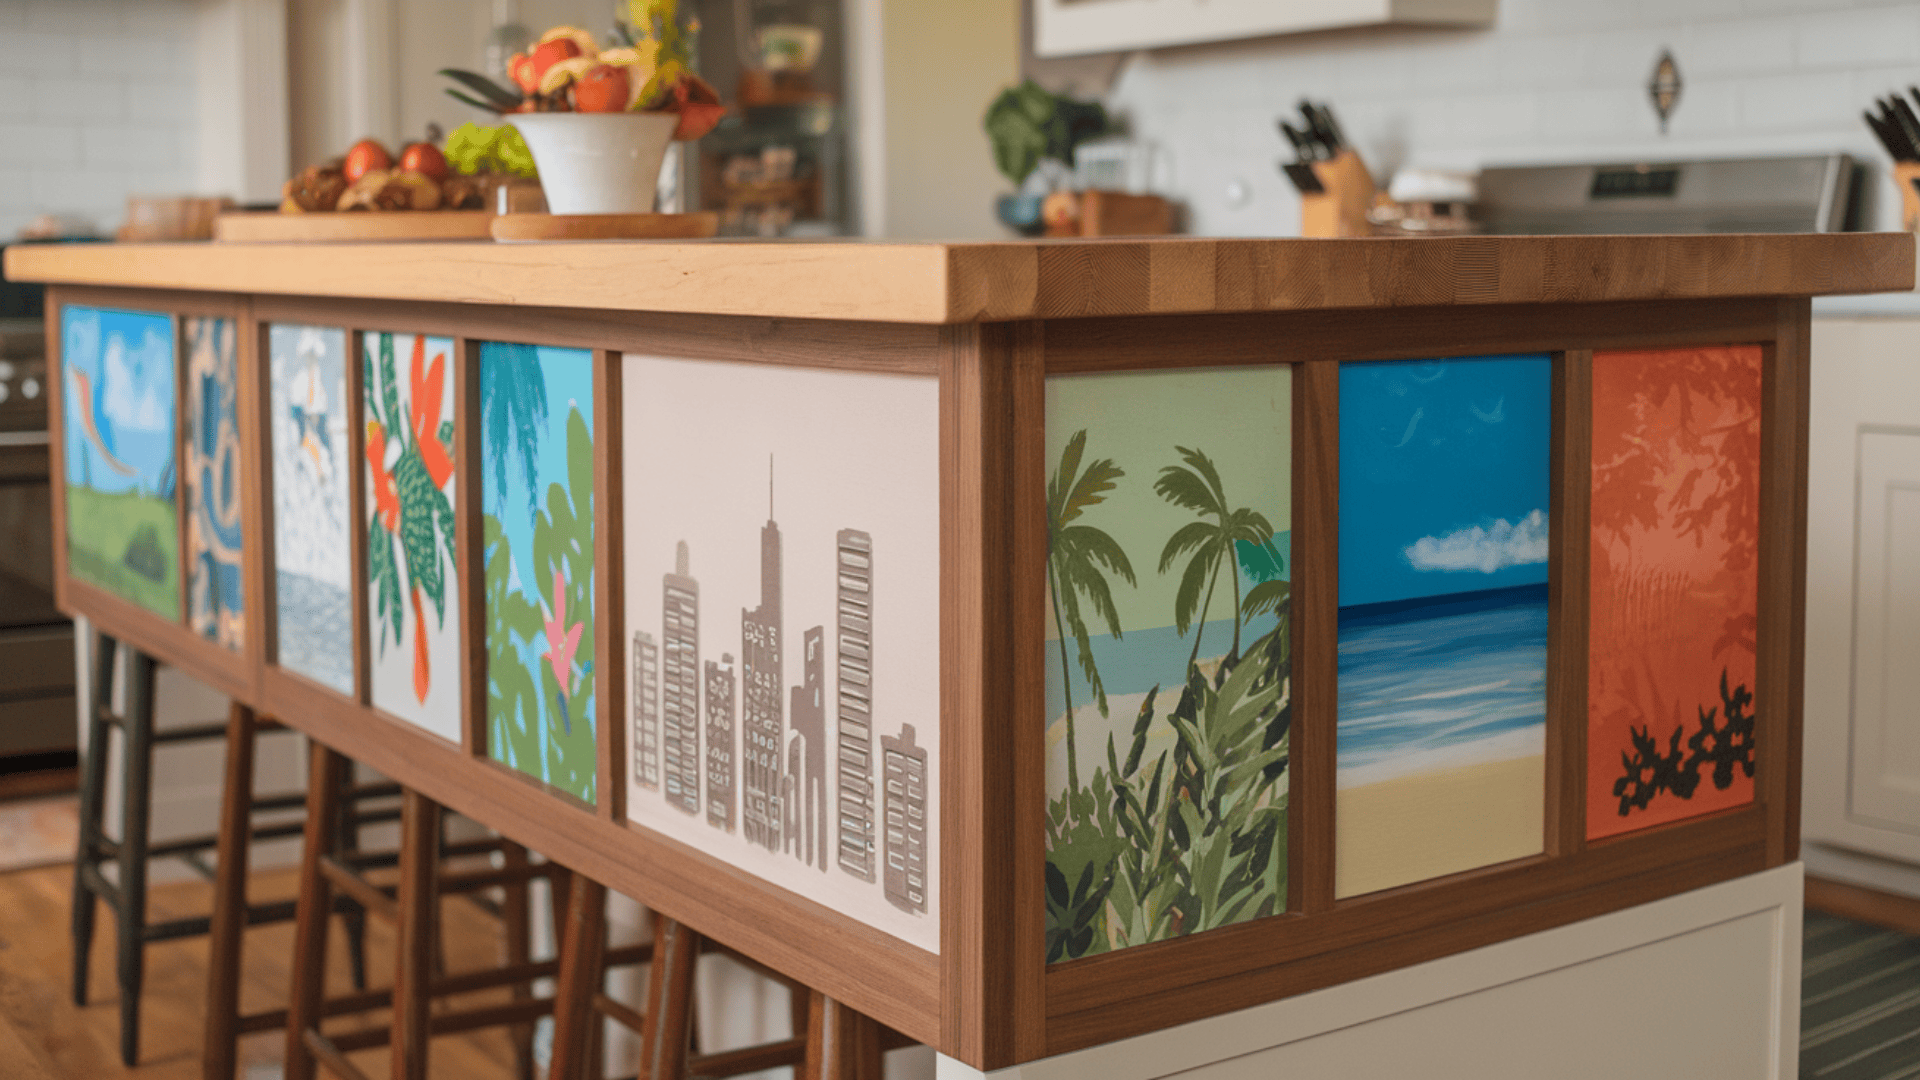
Turn your island into a storytelling board.
Build a wood frame along one side that holds slide-in art panels.
Paint or print designs on flat MDF boards, then slide them in to show off.
It’s a creative way to add fun and color to your kitchen without taking up counter space or making anything permanent.
Materials:
- MDF boards
- Wood channels
- Paint
10. Moroccan Tadelakt Island
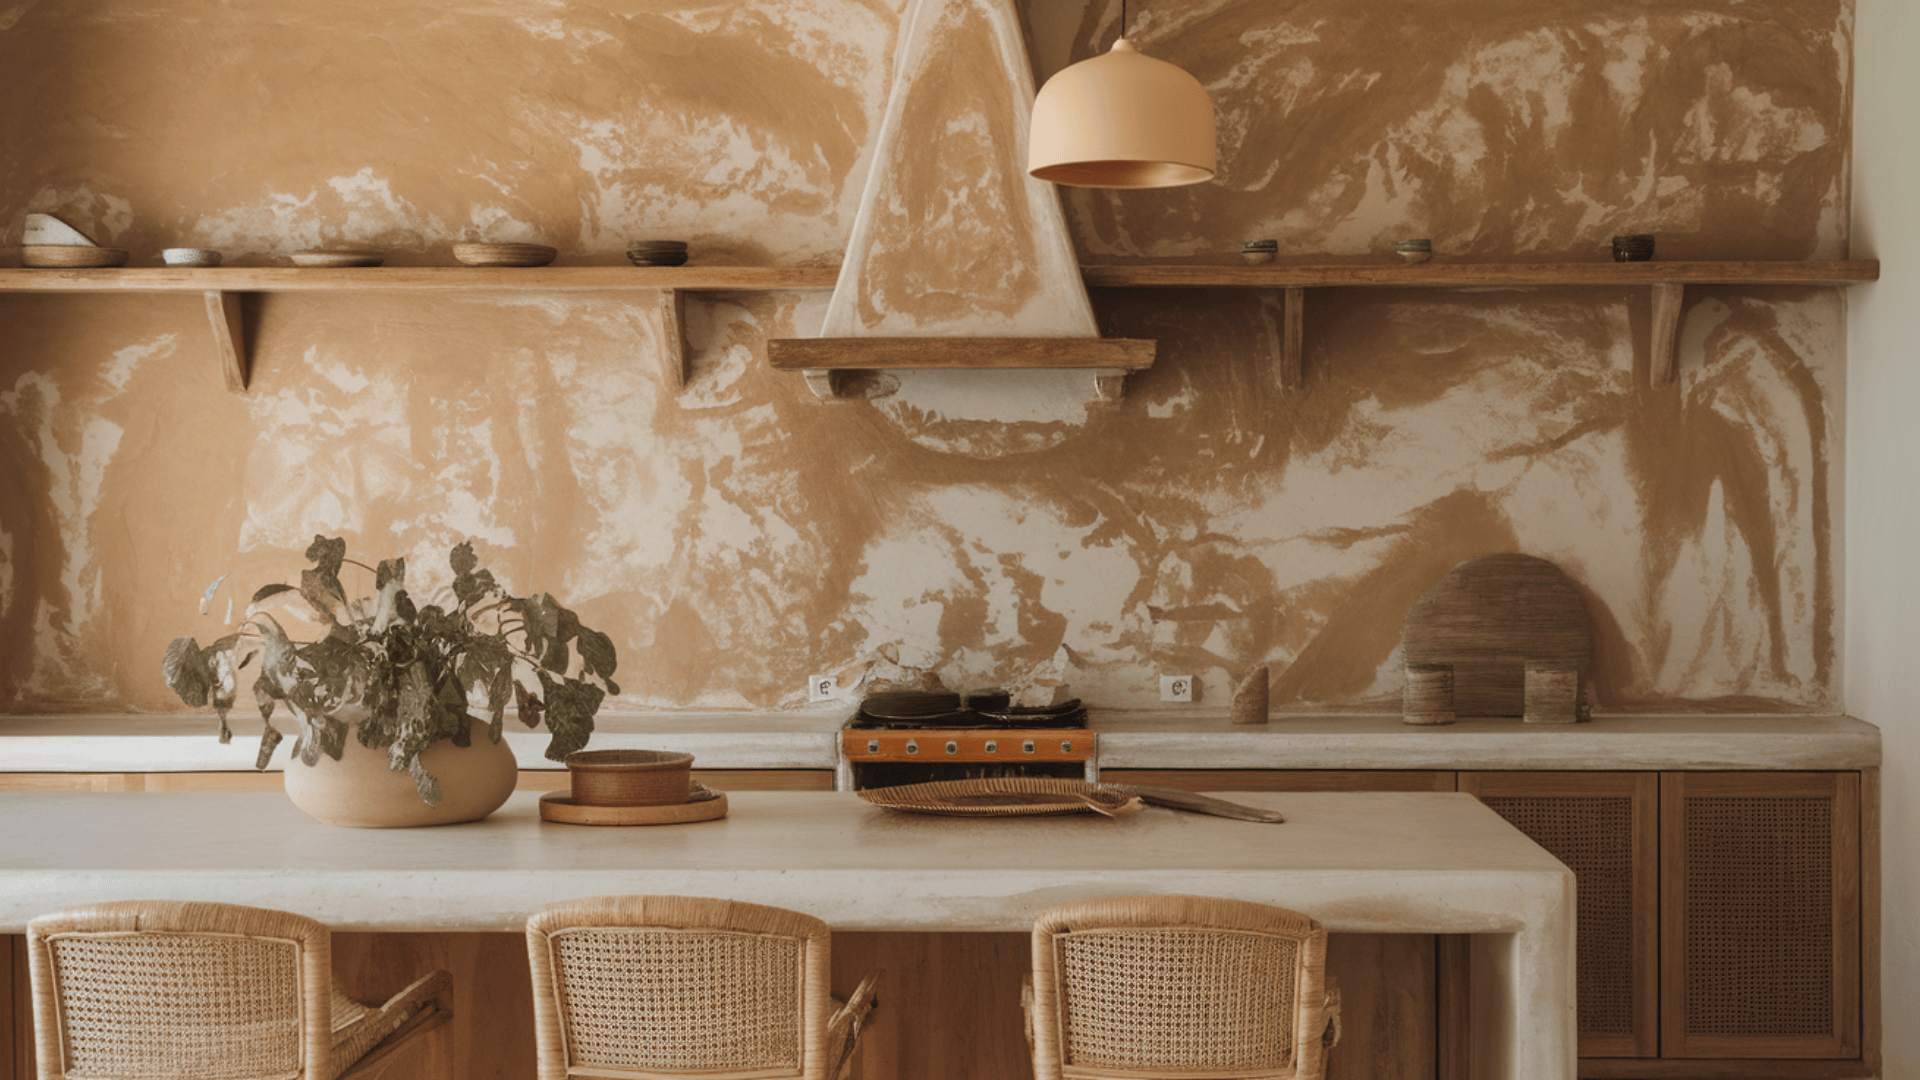
This design uses an old Moroccan plaster called Tadelakt, known for its smooth look and water-resistant finish.
The process starts with a cement base covered in a lime and pigment mix.
The mix is spread in layers using a flat metal tool.
The texture reflects light and feels nice to touch.
This design brings a natural, hand-finished style to your kitchen.
Materials:
- Tadelakt lime plaster
- Pigment
- Black soap
- Trowels
- Burnishing stone
11. Japanese Joinery Island Base
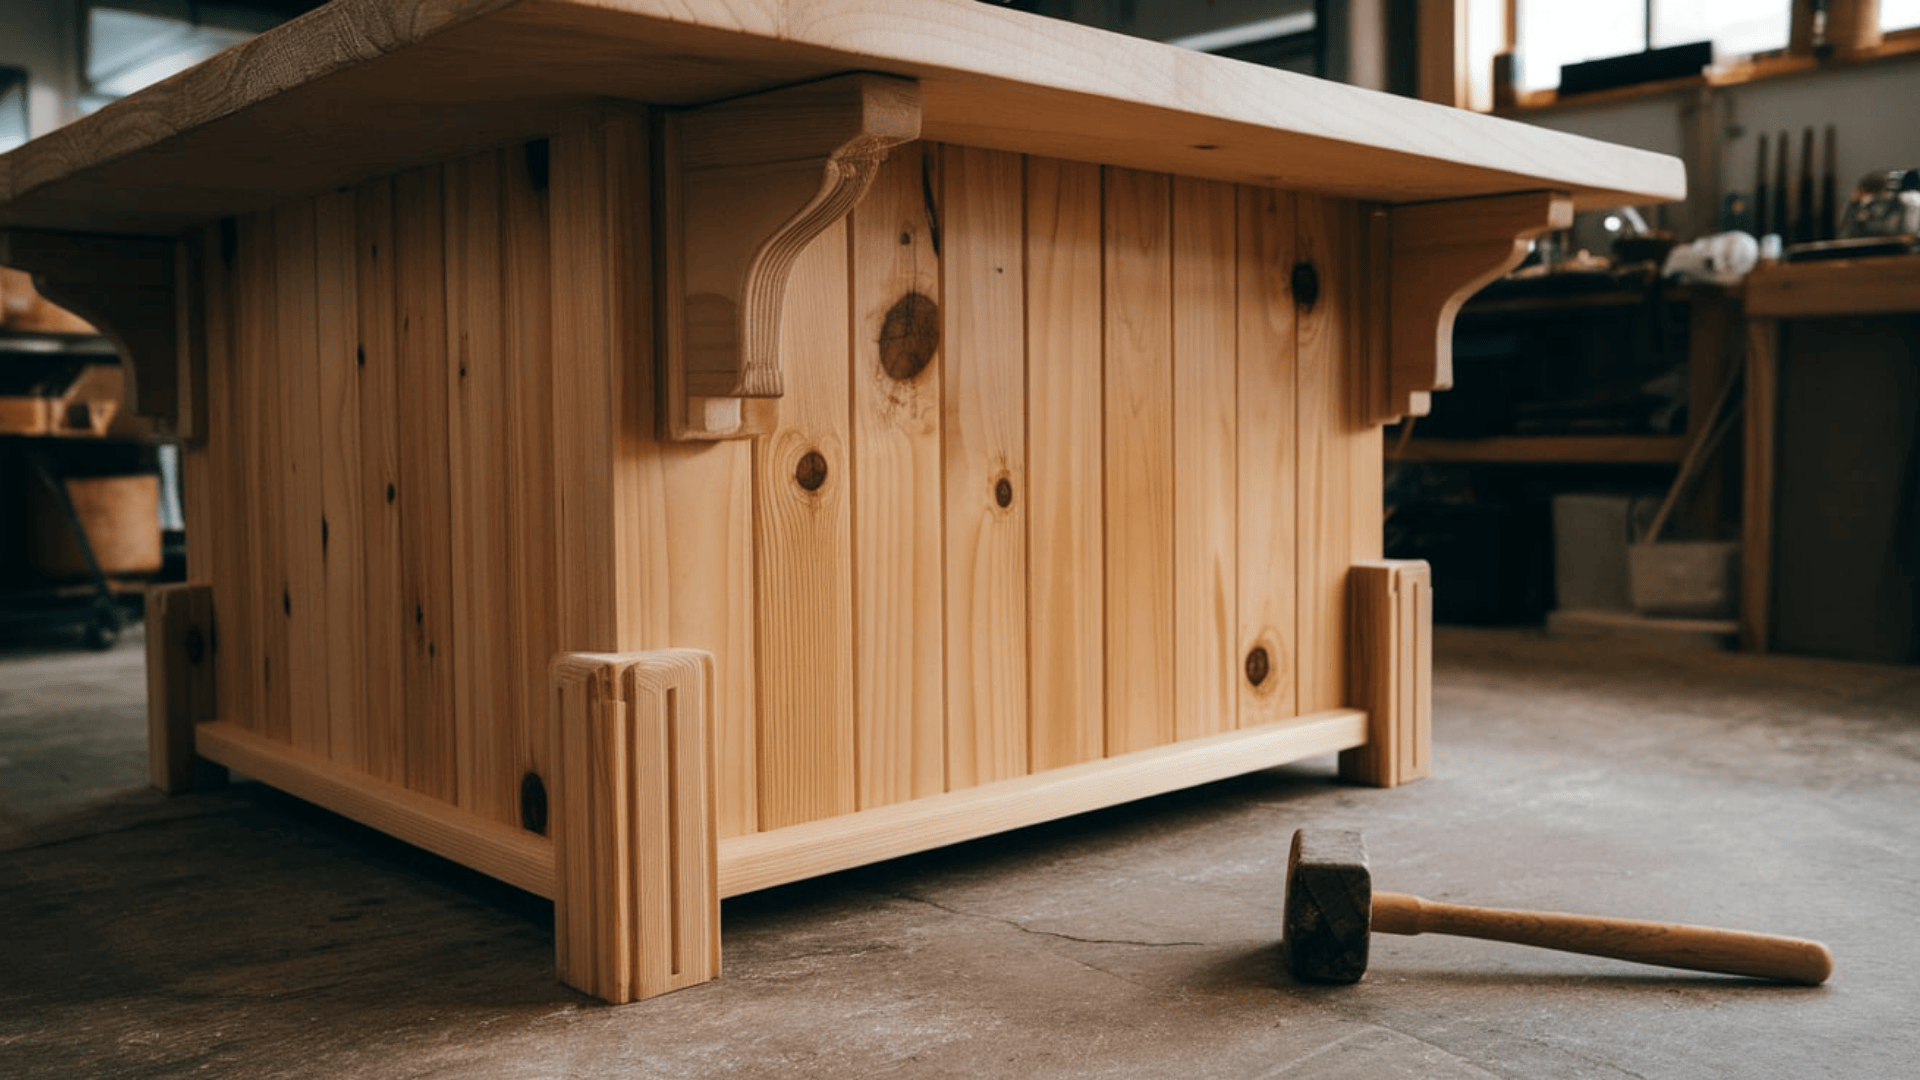
This island is made without nails or screws.
It uses an old Japanese method called joinery.
A mallet helps tap the parts into position.
A natural oil finish brings out the wood’s color.
The result is strong and simple, with clean lines and great care in every joint.
Materials:
- Hardwood planks
- Chisels
- Japanese saws
- Mallet
- Joinery templates
12. Greek Mosaic Top Island
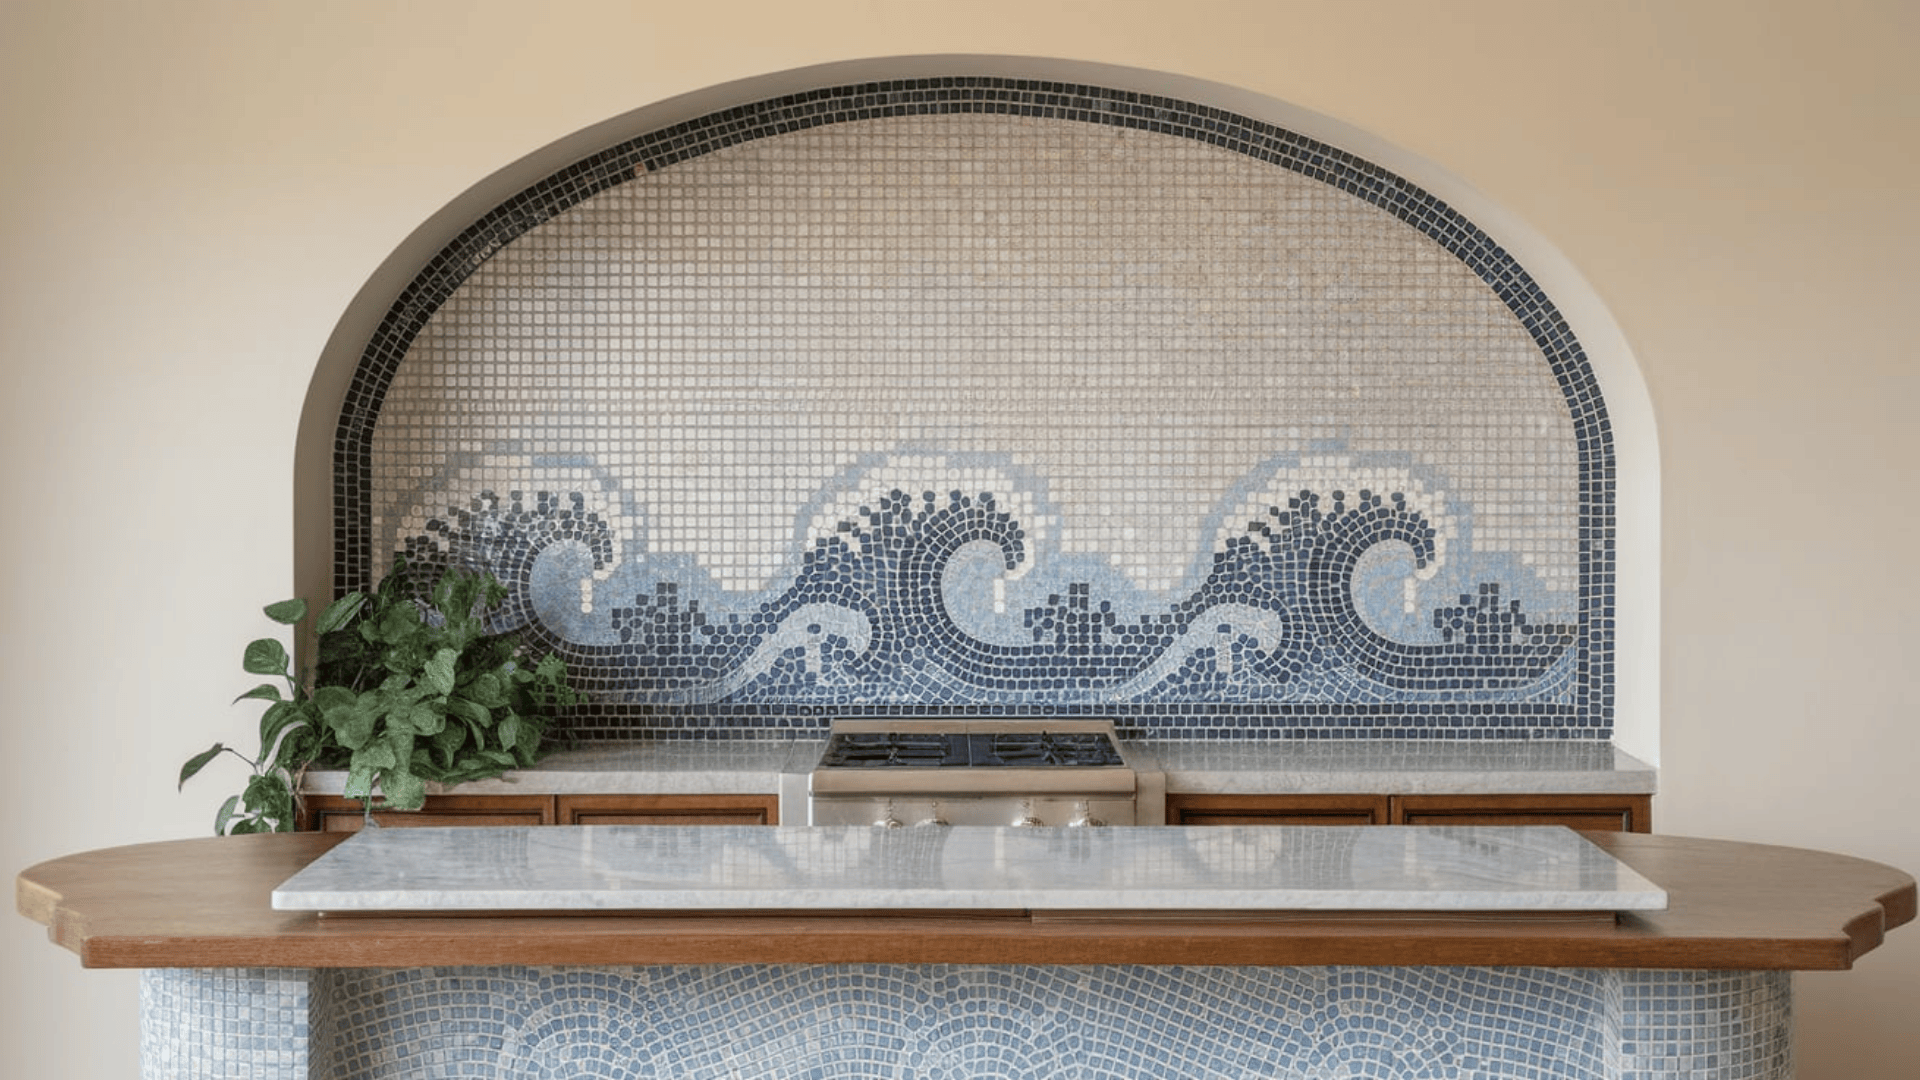
This idea turns your island into a piece of art using tiny tiles.
Start by adding a sturdy surface to your island, then lay out a pattern using small stone or glass tiles.
You can create a wave border or other Greek shapes.
It feels like something from long ago, but it works well in any kitchen today.
Materials:
- Mosaic tiles
- Thin-set mortar
- Grout
- Sponge, sealer
13. British Tea Nook Island
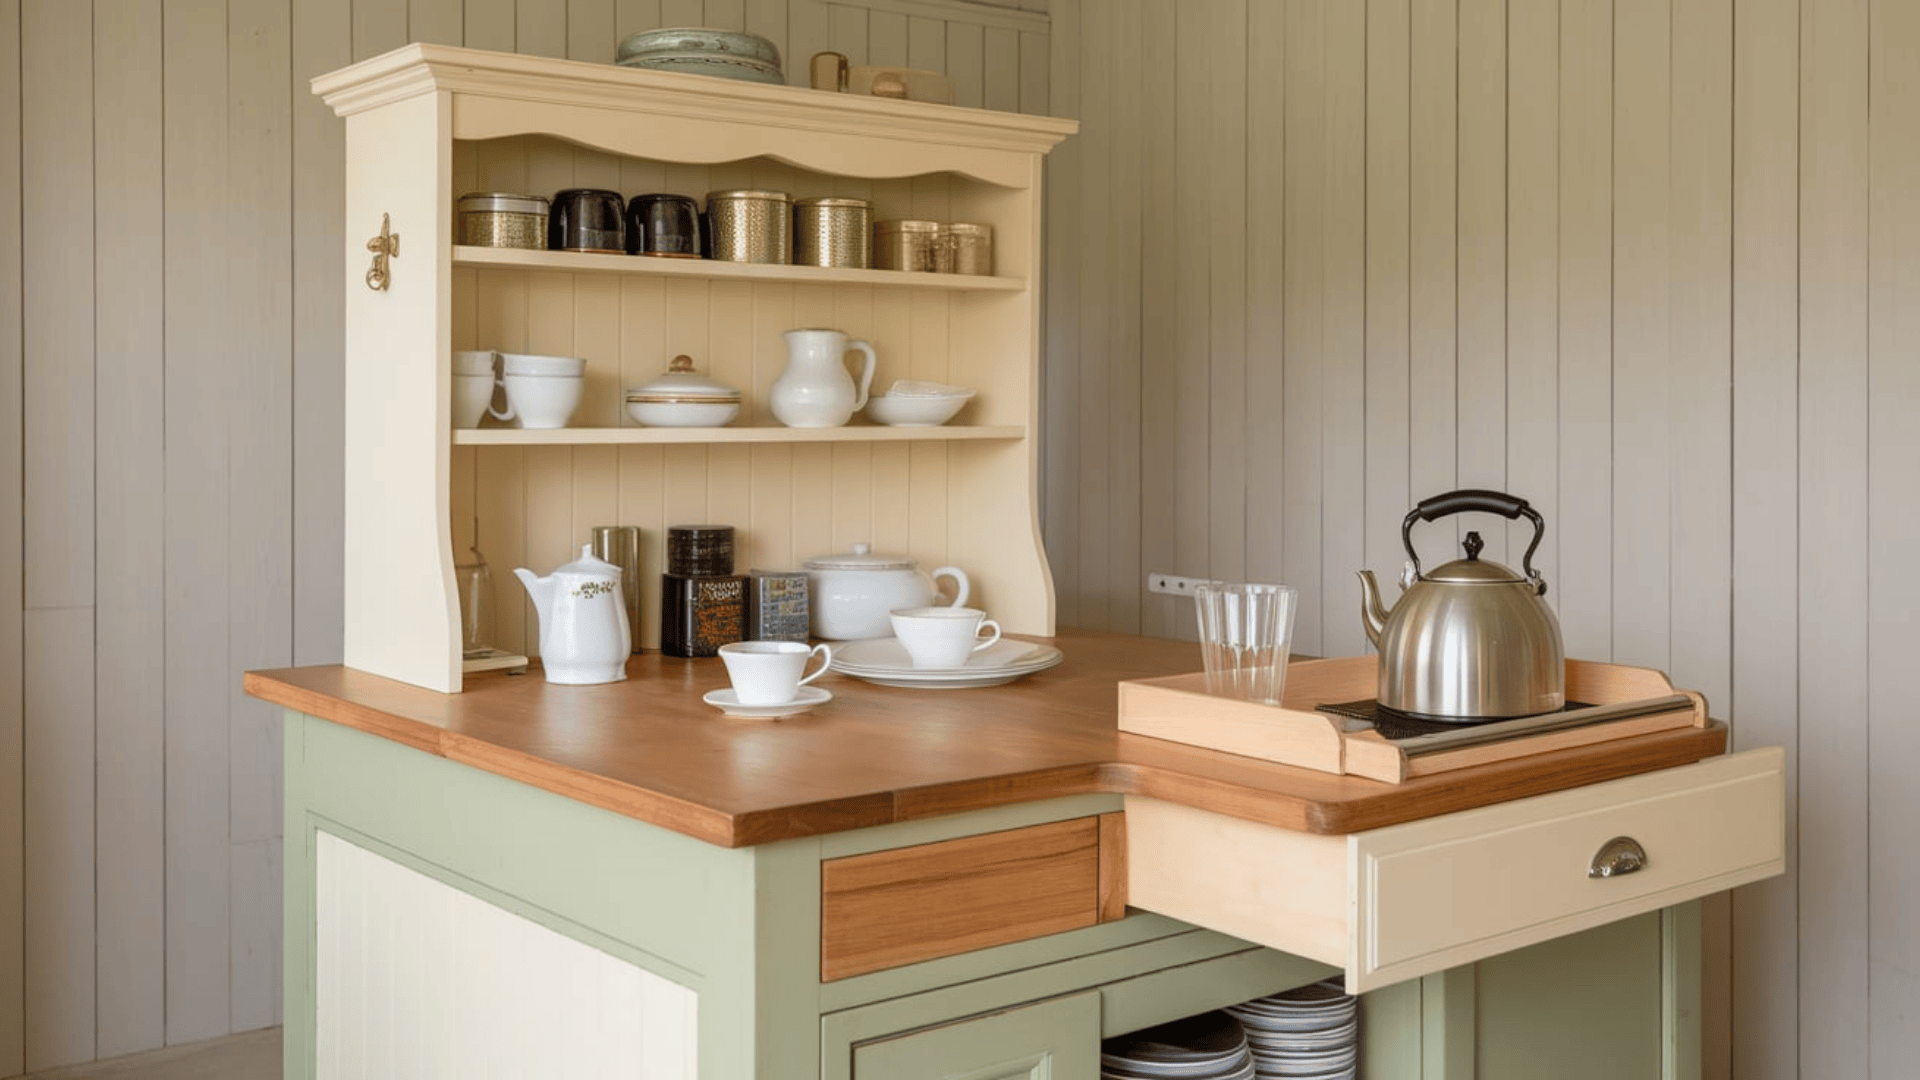
This kitchen island includes a cozy tea station.
One side has a pull-out tray for a kettle, while shelves above hold cups, tins, and jars.
Use wood panels and paint them in soft colors like cream or green.
It adds both charm and purpose to your kitchen.
Materials:
- Beadboard
- Oak panels
- Shelf brackets
- Drawer slides
14. Rolling Crate Island for Produce Storage
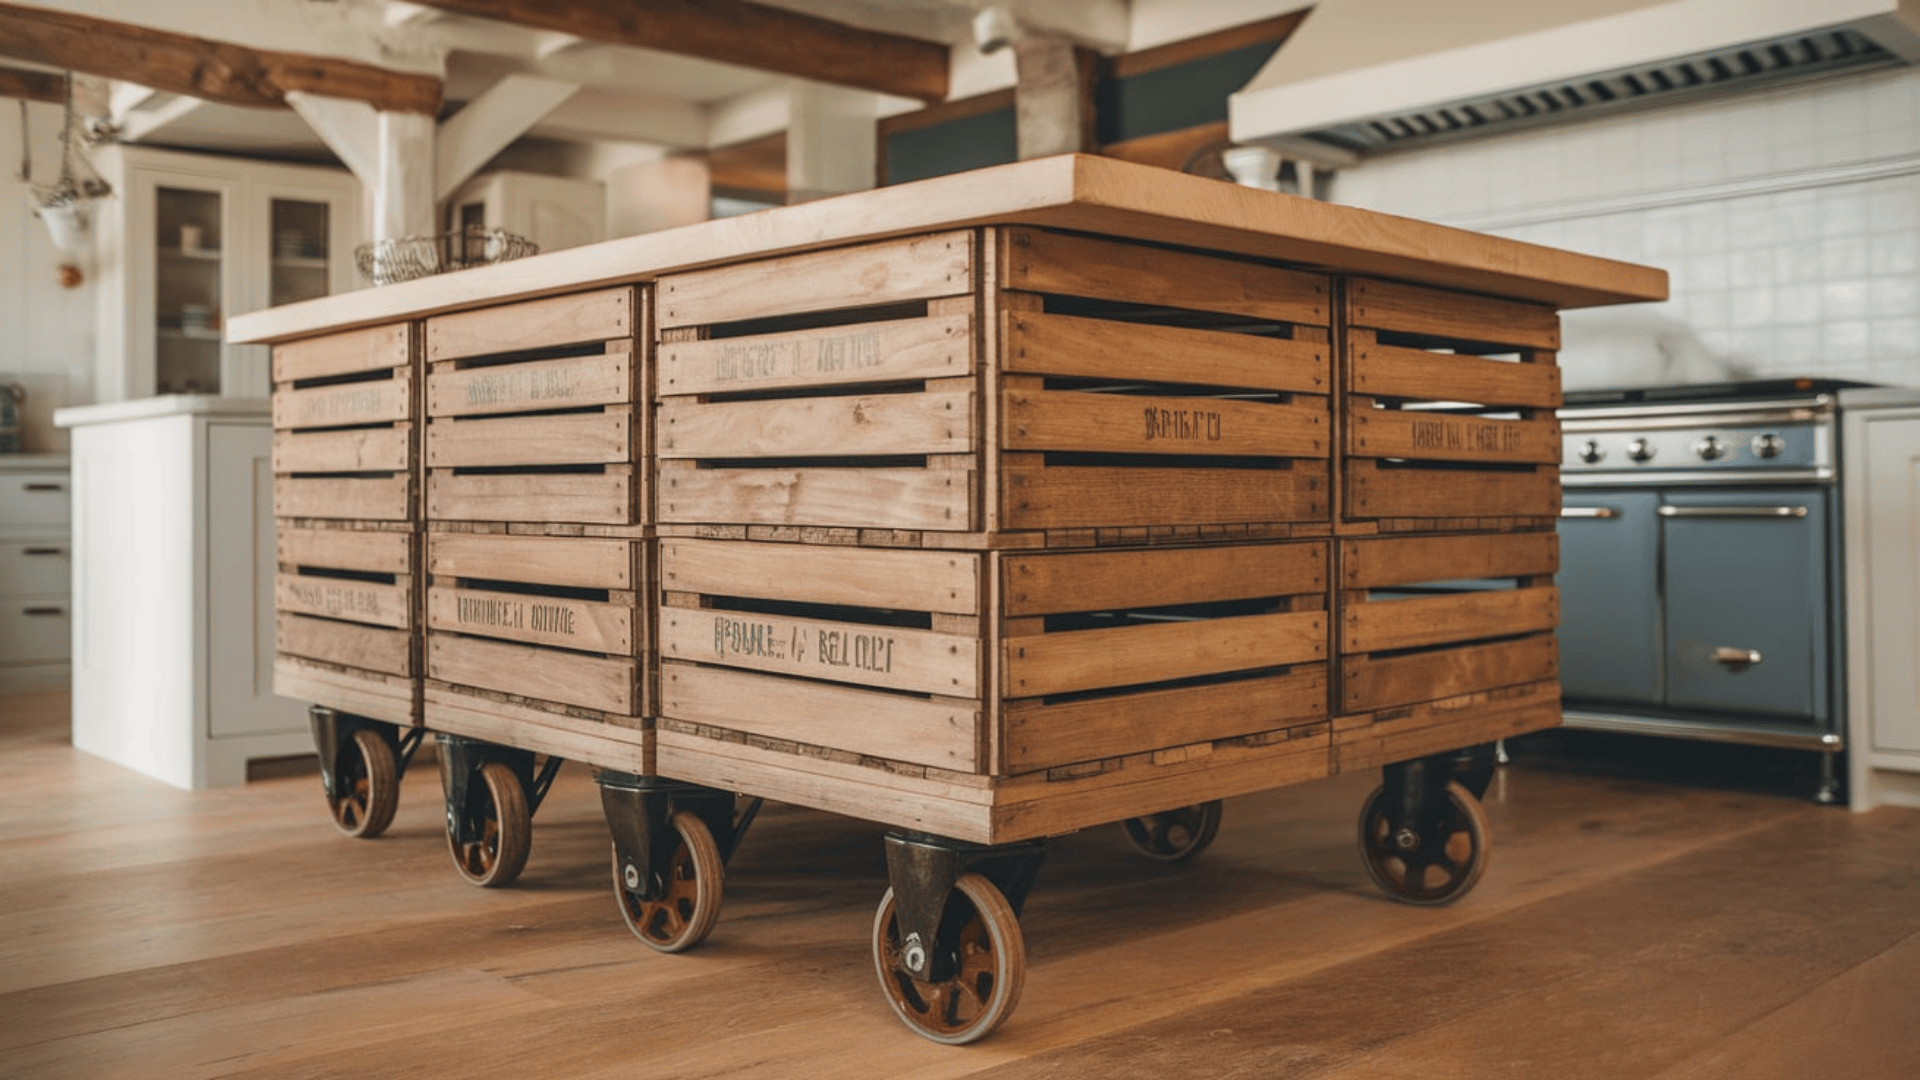
This charming island is made using stacked wooden fruit crates, perfect for a farmhouse or cottage-style kitchen.
Begin by collecting four or five sturdy, vintage-style wooden crates—ensure they’re strong enough to stack.
Clean and sand them to remove splinters, then paint or stain for a uniform look.
Add industrial wheels with locking casters so the island can move easily.
Materials:
- Wooden crates
- Screws
- Caster wheels
- Wood top
15. Terracotta Tiled Island with Open Arches
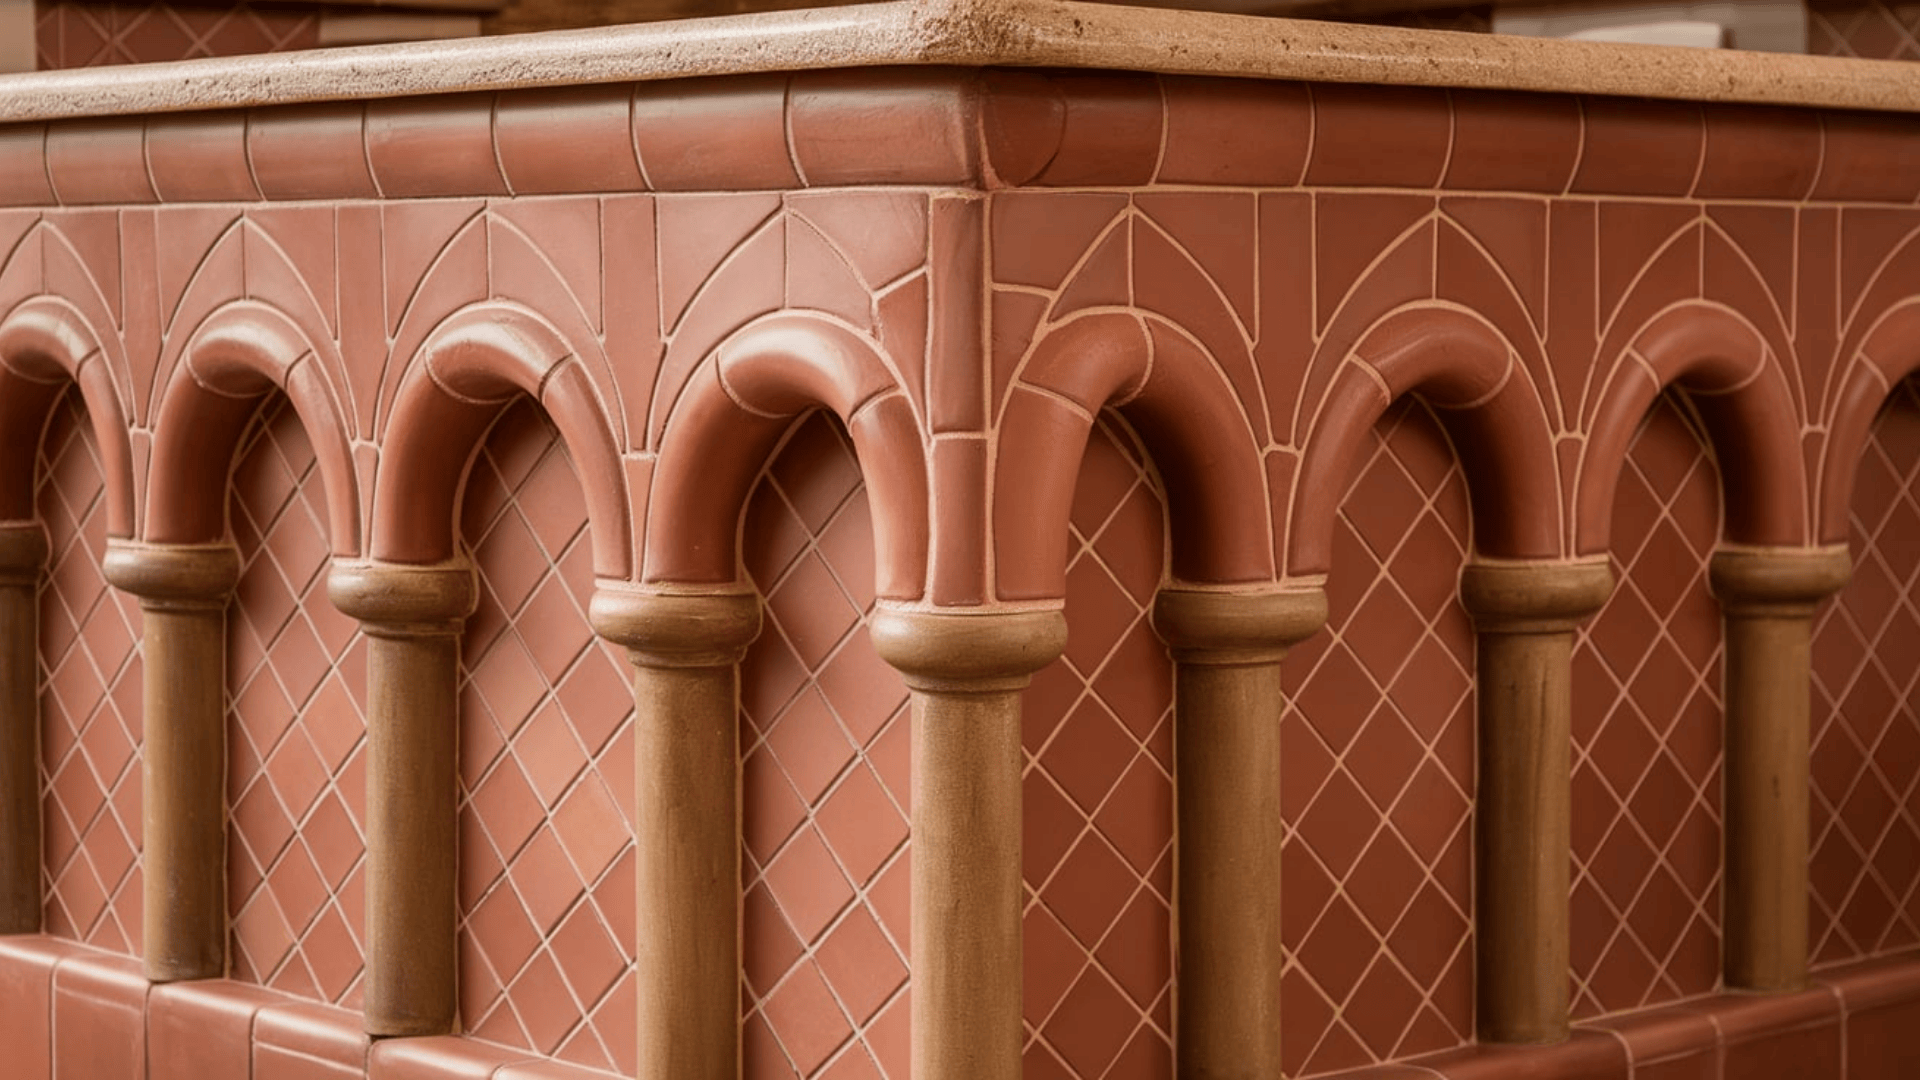
Inspired by Mediterranean aesthetics, this island features curved arches and terracotta tile facing.
Start by building a basic rectangular base using cement board or plywood.
Using tile adhesive, cover the entire frame with handmade terracotta tiles, following the curvature of the arches.
Top it with a limestone or wooden slab.
Materials:
- Cement board,
- Terracotta tiles,
- Tile adhesive,
- Grout,
- Countertop
16. Hanging Plant Trough Island
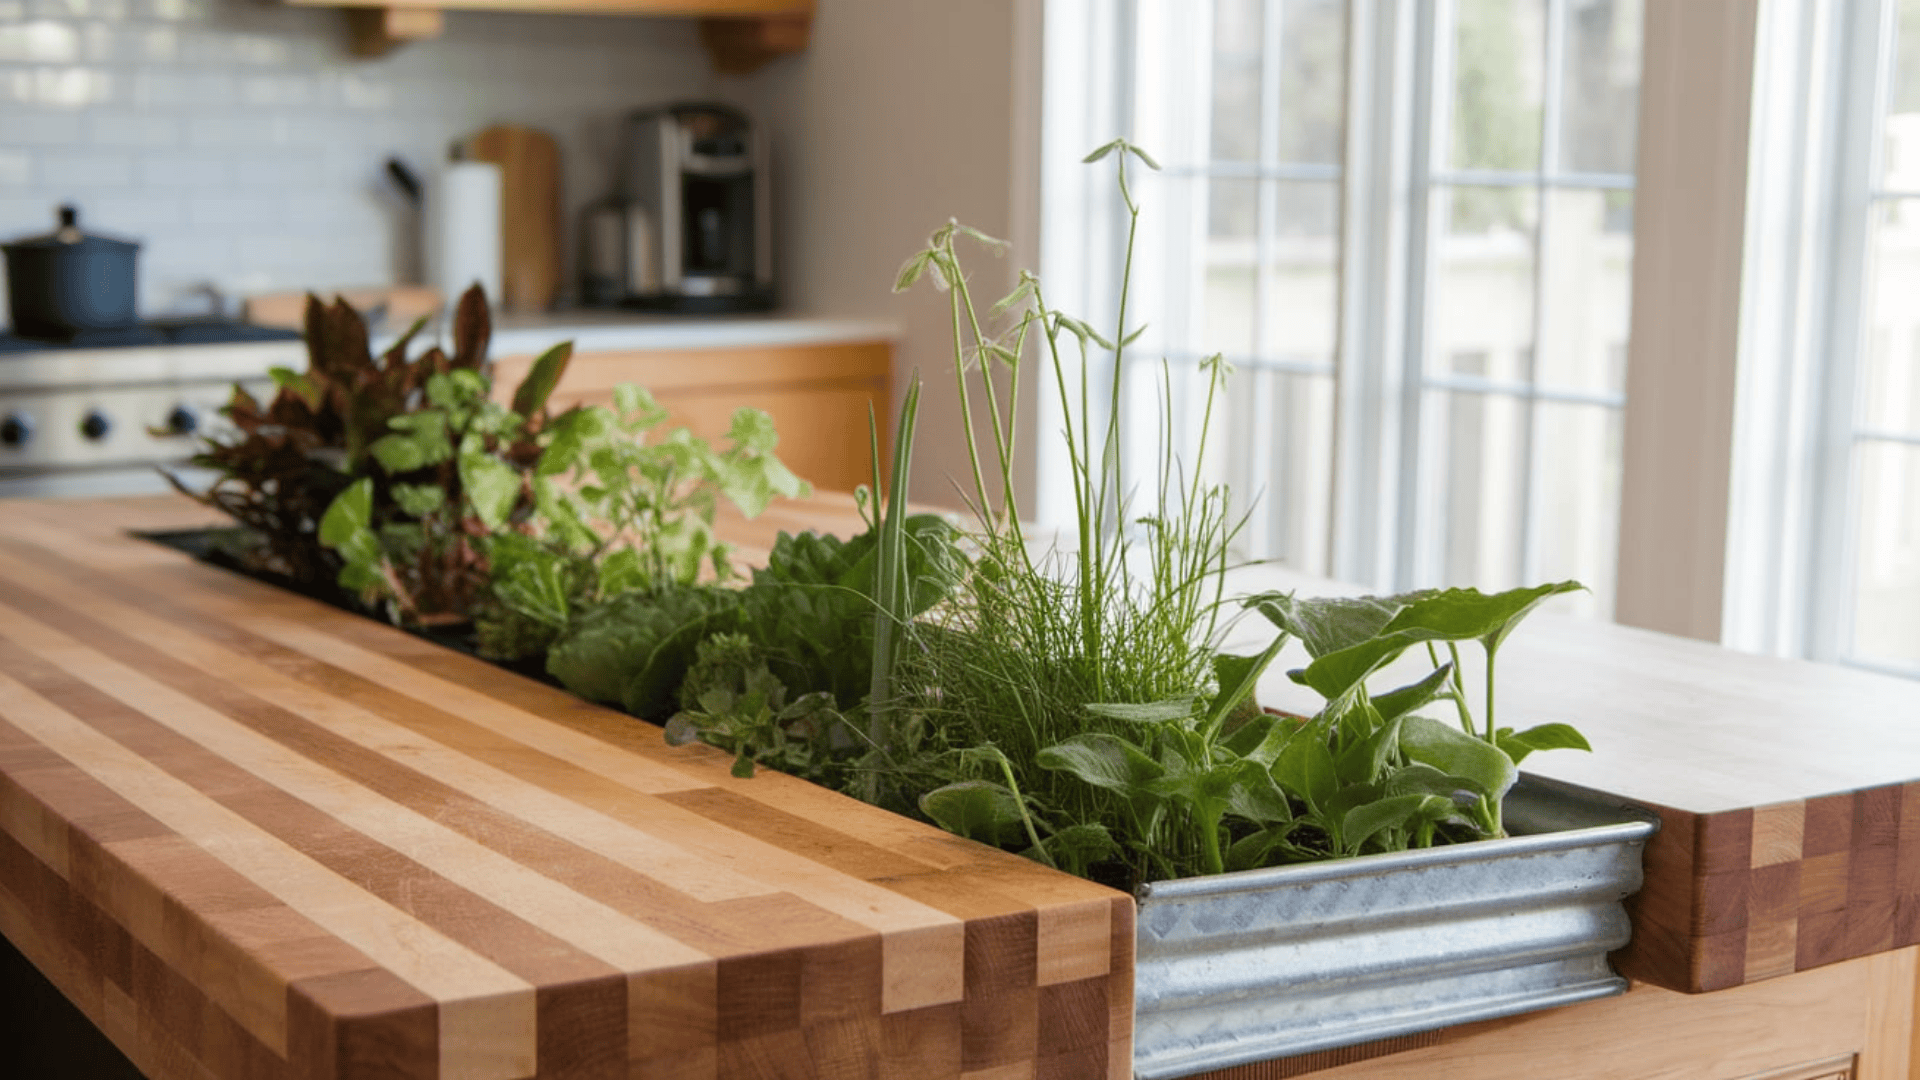
Bring greenery right into your kitchen by embedding a plant trough down the center of your island.
Start by carving out a channel through a butcher block or wood top.
Line it with galvanized metal or a waterproof resin liner.
Install grow lights or position the island near a bright window for best results.
Materials:
- Wood or Butcher block top
- metal trough
- soil
- plants
17. Glow-in-the-Dark Epoxy Island Accents
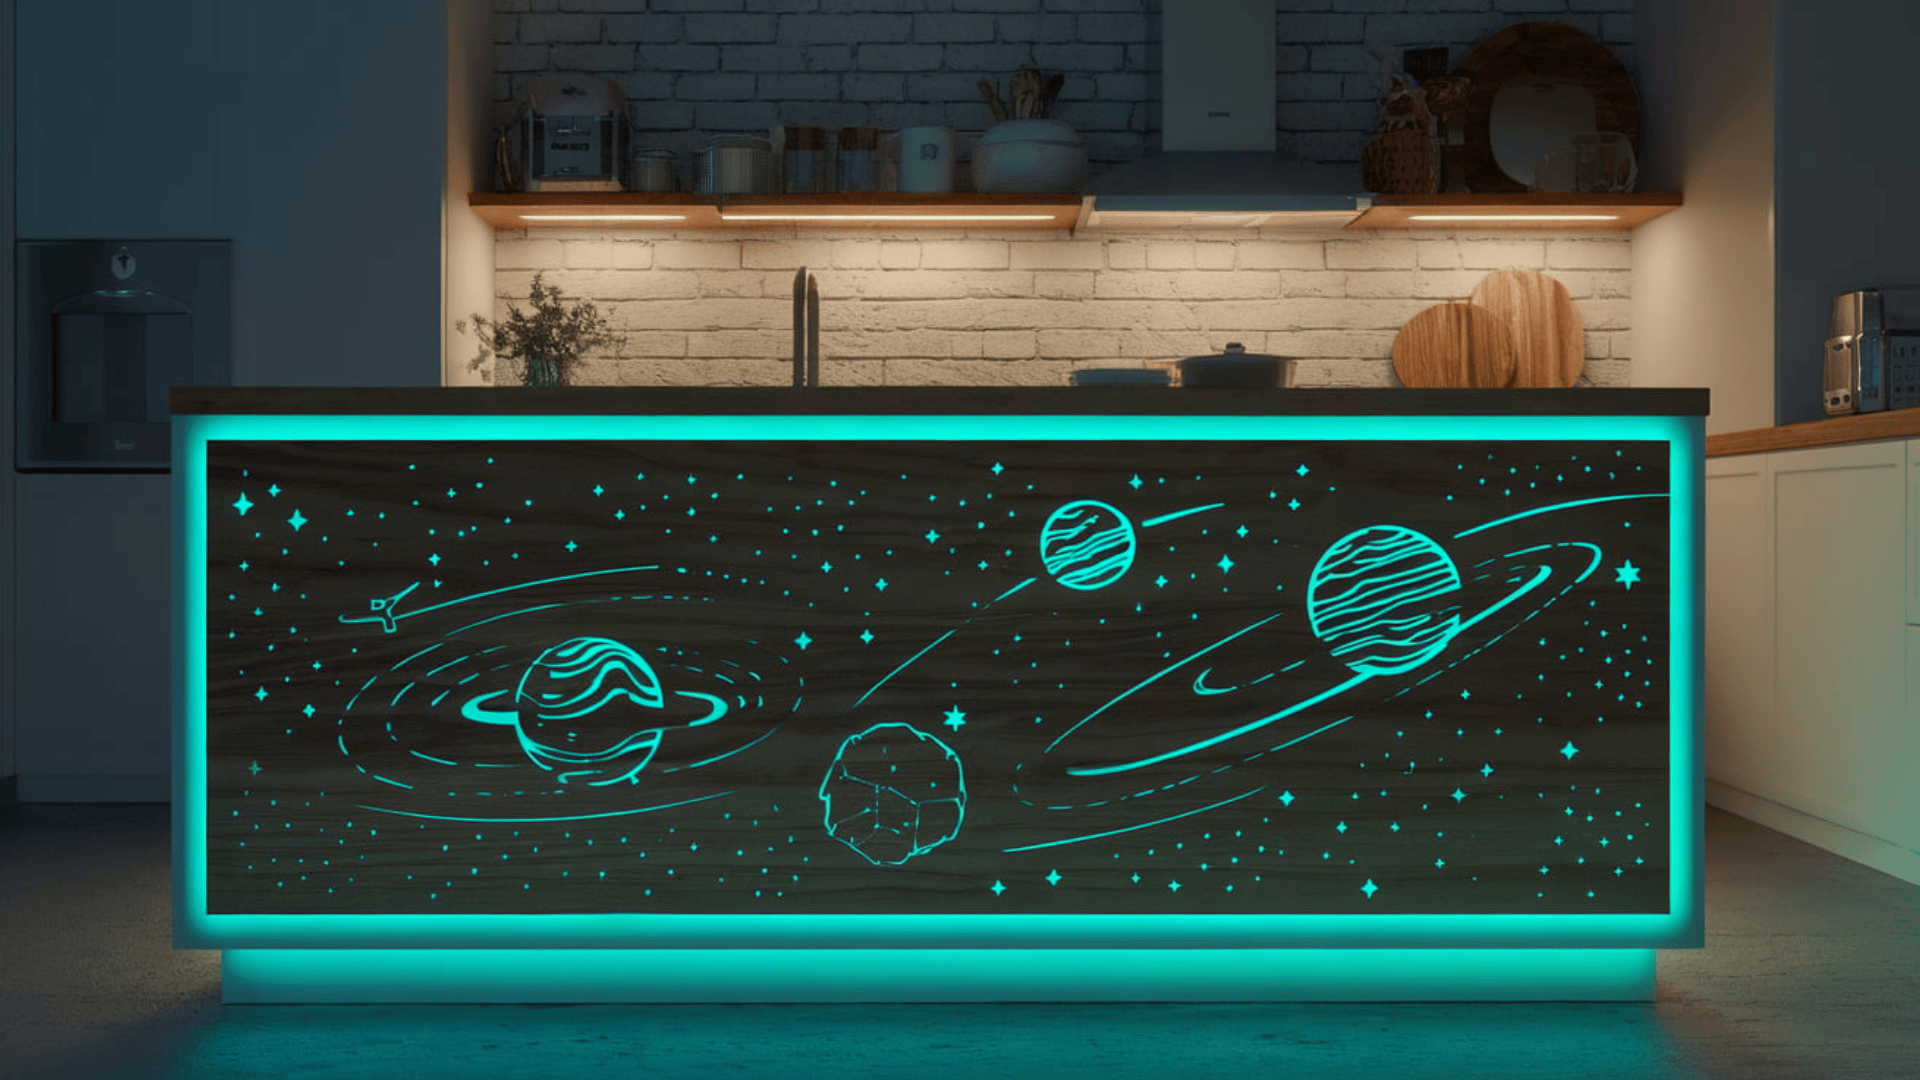
This kitchen island glows softly at night, making it both fun and useful.
First, carve patterns into the surface of a wood.
Fill the lines with glow-in-the-dark epoxy mixed with special powder.
Use a heat gun to remove bubbles, then let it dry overnight.
After sanding the top flat, seal it with a shiny finish.
Materials:
- Epoxy resin
- Phosphorescent pigment
- Wood router
- Sealer
18. Island with Pop-Out Dining Table
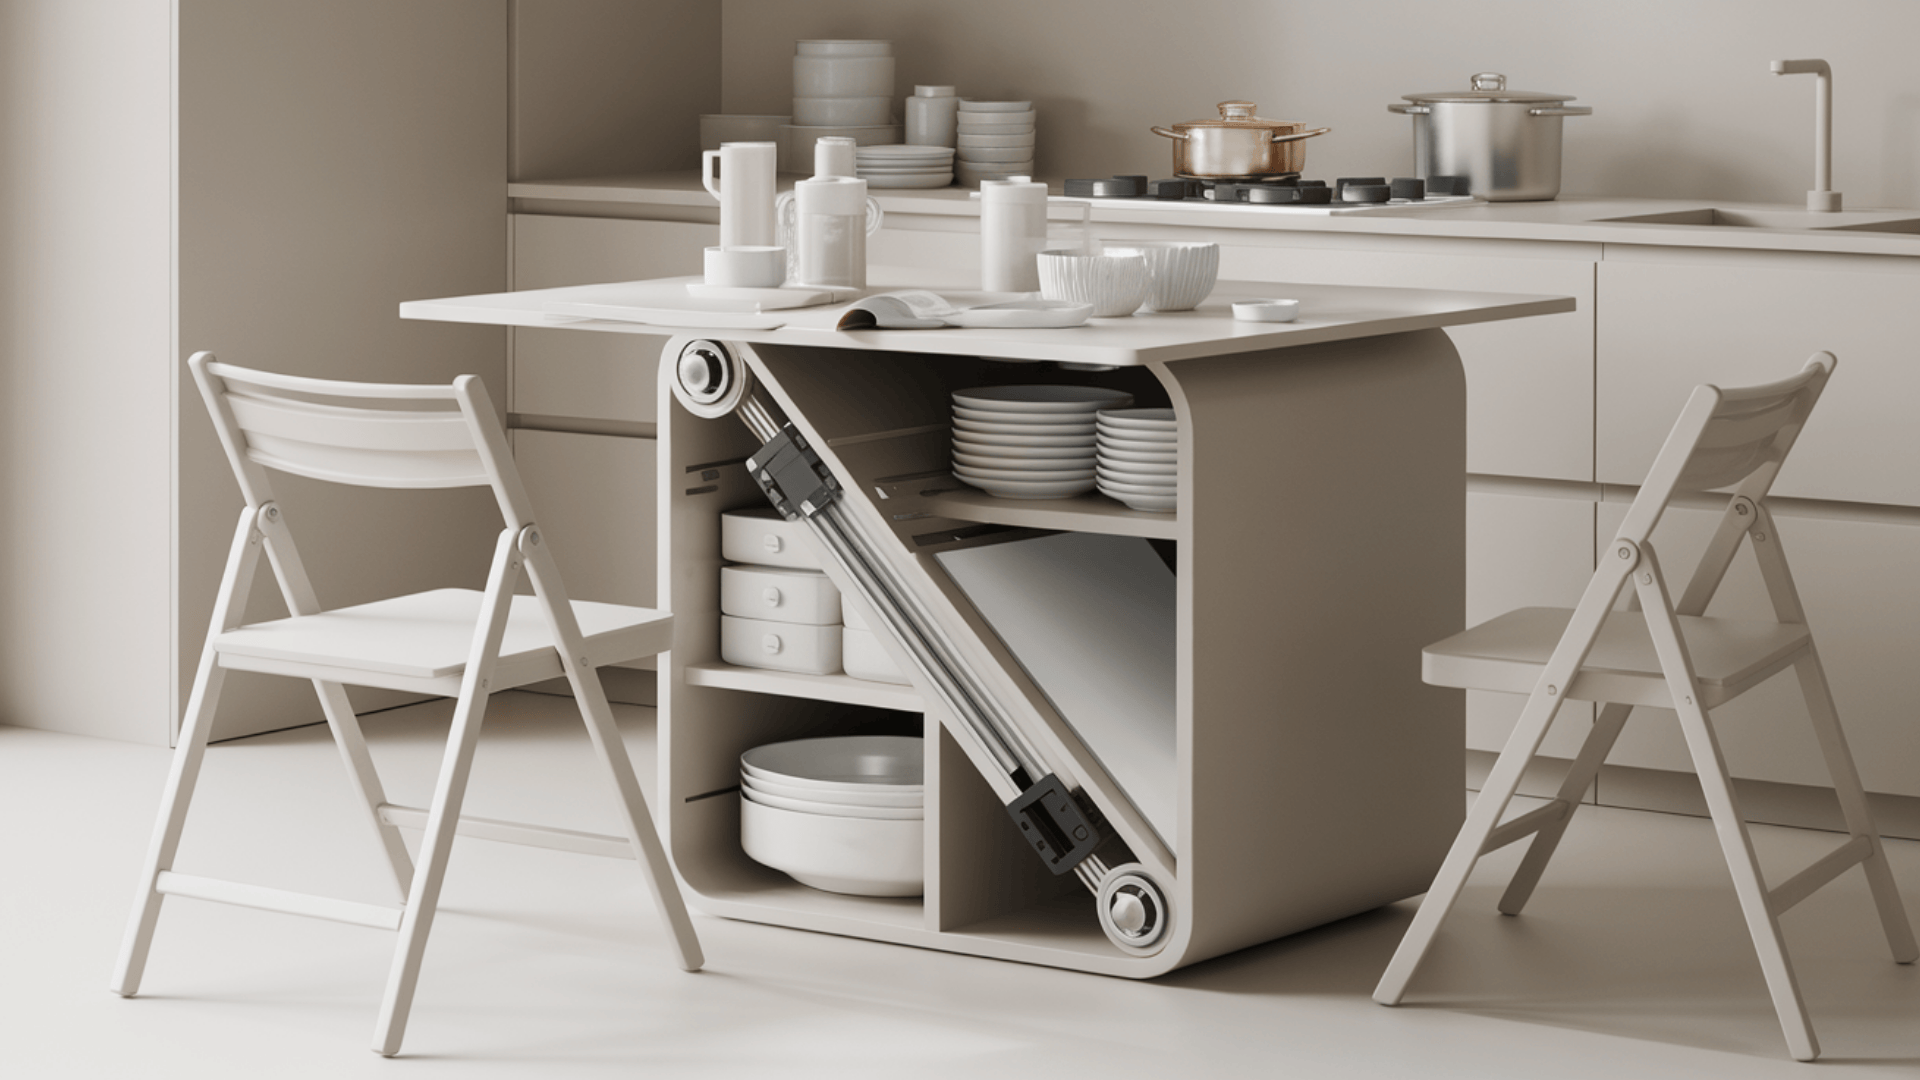
This design gives you an island and a table in one.
A hidden tray pulls out from the base, creating a small dining table.
Build a frame with a special track system so the table slides out and locks in place.
Use foldable chairs nearby for easy seating.
Materials:
- Plywood tabletop
- Drawer slides
- Wood frame
19. Leather-Wrapped Island Corners
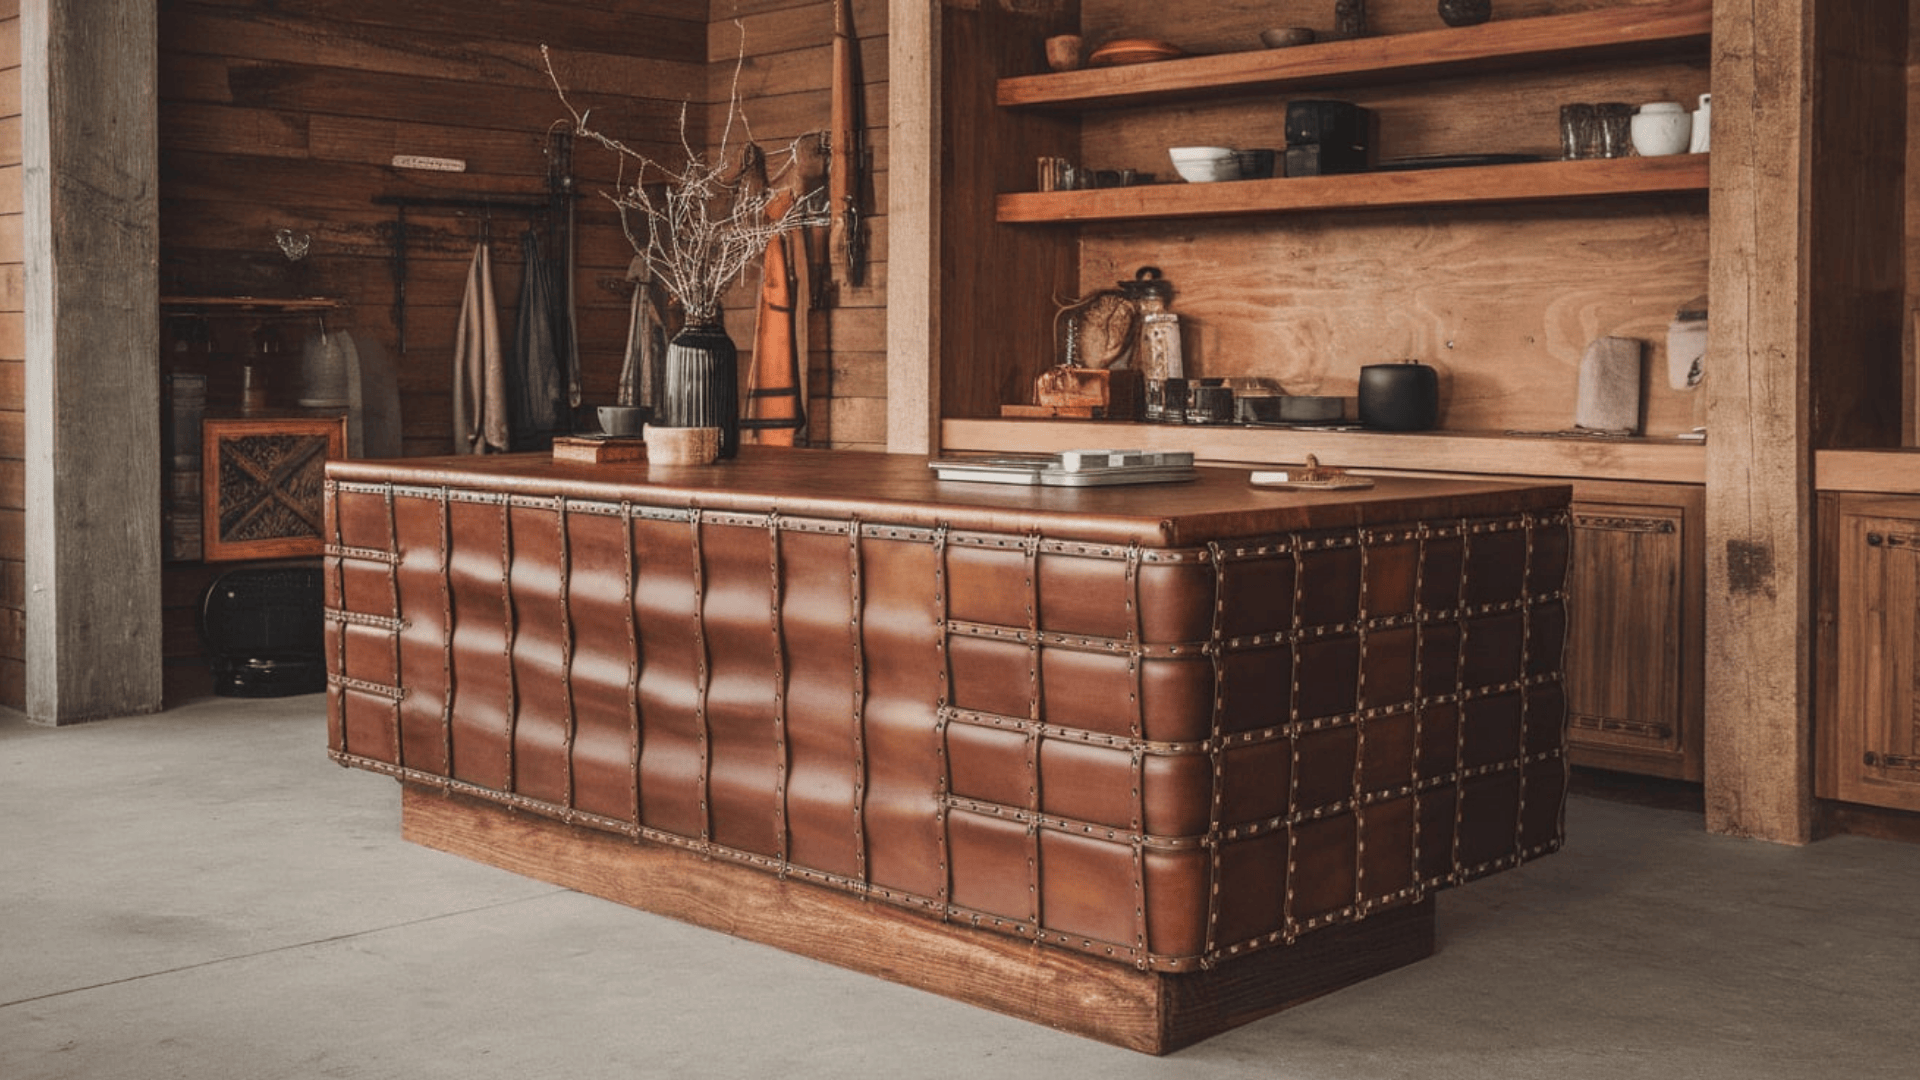
This design adds soft edges and bold style.
Wrap leather around the island’s corners or sides, and secure it with glue or metal tacks.
Use thick leather in dark or warm shades.
Over time, it will age and change color, adding even more style.
Materials:
- Leather hide
- Adhesive
- Brass tacks
20. Island with Built-In Bookcase for Cookbooks
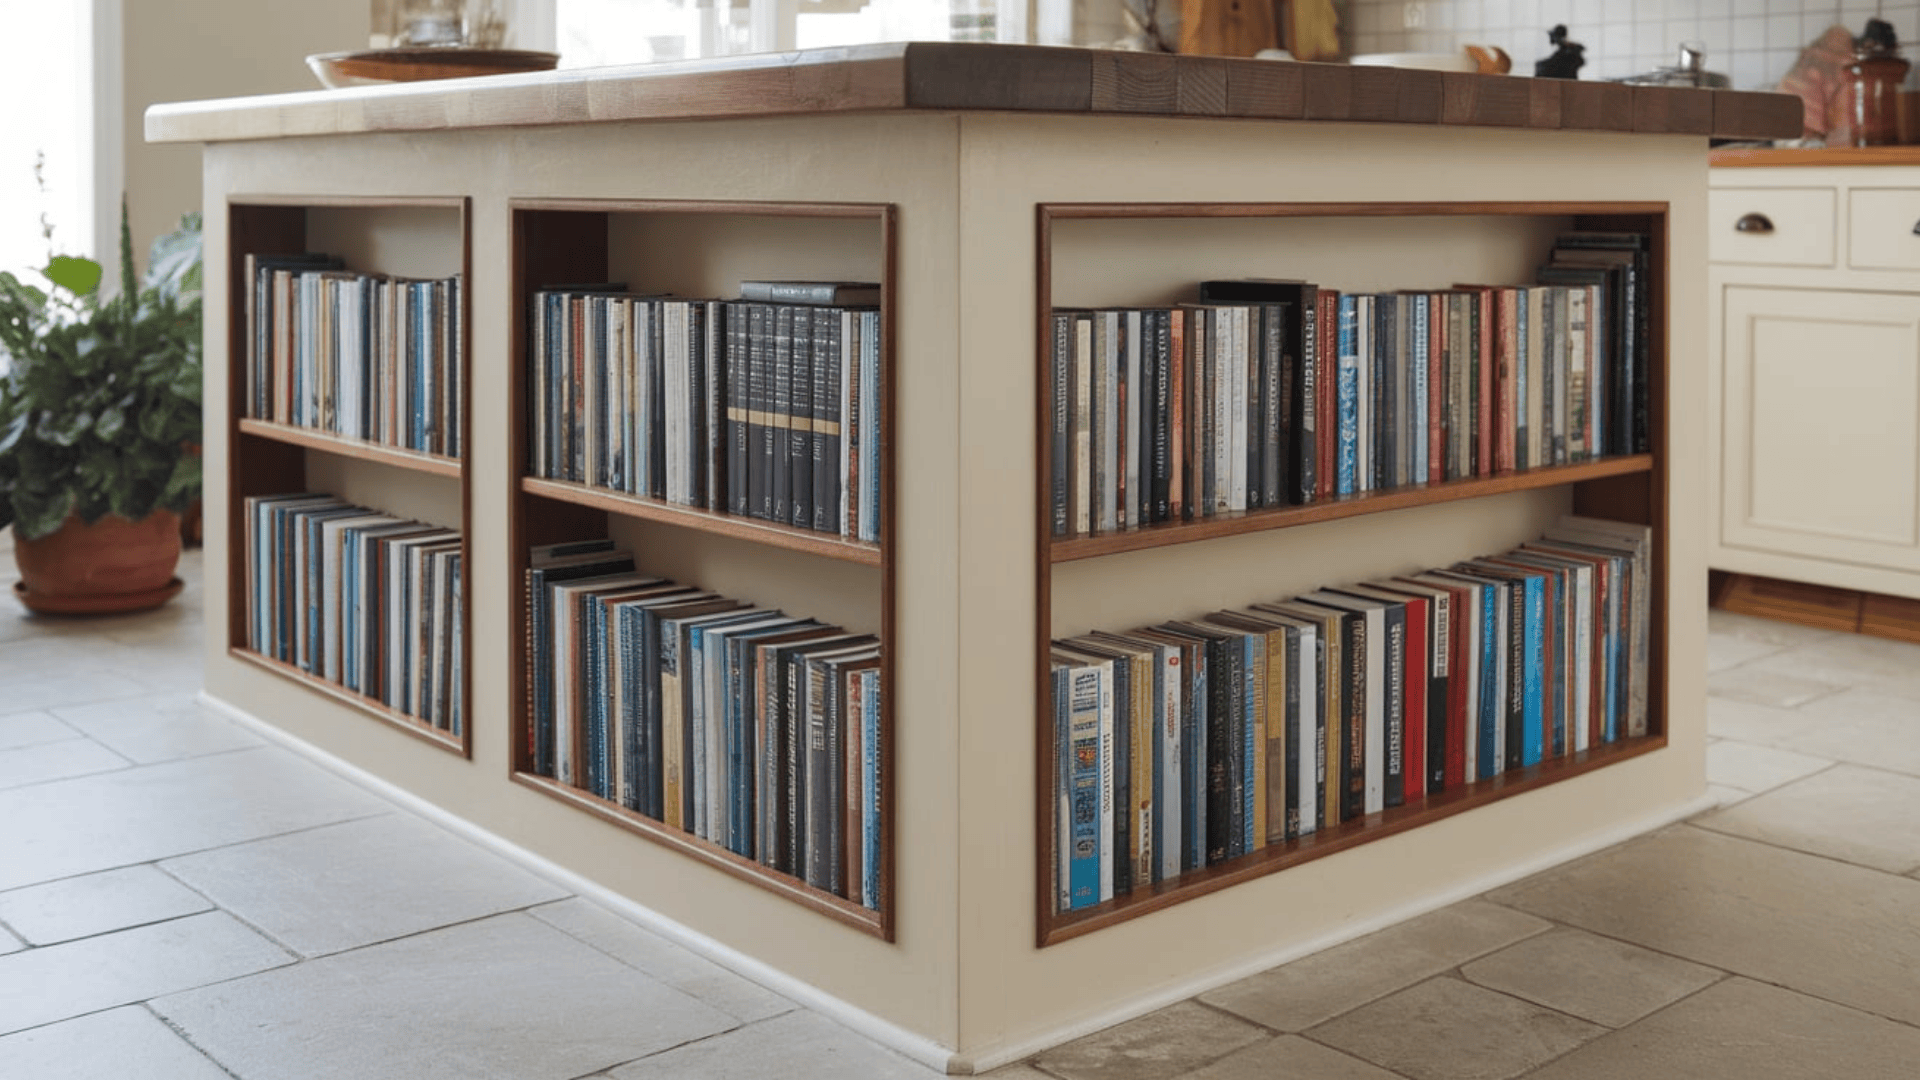
This island serves both style and storage by incorporating a recessed bookcase on one or both sides.
Start by building a standard island base, then frame a shallow nook using MDF or plywood.
Install vertical and horizontal dividers to create cubby-like shelves.
Paint or stain the shelf interior in a contrasting color to make the spines pop.
Materials:
- MDF or plywood
- Wood screws
- Paint or stain
- Optional LED light
21. Island Made of Recycled Gym Floors
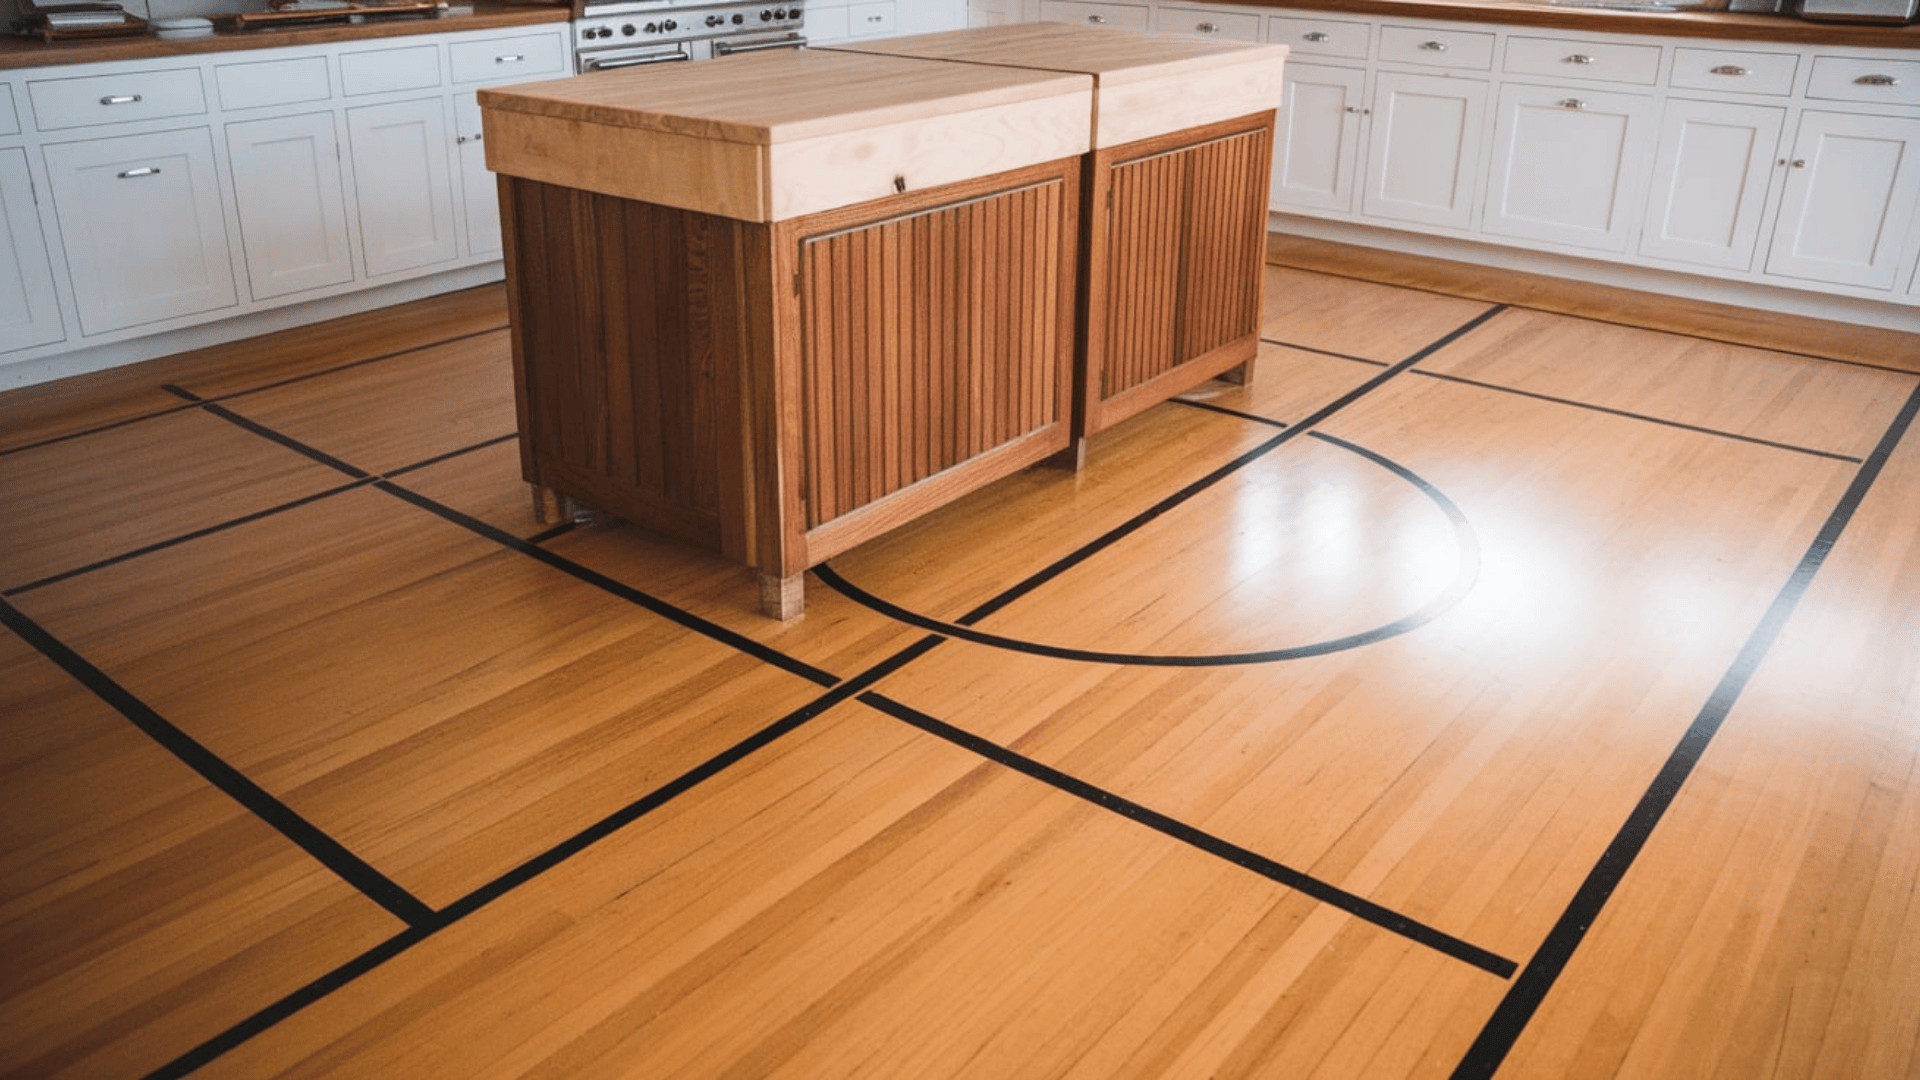
Old gym floors are made of hard maple and often come marked with court lines, giving your island a sporty, vintage aesthetic.
Locate salvaged gym flooring from a reclaimed lumber dealer.
Cut planks to size and assemble them into a butcher block top or side panels.
You can either preserve the colored lines for character or sand and refinish for a cleaner look.
Materials:
- Recycled gym floor planks
- Wood glue
- Polyurethane
22. Vintage Piano Island Conversion
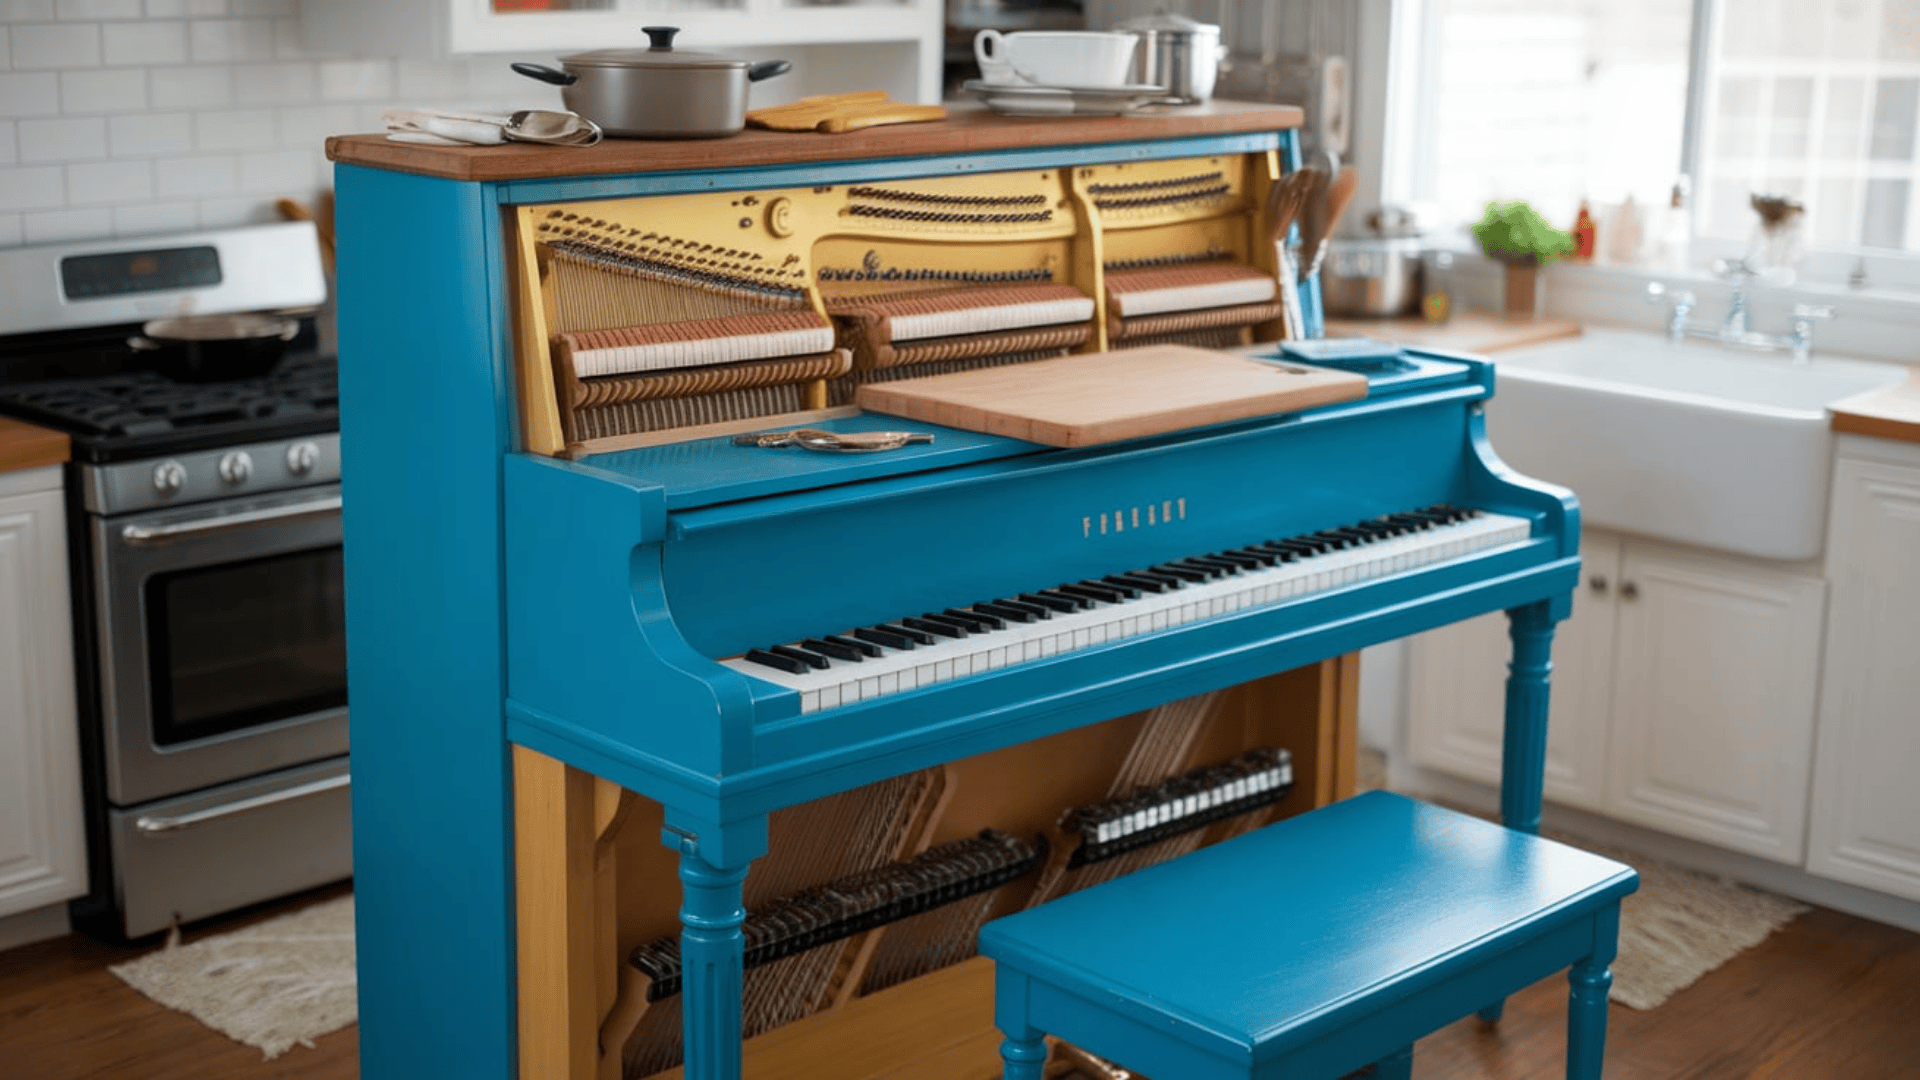
A dramatic and imaginative idea involves converting an old upright piano into a kitchen island.
First, remove the inner harp (the metal component), hammers, and keys.
Reinforce the frame with a steel bracket or inner wood shelf for stability.
Paint or refinish the piano body, preserving any decorative carvings.
Materials:
- Upright piano
- Support bracket
- Countertop, stain, or paint
23. Island with Hidden Beverage Cooler Drawer
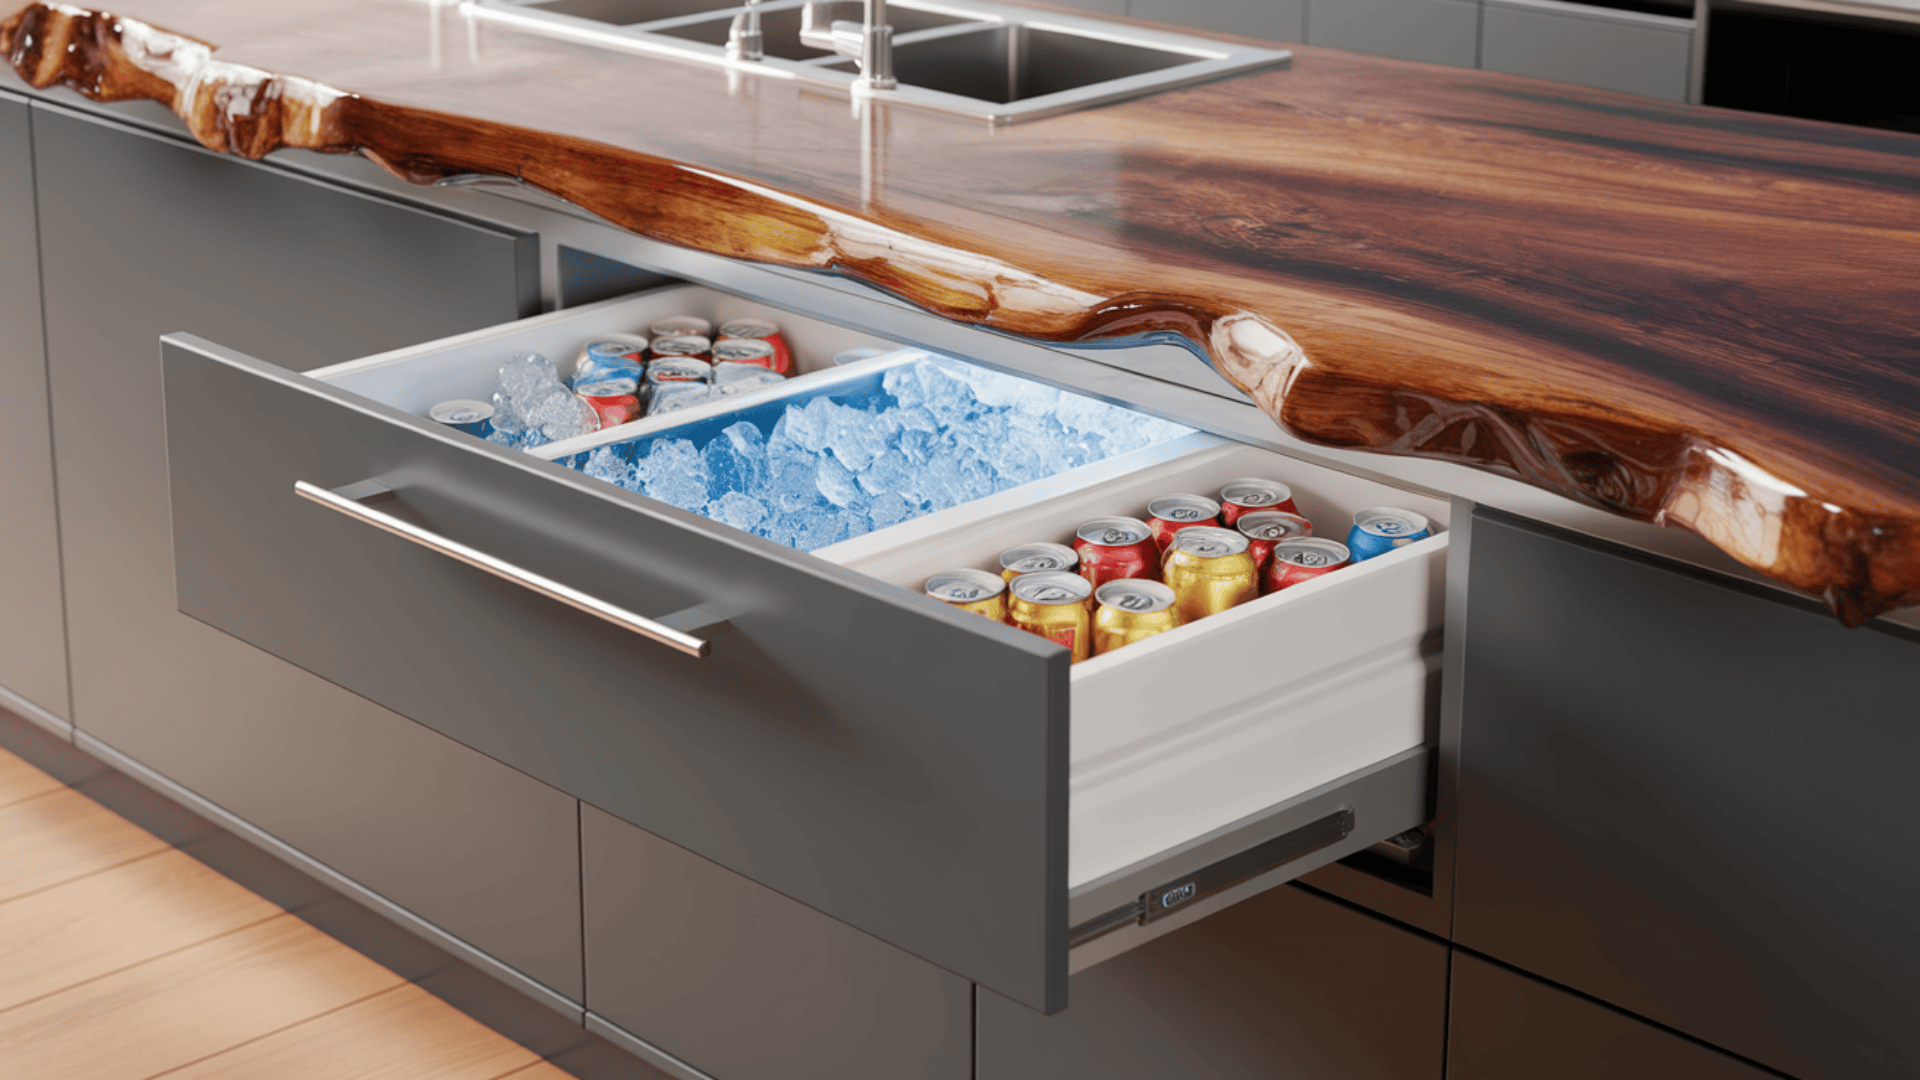
Turn part of your island into a secret drink cooler.
Build a deep drawer and add an insulated liner or cooler box inside.
You can keep cold drinks, cans, or even ice there.
The drawer slides out smoothly and tucks away when not in use.
Materials:
- Drawer base,
- Cooler insert or insulation board
- Metal glides
24. Angled Multi-Tier Island for Standing and Sitting
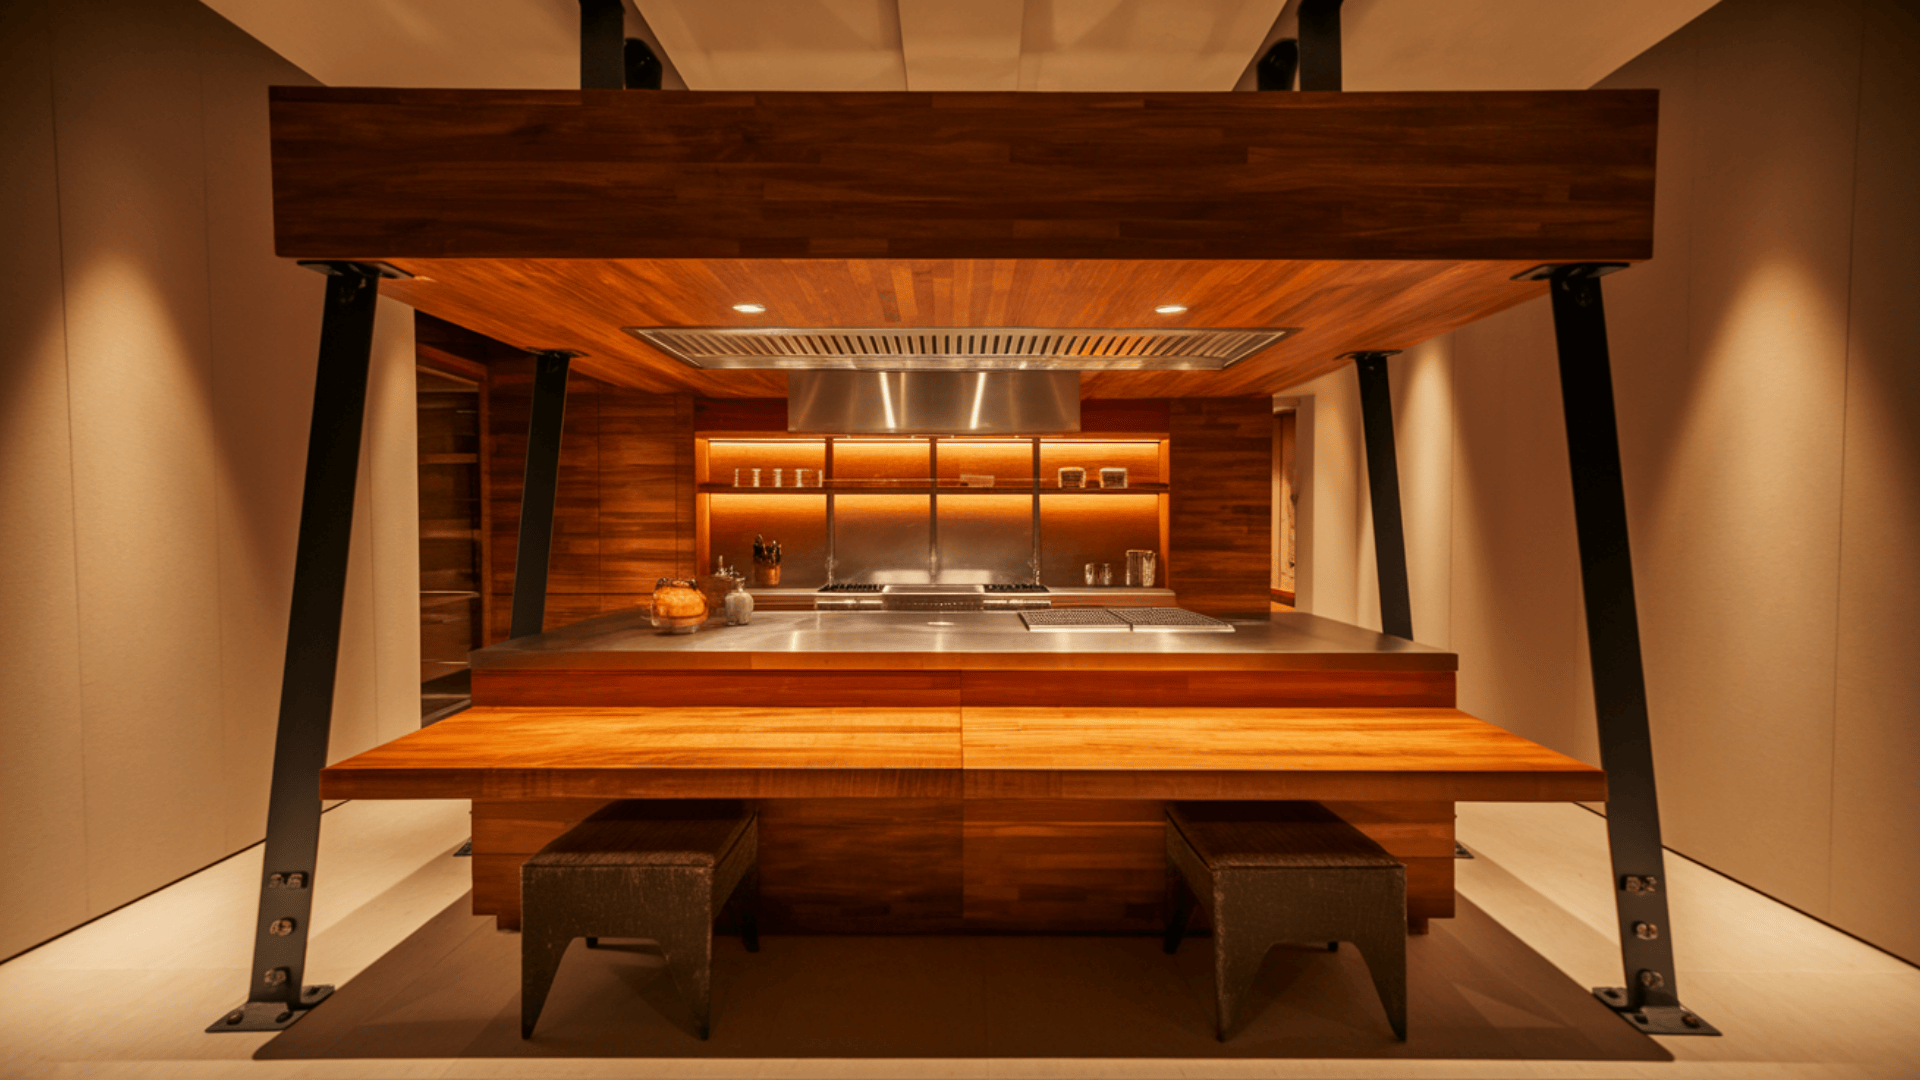
This island has two levels: one for cooking and one for eating.
The cooking section is taller, while the dining part is lower for seated use.
Build both parts with strong wood and use brackets to support the angles.
The top surfaces can be made from different materials to show their various uses.
Materials:
- Plywood frame
- Stone or wood slabs
- Brackets
25. Island Wrapped in Corrugated Tin
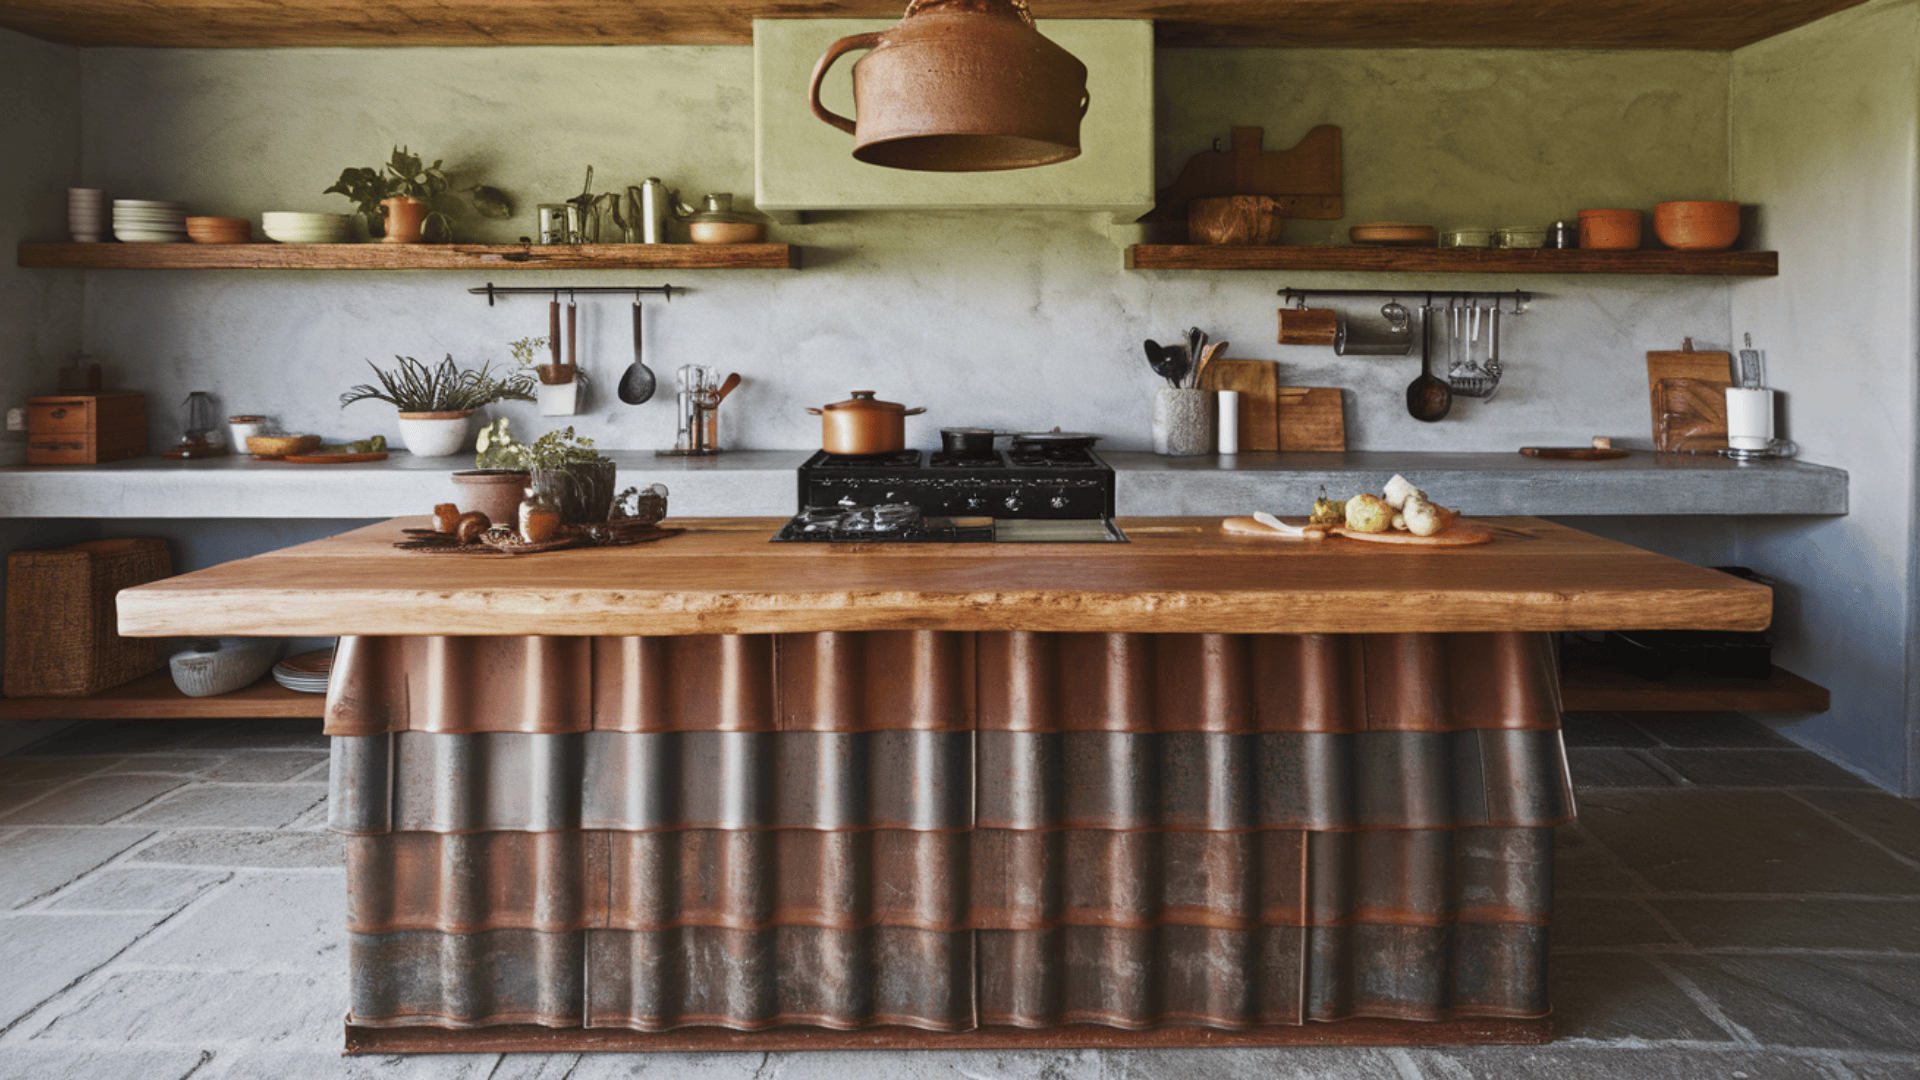
This design gives your kitchen a strong, bold look.
Wrap the outside of your island in tin roofing panels.
The wavy metal adds texture and works well in rustic or warehouse-style kitchens.
You can leave the metal shiny or paint it with rust-proof paint.
Use glue or screws to attach it.
Pair it with wood or concrete for a cool mix of materials.
Materials:
- Corrugated tin panels
- Screws
- Rust-proof paint
26. Island with Built-In Vertical Herb Dryer
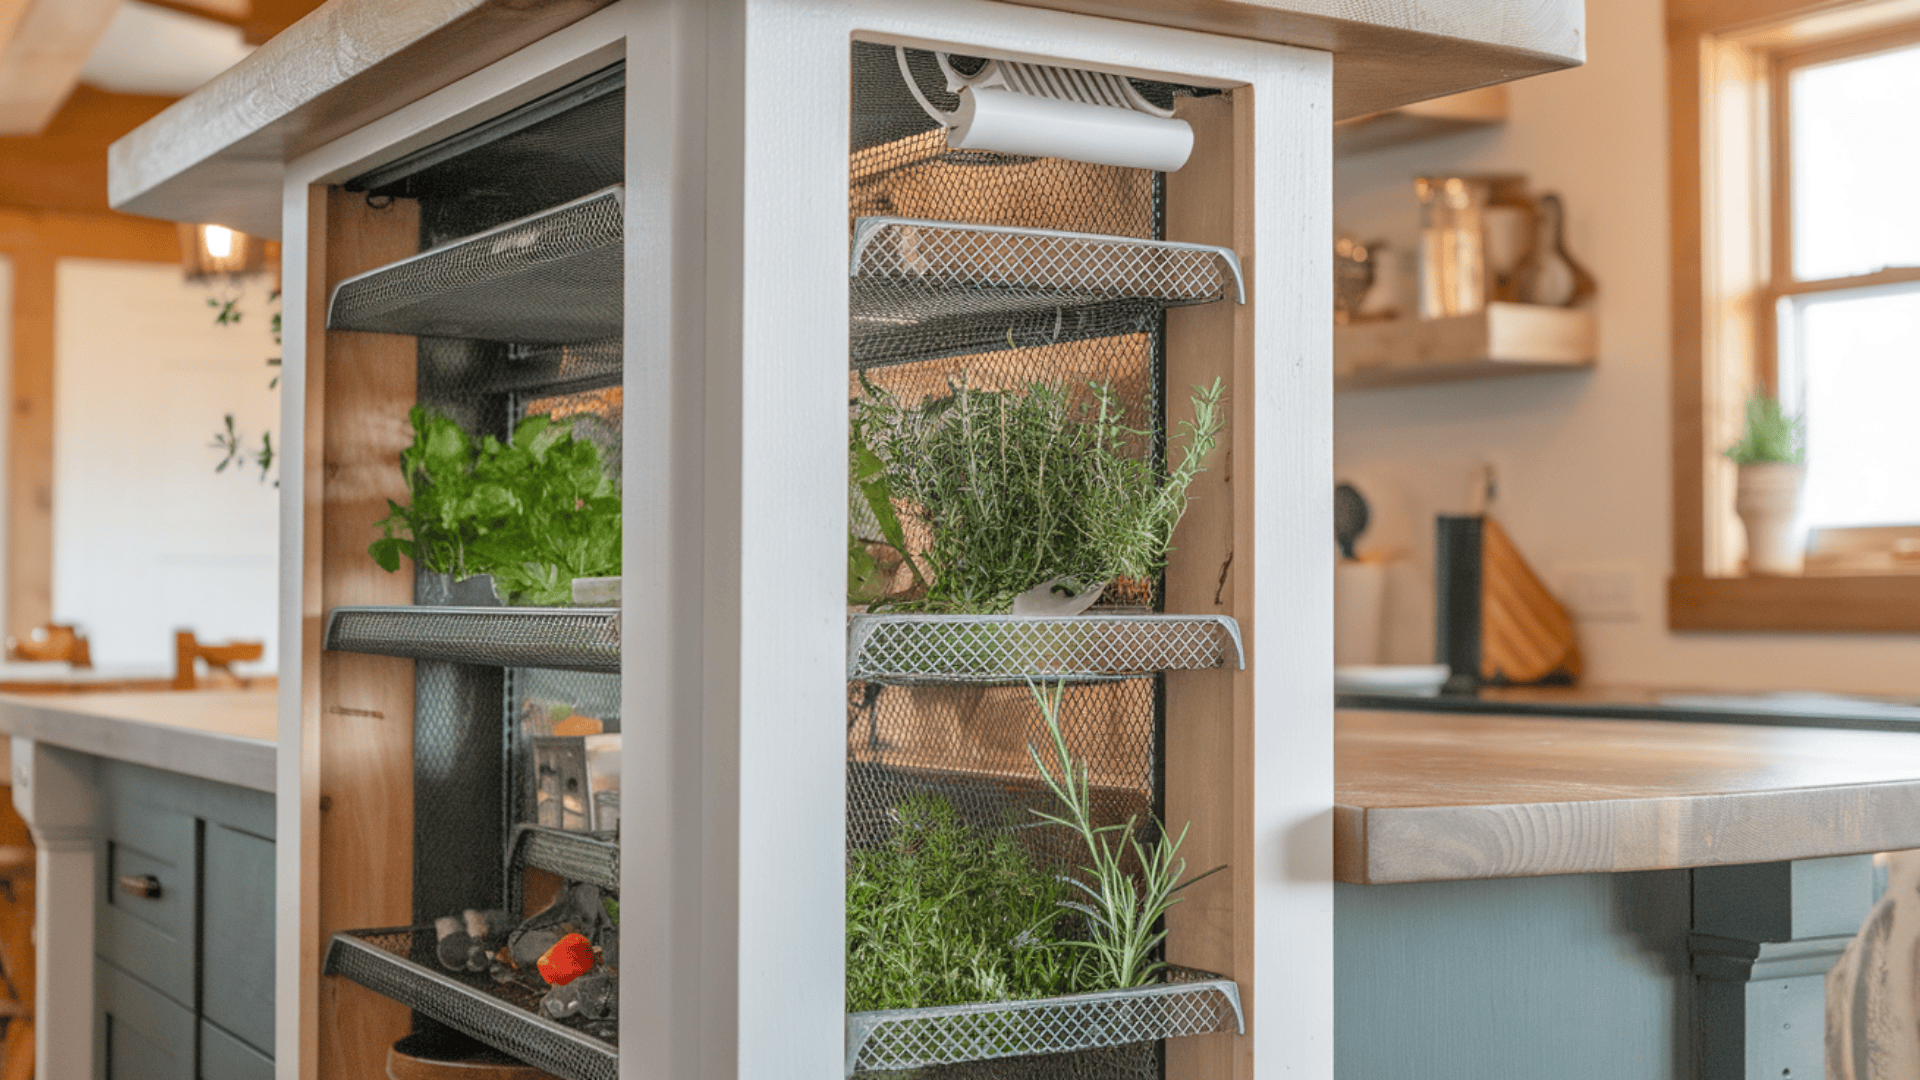
Dry herbs the old-fashioned way—right inside your kitchen island!
Add a tall, narrow space inside the island and fill it with mesh shelves or wire racks.
Use cedar or bamboo to help keep bugs and moisture away.
Herbs like thyme or rosemary can dry slowly here using kitchen airflow or a small fan.
Materials:
- Wire drawers
- Cedar boards
- Mesh screens
- Optional fan
27. Minimalist Island with Hidden Outlets in the Counter Lip
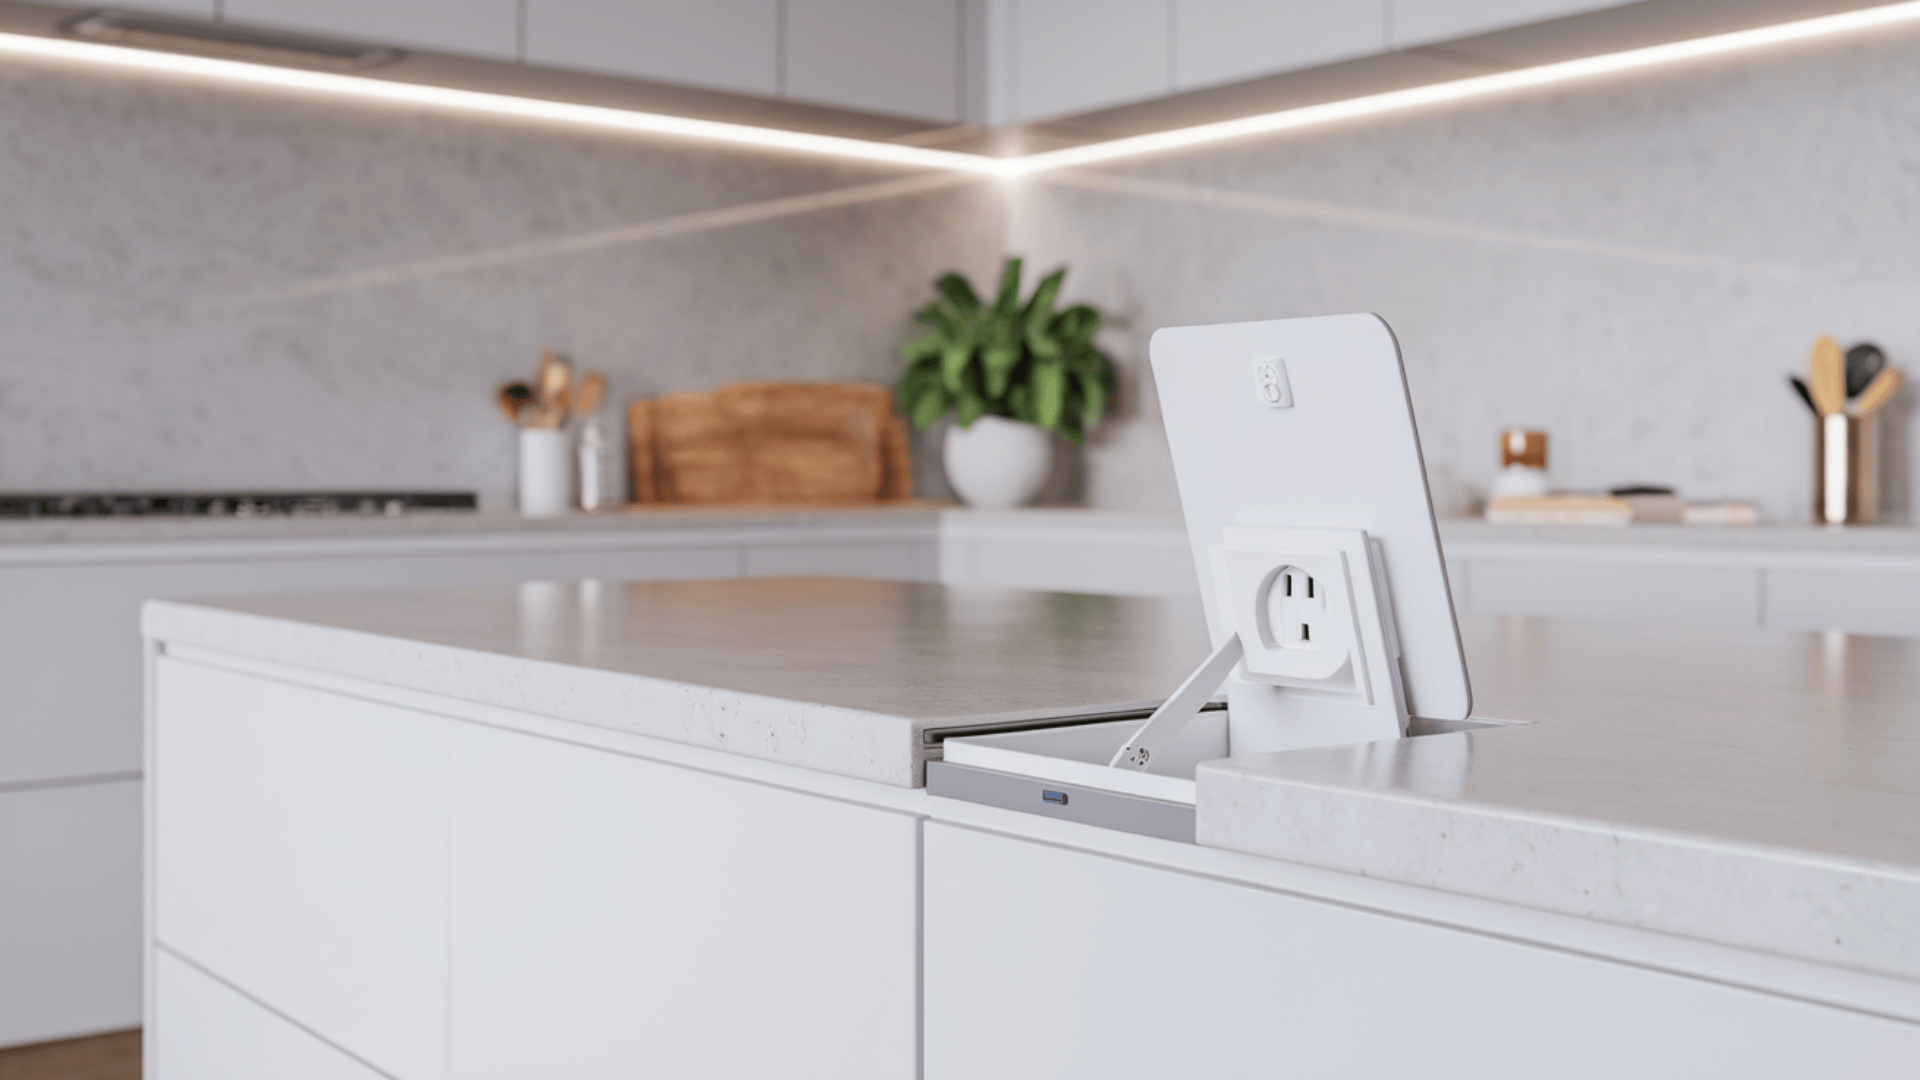
Keep your island looking neat by hiding outlets under the edge of the counter.
These flip-up or pop-out outlets sit inside the bottom lip of the surface and stay hidden when not in use.
Choose quartz or wood for the top, and make sure wiring is done safely.
This design is great for modern kitchens where style and use work together.
Materials:
- Flip-up outlet kit
- Quartz or wood counter
- Wiring
28. Island with Rotating Spice Tower Insert
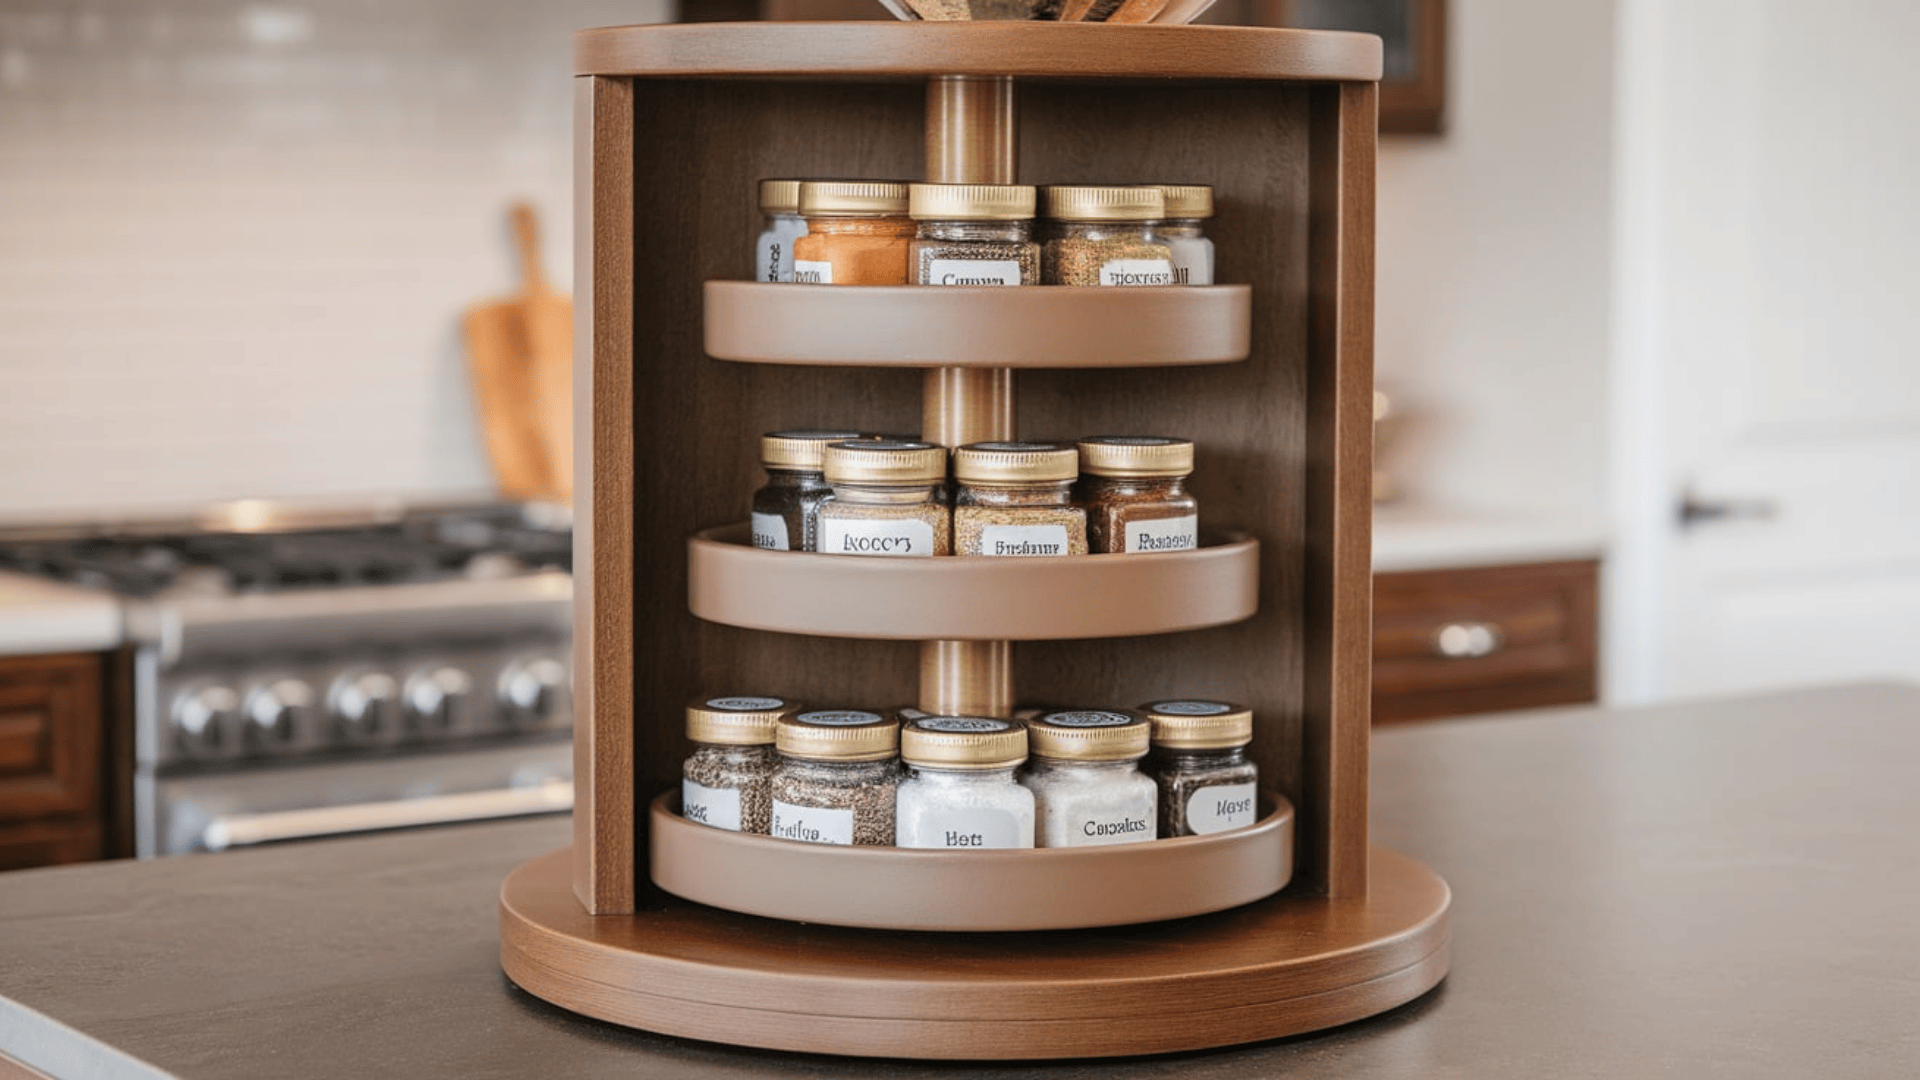
Create a tall, narrow cubby inside your island and install a lazy Susan base.
Attach a vertical dowel in the center and stack circular shelves around it for holding spice jars.
Label the jar tops so they’re easy to identify from above.
This design saves cabinet space, keeps spices organized, and looks cool.
Materials:
- Lazy Susan base
- Wood shelves
- Dowel
29. Island Wrapped in Denim Panels
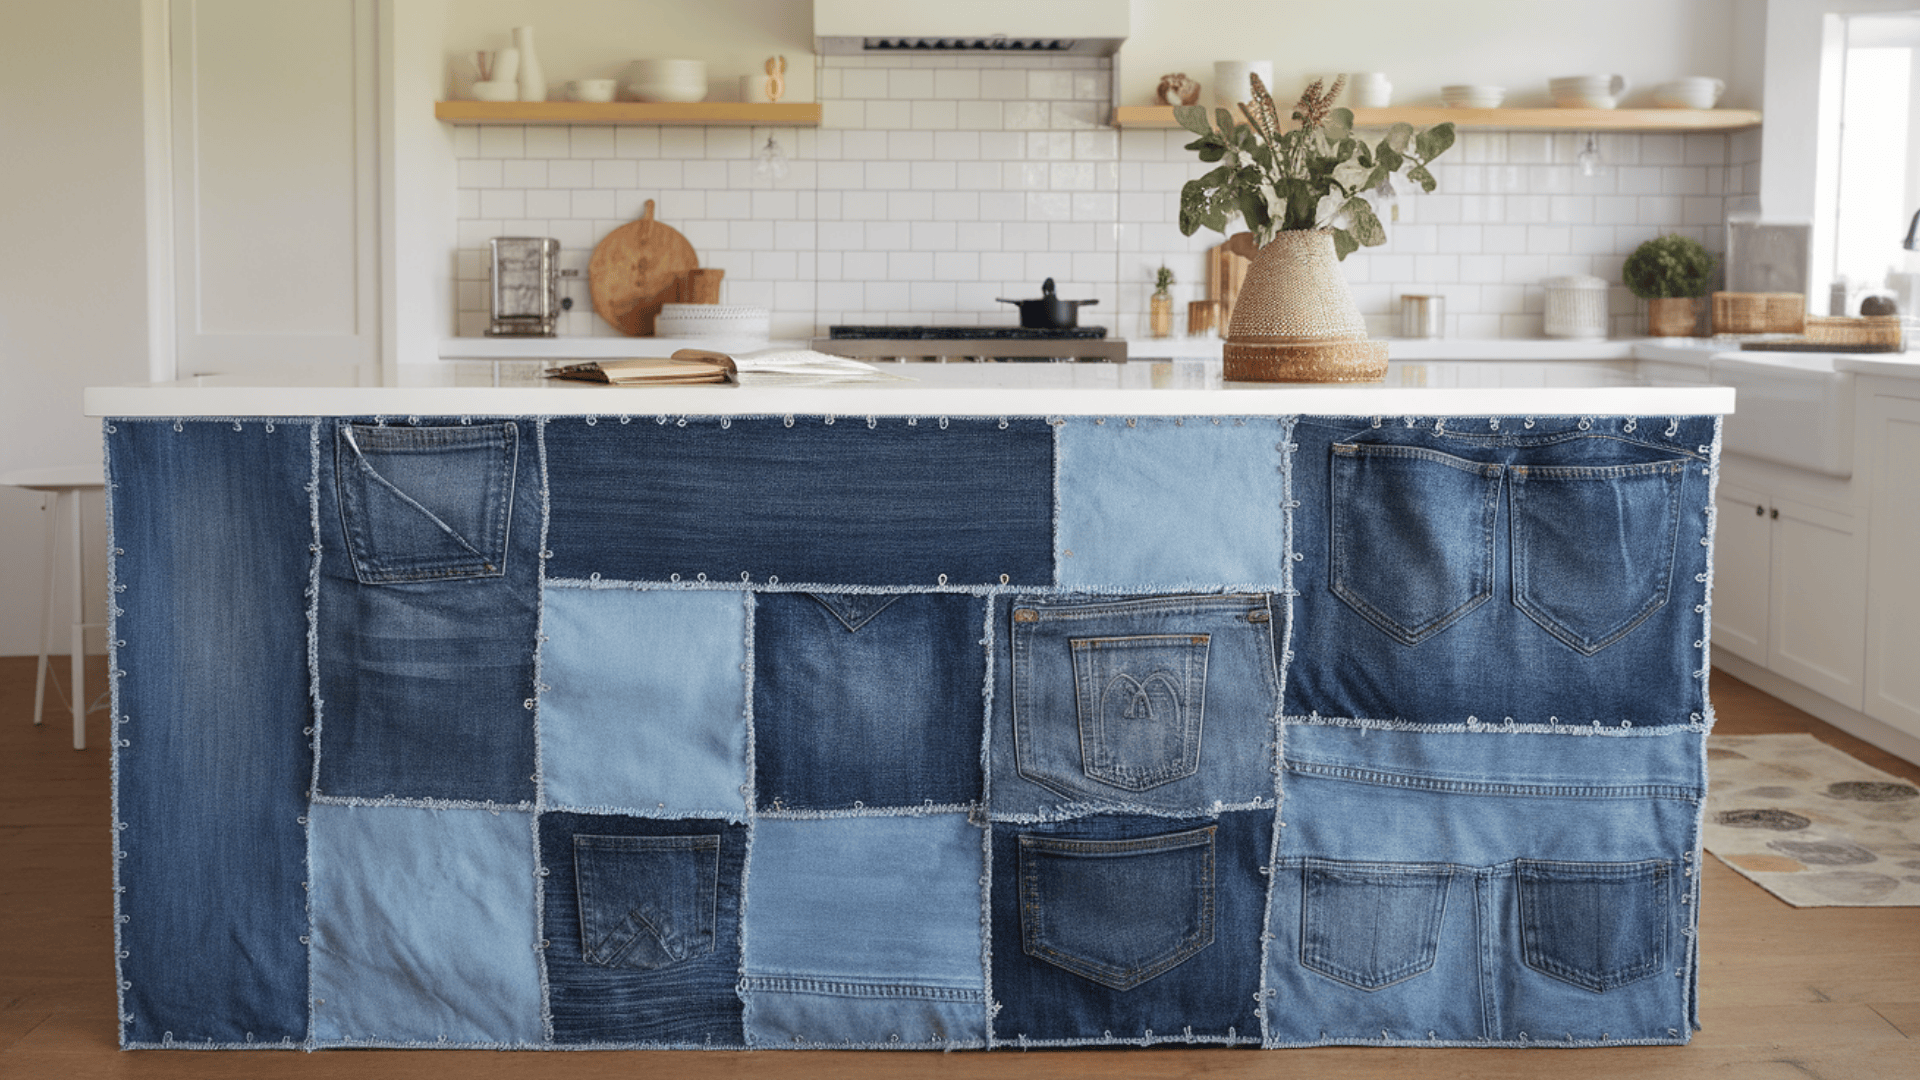
Give your island a relaxed, creative look by wrapping it in upcycled denim.
Collect old jeans and cut them into square or rectangular panels.
Glue or staple them onto MDF boards, then attach those to the island sides.
Use tacks or stitching for a patchwork feel.
This works well in homes that love casual, friendly design without spending a lot of money.
Materials:
- Denim fabric
- Adhesive
- Clear coat
30. Island Topped with Recycled Surfboard Resin Layers
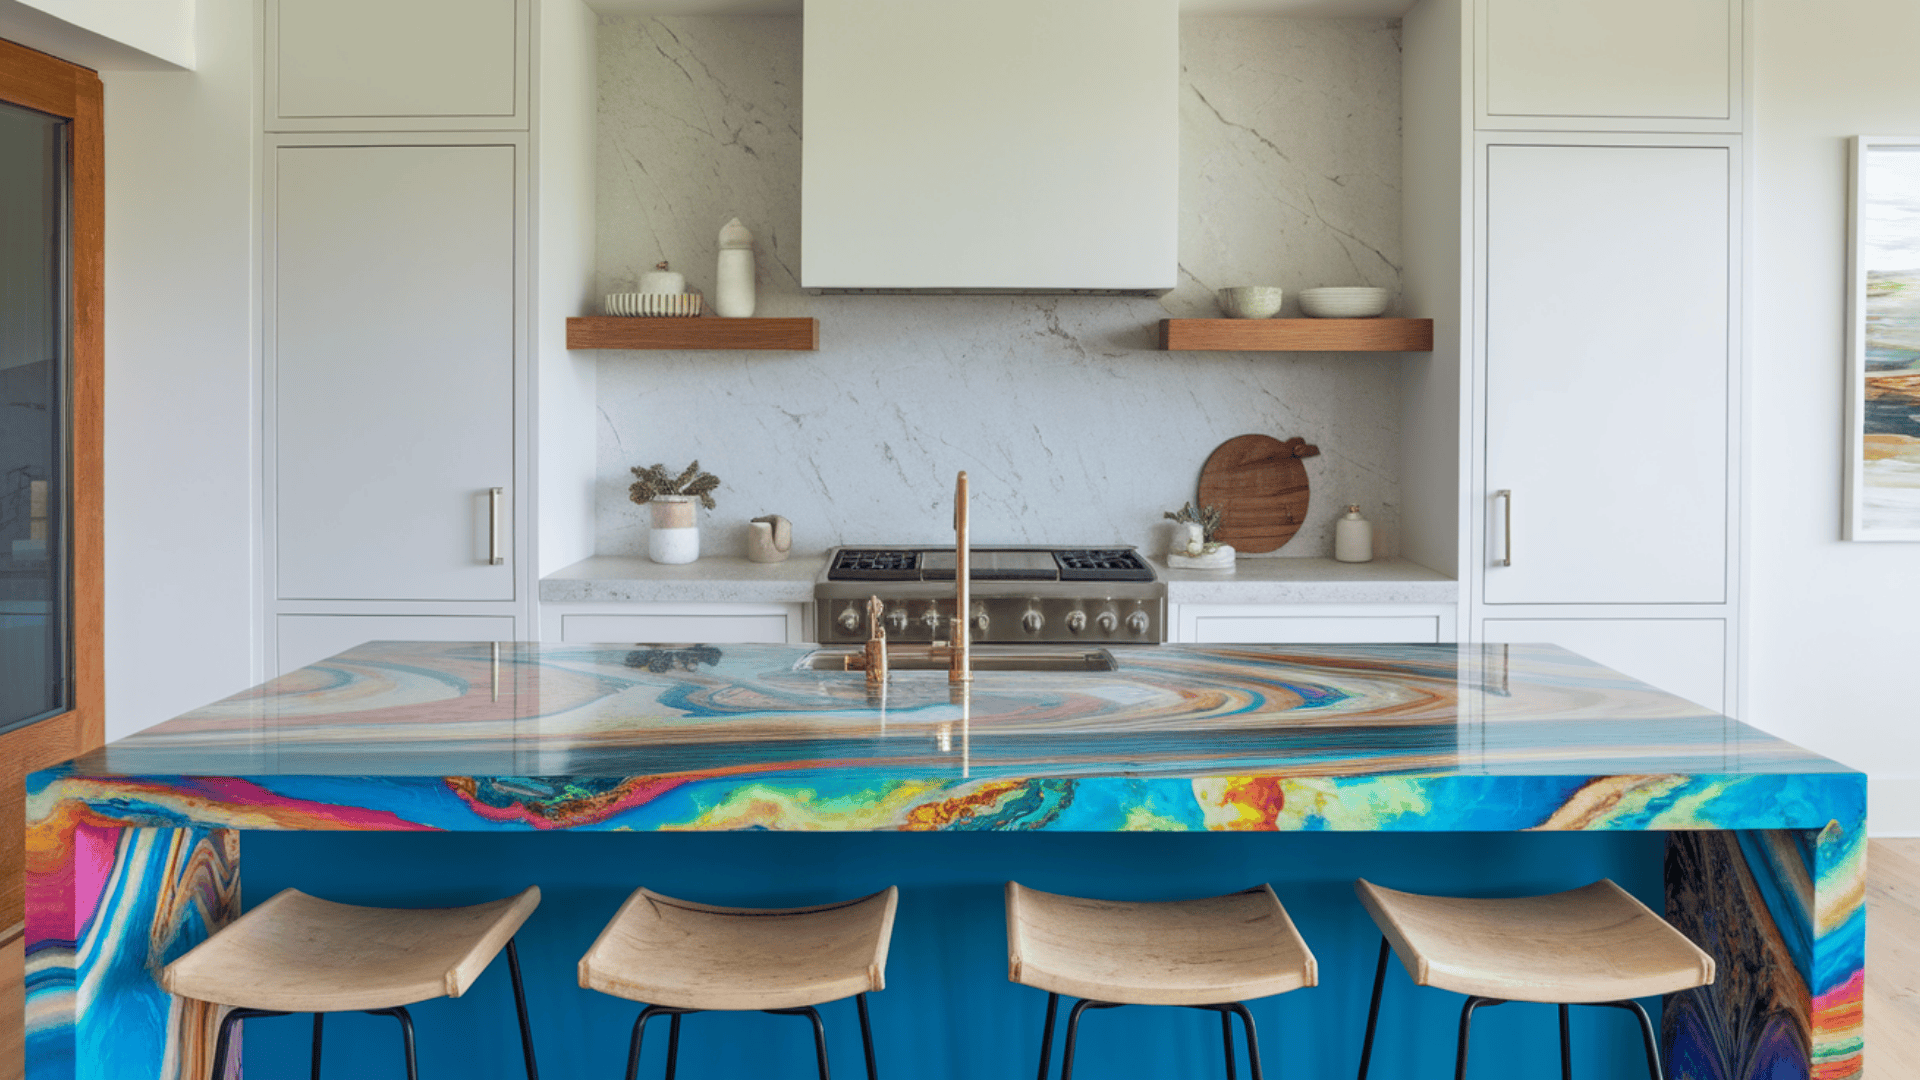
Craft an island countertop using layers of recycled surfboard resin, collected from shaping bays or surfboard makers.
Colorful resin drips—once discarded—are sliced into thin layers and fused with clear epoxy to create a psychedelic, durable surface.
The result is a vibrant, abstract swirl of ocean-inspired hues that’s both eye-catching and eco-conscious.
The base can be minimalist to let the top shine—use matte black steel or salvaged wood.
Materials:
- Surfboard resin waste
- Epoxy resin
- Sanding tools
- Clear sealant
- Steel or Wood island frame
Kitchen Island Ideas Was Just the Start, Here’s More!
This list has bold and clever ideas that go beyond the basics.
From recycled materials to hidden features, each design brings new use and style to your space.
If you’re into tech, upcycling, or handmade charm, there’s something here for every kitchen.
31. LED Mood Strip Edging
32. Hidden Induction Cooking Surface
33. Transparent Mini-Fridge Drawers
34. Motion-Activated Waste Compartment
35. Smart Herb Garden Integration
36. Modular Island with Sliding Components
37. Recycled Aluminum Island
38. Bio-Epoxy Finished Island Top
39. Upcycled Glass Shard Counter Island
40. Hempcrete Block Island Base
41. Cork-Clad Island Exterior
42. Recycled Skateboard Plank Island
43. Solar-Powered USB Island Station
44. Demolition Brick Base Island
45. Reclaimed Barnwood Island
46. Mughal Arch-Inspired Island Legs
47. Scandinavian Dry-Stacked Wood Island
48. Italian Marble Column Island
49. Mexican Talavera Tile Island
50. Turkish Copper-Clad Island
51. Steel Drum Repurposed Island
52. Concrete Waterfall Island with Built-in Sink
53. Upholstered Banquette Island
54. Resin and Wood River Island
55. Pegboard Storage Island
56. Curved Bamboo Panel Island
57. Chalkboard Panel Island for Notes and Recipes
58. Mosaic Broken China Island Top
59. Island Built from Vintage Suitcases
60. Magnetic Knife Strip Built Into Island Side
61. Island with Flip-Top Hidden Mixer Station
62. Floating Waterfall Island with Underglow Lighting
63. Island with Chalk Rail and Hanging Recipe Clips
64. Island with Integrated Dog Feeding Station
65. Rolling Trolley Island with Drop Leaf Extension
66. Island with Built-In Pizza Oven Shelf
67. Geometric Slatted Island Facade
68. Chalk Paint Island with Changeable Color Panels
69. Island with Vintage Icebox Drawers
70. Island with Fold-Out Ironing Station
71. Island Built from Shipping Crates
72. Island with Built-In Compost Chute
73. Island with Slide-In Dining Benches
74. Antique Door Panel Island
75. Hidden Step Stool Island
76. Barrel Base Island with Circular Stone Top
77. Island with Vertical Pull-Out Pantry Column
78. Tile Mosaic Island Front with Family Handprints
79. Island Made from Salvaged Street Signs
80. Upholstered Velvet Island Panels
81. Island Topped with Recycled Bottle Caps in Epoxy
82. Island With Rotating Lazy Susan Extension
83. Island Built From Old Bed Frames
84. Island with Built-In Pull-Out Bread Box
85. Island With Vinyl Record Shelf and Turntable Stand
86. Island with Hidden Pull-Out Trash Sorting Station
87. Island with Detachable Rolling Cart Insert
88. Island with Dry-Erase Panel for Kids
89. Sculptural Branch Leg Island
90. Island with Slide-Out Pastry Marble Board
91. Island with Hanging Pot Ladder Frame
92. Island with Quartz Crystal Inlay
93. Island with Concrete Brick Veneer Siding
94. Industrial Pipe Frame Island with Glass Top
95. Island with Oversized Drawer for Pet Beds or Toy Storage
96. Island with Puzzle Piece Countertop
97. Island with Hanging Lantern Storage
98. Island with Built-In Towel Warmer
99. Island with Built-In Manual Crank Pasta Roller Station
Final Thoughts
A kitchen island can be more than just a surface; it can showcase your creativity and smartly meet your needs.
These ideas prove that with some planning and the right tools, any island can become useful and fun.
From smart tech and storage tricks to pieces made from boats or gym floors, there’s no limit to what you can build.
Many of these projects use recycled or natural materials, which helps the environment too.
Some can be built in a weekend, while others may take more time, but all offer lasting use.
Think about what matters most in your kitchen: easy access, better storage, fun style, or extra seating.
Then pick an idea that fits your space and start building.
A kitchen island can be the heart of the room, where meals are made and people gather.
Let it match both your needs and your style. Here’s to a home that feels like you.
Looking for more home improvement guides? Check out our related articles:

