
Want to make your basement look better without spending too much money? Painting your basement ceiling is a great way to update your space and hide those pipes and wires.
This guide will show you exactly how to do it, even if you’ve zero experience in ceiling painting.
Many homeowners think basement ceilings are hard to work with because of all the exposed pipes, ducts, and wires.
But with the right paint and tools, you can turn that messy ceiling into something that looks clean and finished. The best part? It costs way less than putting in a drop ceiling or drywall.
In this step-by-step guide, I’ll share everything I’ve learned about painting basement ceilings, from doing it myself to helping others.
You’ll know which colors work best, what tools you need, and simple tricks to make the job easier. Ready to transform your basement ceiling? Let’s get started!
Choosing the Right Paint Color for Your Basement Ceiling

Choosing the right paint color for your basement ceiling can significantly impact the space’s overall look and feel.
Lighter shades, like white or soft gray, create an open and airy feel, making low ceilings appear higher. Darker tones, such as black or charcoal, can add depth and hide exposed pipes and ducts for an industrial look.
Consider your lighting and basement design to find the best color for your space. Here are some ideas related to the same.
1. Black Ceiling: A Bold and Stylish Choice

Painting your basement ceiling black can create a dramatic, modern, and visually cohesive look. This color is excellent for hiding exposed pipes, ducts, and imperfections while adding depth to the space.
A black ceiling works particularly well in basements with industrial or contemporary designs, making the room feel sleek and polished.
However, since dark colors can absorb light, it’s essential to incorporate adequate lighting to prevent the space from feeling too dim or closed in.
If done right, a black ceiling can enhance the aesthetic appeal of your basement while maintaining a functional and stylish appearance.
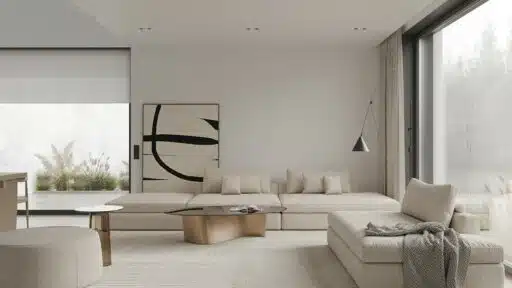
2. White Ceiling: A Bright and Open Feel

A white-painted basement ceiling is a great choice for making the space feel larger, brighter, and more inviting.
It reflects light effectively, helping to maximize both natural and artificial lighting, which is especially beneficial in basements with limited windows.
White also creates a clean and polished look while keeping the ceiling from feeling too heavy or overwhelming.
Additionally, it works well with various design styles, from modern to traditional, allowing for greater flexibility in décor choices.
A white ceiling is a practical and visually appealing option if you want to maintain an open and airy atmosphere in your basement.
3. Other Color Options for Your Basement Ceiling

While black and white are the most popular choices, other colors can enhance your basement ceiling based on the desired ambiance.
Gray is a versatile option that balances brightness and depth, offering a modern yet subtle look. Darker shades like navy or deep green add a bold, complete touch without being as stark as black.
Lighter tones like beige or soft blue can create a warm and inviting feel while maintaining an open atmosphere.
If you want to add personality, consider muted earth tones or even a pop of color that complements your basement’s overall design.
The right color choice can help define the space while blending seamlessly with your décor.
4. Lighting Considerations

The right lighting is crucial when painting your basement ceiling, as it affects both the ambiance and functionality of the space.
Light-colored ceilings, like white or soft gray, reflect light well, making the area more open and bright. In contrast, darker ceilings, such as black or deep colors, absorb light, requiring additional fixtures to maintain proper illumination.
Recessed lighting, track lighting, or LED strips can help enhance visibility while complementing the ceiling color.
If using a dark ceiling, consider warm or dimmable lighting to prevent the space from feeling too harsh.
Proper lighting placement ensures a balanced, well-lit basement, enhancing aesthetics and practicality.
Tools and Materials Needed

Getting the right tools ready before painting your basement ceiling makes a huge difference. Think of it like cooking—you want all your ingredients measured and prepared before you start!
You’ll need basic painting supplies, safety gear to protect yourself, and materials to clean your floors and walls.
While some tools might seem expensive initially, I’ll show you where you can save money without cutting corners on quality.
I’ve painted several basement ceilings, and through trial and error, I’ve figured out what’s worth spending on and what’s not. Here’s a complete list of everything you’ll need, from the must-haves to money-saving alternatives.
Essential Safety Equipment
Before you get ready to start painting your ceiling, make sure you have this equipment first. These are important as paint chemicals can harm your skin. These are some of the important equipment:
- N95 mask
- Safety goggles
- Protective coveralls or old clothes
- Disposable gloves (box)
Basic Tools
When painting a basement ceiling, having the right basic tools can make the process smoother and more efficient.
From the cleanup application, the right equipment ensures even coverage and minimizes mess. Here are some essential tools to get started
| ITEM | PRICE RANGE ($) |
|---|---|
| Paint roller frame | $5-8 |
| Extension pole | $15-20 |
| Paint roller covers (3-pack) | $10-15 |
| 3-inch paintbrush | $10-18 |
| Paint tray | $5 |
| Paint tray liners (5-pack) | $5-10 |
| Drop cloths (2-pack) | $15-30 |
| Painters tape | $5-10 |
| Step ladder | $30-80 |
| Utility light | $15-30 |
| Flat latex ceiling paint (per gallon) | $25-40 |
| Paint for 500 sq ft (2-3 gallons total cost) | $50-105 |
| Paint mixer stick | Free at store |
| Total Cost | $240-400 |
Money-Saving Options
Here are some options to save money and complete your painting.
- Skip extension pole, use standard rollers – Save $15
- Use disposable brushes – Save $8
- Basic safety glasses instead of goggles – Save $10
- Rent paint sprayer instead of roller – $50/day
- Use old sheets instead of drop cloths – Save $15
Paint Brand Options
When choosing a ceiling paint, several options cater to different budgets and performance needs. Benjamin Moore Ceiling Paint delivers exceptional quality and durability for a premium finish.
If you’re looking for a balanced option, Sherwin-Williams ProMar offers reliable coverage and ease of application at a mid-range price.
The Valspar 2000 Series provides effective results for budget-conscious projects without breaking the bank.
Each option is designed to meet specific requirements, ensuring you can select the right product that combines quality, value, and performance for your space.
One gallon of paint covers about 400 square feet. For textured surfaces, adding an extra 20% to your coverage estimates is wise.
Additionally, plan to apply at least two coats to ensure even coverage and lasting durability.
Preparing the Basement Ceiling for Painting

Before you crack open that paint can, proper prep work is crucial. Start by thoroughly cleaning your ceiling.
I like using a broom followed by a shop vac to eliminate dust, cobwebs, and debris hiding there. Next, take some time to organize those electrical wires and plumbing pipes.
You might want to staple loose wires close to the joists for a cleaner look. If you’ve got exposed insulation, consider covering it with Thermo Pan panels – they’ll give you a smoother surface to paint.
Don’t forget to protect your floors and walls! I learned that paint drips are no fun to clean up later.
A Step-by-Step Guide to Painting the Basement Ceiling
Step 1: Clear the Basement Space

- Move or Cover Furniture – Since painting the ceiling can get messy, move all furniture out of the way or cover it with plastic sheets or drop cloths.
- Protect Walls and Floors – Use painter’s tape and plastic sheeting to cover the walls if you don’t want any accidental paint splatters. Lay down a tarp or drop cloth on the floor.
- Ensure Proper Ventilation – Open windows and doors or use fans to keep fresh air circulating while you work.
Precaution: Even if you’re using a paint sprayer, paint can drift, so ensure everything is properly covered to prevent unwanted stains.
Step 2: Wear Protective Gear

- Respirator Mask – Prevent inhaling paint fumes and dust particles by wearing a high-quality respirator or N95 mask.P2 masks are also a good alternative to N95 masks.
- Safety Goggles – Protect your eyes from paint drips, especially when painting overhead.
- Full-Body Coveralls or Old Clothes – Paint will drip, so wear a disposable coverall or old clothes that you don’t mind getting stained.
- Gloves and Head Covering – Gloves keep your hands clean, and a hat or bandana prevents paint from getting into your hair.
Precaution: Never skip the respirator—paint fumes, especially in enclosed spaces, can cause dizziness or irritation.
Step 3: Set Up the Paint Sprayer or Brushes

- Choose the Right Sprayer Settings – If using a paint sprayer, adjust it according to the paint type and ensure it sprays evenly. Test on a piece of cardboard first.
- If Using a Brush/Roller – Use a high-quality roller with an extension pole for larger areas and an angled brush for tight corners and details.
- Thin the Paint if Necessary – Some sprayers work best with slightly thinned paint. Follow the manufacturer’s instructions to determine if this is needed.
Precaution: Always test your sprayer before starting to avoid uneven application or clogging issues.
Step 4: Apply Primer to the Ceiling

- Use a Paint Sprayer for Best Coverage – A sprayer ensures an even coat, especially in hard-to-reach areas like joists and around pipes.
- Choose the Right Primer – Use a stain-blocking primer if your ceiling has water stains or discoloration.
- Let the Primer Dry Completely – Follow the recommended drying time on the primer can before applying the topcoat.
Precaution: Skipping primer can lead to uneven paint absorption, requiring extra coats later.
Step 5: Start Painting the Ceiling

- Work in Sections – Divide the ceiling into sections and paint in a systematic order to avoid missing any spots.
- Apply the First Coat Evenly – Spray or roll in one direction for uniform coverage.
- Wait for the First Coat to Dry – Follow the manufacturer’s drying time before applying a second coat.
Precaution: Avoid over-spraying in one area to prevent drips and an uneven finish.
Step 6: Apply the Second Coat for Full Coverage

- Paint in the Opposite Direction – If the first coat was applied front to back, apply the second coat left to right for even coverage.
- Touch Up Missed Spots – Use a small brush or roller to fill in areas the sprayer or first coat may have missed.
- Check for Uneven Areas – Step back and inspect the ceiling under different lighting to ensure a consistent finish.
Precaution: Overlapping too much can create buildup in some areas, leading to an inconsistent texture.
Step 7: Let the Paint Cure Before Removing Covers

- Wait the Recommended Curing Time: Even if the paint feels dry to the touch, allow at least 24-48 hours for it to fully cure.
- Avoid Touching the Ceiling: Refrain from moving furniture back in place until the paint is fully set to prevent accidental smudging.
- Remove Protective Coverings Carefully: Slowly remove painter’s tape and plastic sheets to avoid pulling off any dried paint.
Precaution: Rushing this step can lead to smudging, which might require touch-ups.
Step 8: Install or Adjust Lighting

- Choose the Right Fixtures – Select pendant lights, track lighting, or recessed can lights depending on the ceiling height and basement use.
- Adjust Placement for Maximum Illumination – Black ceilings absorb light, so ensure adequate fixture placement if using dark paint.
- Test the Lighting Effect – Turn on the lights and check for unpainted spots that may need a final touch-up.
Precaution: Ensure all electrical work is done safely—if unsure, consult an electrician.
Step 9: Final Inspection and Cleanup

- Check for Any Missed Spots – Look at the ceiling from different angles and under varied lighting to identify any touch-ups needed.
- Store Leftover Paint Properly – Seal paint cans tightly for future touch-ups and store them in a dry, cool place.
- Dispose of Materials Safely – Dispose of used drop cloths, empty cans, and paint-stained rags according to local regulations.
Precaution: Always have extra paint for minor touch-ups, as ceilings can get scuffed over time.
Watch How It’s Done: Painting Basement Ceiling
For more information, check out this video tutorial by Golden Key Design
Common Mistakes To Avoid
When painting a basement ceiling, several pitfalls can affect the final results and make the job harder than necessary. Understanding these common errors before starting can save you time, money, and the frustration of having to redo your work.
Here are the key mistakes to watch out for when tackling this home improvement project.
- Skipping Proper Cleaning: Dust and cobwebs can prevent paint from adhering properly. Always clean the ceiling thoroughly before starting.
- Not Wearing a Respirator: Paint fumes and dust from an exposed ceiling can be harmful. A respirator is essential for safety.
- Using the Wrong Paint Type: Glossy paint highlights imperfections. Use flat or matte ceiling paint for the best results.
- Applying Too Much Paint at Once: Heavy coats can cause drips and uneven coverage. Apply multiple thin layers instead.
- Ignoring the Importance of Primer: Skipping primer leads to excessive paint absorption, requiring more coats. Always prime first.
Pros and Cons of Painting a Basement Ceiling
| Pros | Cons |
| Cost-Effective Alternative: Painting is significantly cheaper than installing drywall or a drop ceiling while achieving a polished look. | No Sound Insulation:Without drywall or ceiling panels, noise from the floor above can be more noticeable in the basement. |
| Maintains Ceiling Height: Unlike drywall or suspended ceilings, paint keeps the full height of your basement intact, making the space feel more open. | Time-Consuming Process: Prepping, priming, and painting require significant time and effort, especially when working around pipes and joists. |
| Easy Access to Utilities:An exposed and painted ceiling allows quick access to pipes, ducts, and wiring for future maintenance or repairs. | Potential for Paint Drips and Overspray: Even with careful preparation, paint can easily drip onto walls, floors, or furniture, requiring extensive cleanup. |
Maintenance and Long-Term Considerations

A painted basement ceiling can enhance the look of your space, but maintaining it properly ensures long-term durability and a fresh appearance.
Follow these simple maintenance steps to keep your ceiling looking its best.
- Regular Dusting: Keep your basement ceiling clean by regularly removing dust and cobwebs with a microfiber duster or vacuum with a brush attachment. This simple maintenance step prevents dirt buildup and maintains the paint’s appearance.
- Touch-Up Paint: Store extra paint from your initial project in a sealed container, labeled with the color and finish. Having this on hand makes it easy to quickly cover any scuffs or minor peeling that may occur over time.
- Monitor for Moisture: Regularly inspect your basement ceiling for signs of water damage or condensation, and use a dehumidifier to control moisture levels. This proactive approach helps prevent paint damage and potential mold issues.
- Inspect for Cracks or Chipping: Check your ceiling periodically for any signs of paint peeling or cracking. Addressing these issues early can prevent them from spreading and requiring more extensive repairs later.
- Maintain Proper Ventilation: Ensure your basement has adequate air circulation and ventilation to control humidity levels. Good airflow helps protect your painted ceiling from moisture-related problems and extends its lifespan.
Quick Tip: Add stencils or patterns to painted ceilings for a unique touch. If sound insulation is an issue, install acoustic panels while keeping the exposed ceiling look.
Wrapping It Up!
Congratulations! Your basement ceiling is beautifully painted, giving your space a fresh, updated look. This DIY project enhances the style of your basement, saves you money, and keeps the ceiling at full height.
Whether you chose black for a modern touch, white for brightness, or another unique shade, your hard work has paid off!
If you’re considering more home improvements, remember that the key is preparation, patience, and the right tools. Painting a basement ceiling may seem daunting initially, but as you’ve seen, it’s completely doable—even for beginners!
So, take pride in your work, enjoy your transformed space, and don’t hesitate to tackle your next home project with confidence.
Your basement is now a stylish, functional extension of your home—ready for whatever you envision next!

Tommy Hardy, an alumnus of the Georgia Institute of Technology with a degree in Mechanical Engineering, has been a go-to figure in residential upkeep and innovation for over 18 years. His career commenced in a leading home appliance manufacturing company, where he mastered the intricacies of household systems. Joining our platform in 2020, Tommy quickly became a reader favorite for his practical and easy-to-follow guides. He took the helm of our DIY section in 2019, consistently delivering content that empowers homeowners. Beyond his professional pursuits, Tommy is a passionate gardener and enjoys woodworking, skills enhancing his hands-on approach to home care.