Parties feel more meaningful when the decorations reflect care rather than cost.
DIY party decorations are budget-friendly ways to personalize celebrations, using simple materials like paper, balloons, and fabric to create a festive setting at home.
From handmade banners to playful backdrops and table accents, small details can quietly shape the mood of the entire event.
These decorations do not require special tools or advanced skills, only a bit of planning and creativity.
Some ideas work best for walls, others for tables or entryways, each adding its own charm.
The ideas ahead focus on easy projects that feel thoughtful, creative, and well put together without stretching the budget.
Benefits of DIY Party Decorations
Using basic materials makes preparation easier while still allowing the space to feel well put together.
These benefits make DIY decor suitable for many types of gatherings:
- Helps manage decoration costs more effectively
- Allows flexibility in colors, themes, and layouts
- Makes last-minute changes easier to handle
- Supports better planning by allowing early preparation
- Reduces reliance on store-bought items
- Keeps decorations consistent across the party space
Diy Party Decorations Easy

Simple, affordable decor ideas can be created quickly using basic materials, helping any celebration feel more personal without the need for special tools or advanced skills.
Below are easy decoration ideas that add style and personality without requiring special tools or skills:
1. Paper Rosette Wall Backdrop
Materials
- Colored craft paper
- Scissors
- Glue or double-sided tape
- Stapler
- String or removable wall hooks
Prep Time: 20–25 minutes
Steps
- Cut paper into equal rectangular strips.
- Fold each strip back and forth like an accordion.
- Staple or glue the center of each folded strip.
- Gently fan out both sides to form a circle.
- Secure the ends together with glue or tape.
- Attach finished rosettes to the wall using hooks or tape.
2. Balloon Tassel Garland
Materials
- Balloons
- Tissue paper
- Scissors
- String or ribbon
- Tape
Prep Time: 15–20 minutes
Steps
- Inflate balloons to the same size.
- Cut tissue paper into long strips and fringe the strips halfway up.
- Roll strips tightly and twist the top. Tie tassels to balloon knots.
- String balloons together and hang.
3. Mason Jar Lanterns
Materials
- Mason jars
- Fairy lights or tea lights
- Twine
- Scissors
Prep Time: 10–15 minutes
Steps
- Clean and dry the jars.
- Place lights or candles inside.
- Wrap twine around the jar neck.
- Tie securely to form a handle.
- Arrange on tables or hang safely.
4. Hand-Painted Table Numbers
Materials
- Small wooden blocks or cards
- Acrylic paint
- Paintbrush
- Marker or stencil
Prep Time: 20 minutes (plus drying)
Steps
- Paint the surface with a base color.
- Let paint dry fully.
- Write or stencil numbers on top.
- Add small details if needed.
- Allow to dry before placing on tables.
5. Hanging Photo Clip Display
Materials
- Twine or string
- Mini wooden clips
- Printed photos
- Wall hooks or tape
Prep Time: 10–15 minutes
Steps
- Cut the string to the desired length and attach it to the wall hooks.
- Clip photos evenly along the string, adjust spacing for balance.
- Hang at eye level for display.
6. Confetti-Filled Balloons
Materials
- Clear balloons
- Confetti
- Funnel
- Balloon pump
Prep Time: 10 minutes
Steps
- Insert confetti into balloons using a funnel.
- Inflate balloons carefully.
- Rub balloons to spread confetti.
- Tie knots securely.
- Use as wall or floor decorations.
7. Fabric Bunting Banner
Materials
- Fabric scraps
- Scissors
- String or ribbon
- Glue or needle and thread
Prep Time: 25–30 minutes
Steps
- Cut the fabric into evenly sized triangle shapes.
- Fold the top edge of each triangle over the string or ribbon.
- Secure the folded edge using glue or stitching.
- Space each triangle evenly along the string.
- Hang the banner across a wall, table, or doorway.
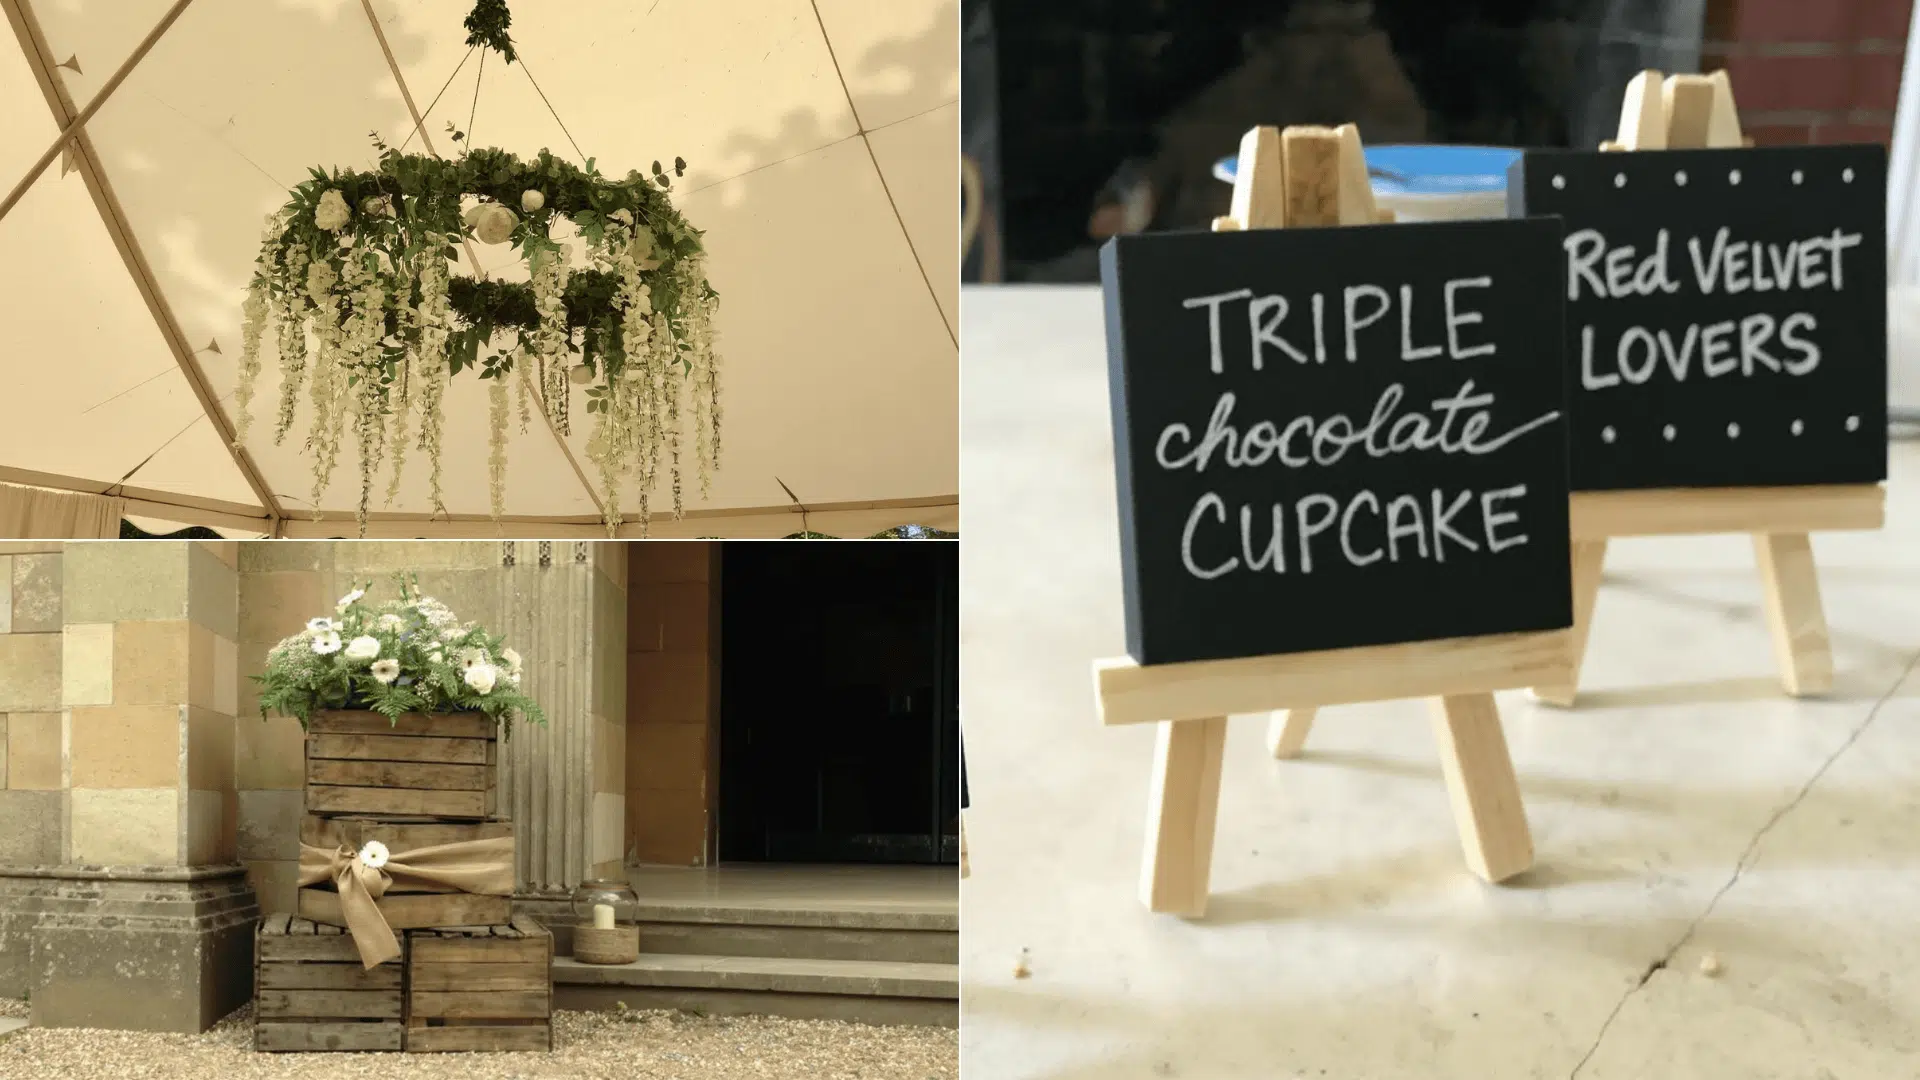
8. Wine Bottle Jute Vases
Materials
- Empty glass bottles
- Jute twine
- Glue
- Scissors
Prep Time: 15–20 minutes
Steps
- Clean and dry the bottles completely before starting.
- Apply a small amount of glue at the base of the bottle.
- Wrap the jute twine tightly around the bottle, moving upward.
- Cut the twine once the bottle is fully covered and secure the end with glue.
- Place flowers or greenery inside the finished vase.
9. LED Wire Sign
Materials
- LED wire lights
- Clear hooks or small nails
- Pencil
Prep Time: 10–15 minutes
Steps
- Lightly sketch the design on the wall and mount hooks along the outline.
- Shape LED wire to match the design, secure wire onto hooks.
- Plug in and adjust placement.
10. Paper Fan Ceiling Decor
Materials
- Colored paper
- Glue or tape
- String
- Scissors
Prep Time: 20 minutes
Steps
- Fold each sheet of paper into an accordion shape.
- Glue or tape the two ends together to form a fan.
- Attach a piece of string to the back of each fan.
- Secure the string to the ceiling using hooks or tape.
- Arrange fans at different heights for a balanced look.
11. Chalkboard Drink Labels
Materials
- Mini chalkboards
- Chalk or chalk marker
- Stands or clips
Prep Time: 5–10 minutes
Steps
- Wipe the chalkboards clean before writing.
- Write the name of each drink clearly on the board.
- Allow the writing to dry if using chalk markers.
- Place the labels next to the corresponding drinks.
- Update or clean the boards as needed during the event.
12. Origami Crane String Decor
Materials
- Origami paper
- String
- Needle or tape
- Scissors
Prep Time: 20–25 minutes
Steps
- Fold each sheet of paper into an origami crane.
- Cut the string to the desired hanging length.
- Thread or tape the cranes onto the string at even gaps.
- Hang the finished strands from the ceiling or doorway.
13. Floral Ice Cubes
Materials
- Edible flowers or herbs
- Ice tray
- Water
- Freezer
Prep Time: 10 minutes (plus freezing time)
Steps
- Rinse the flowers gently and pat them dry.
- Place one flower into each ice tray compartment.
- Fill the tray halfway with water.
- Freeze briefly, then top off with more water.
- Freeze fully before adding to drinks.
14. Paper Fringe Table Skirt
Materials
- Tissue paper
- Scissors
- Tape
- Measuring tape
Prep Time: 30 minutes
Steps
- Measure the length of the table edge.
- Cut tissue paper into long rectangular strips.
- Stack the strips neatly on top of each other.
- Cut fringes along one long edge of the stack.
- Attach the uncut edge to the table using tape.
- Layer multiple strips to create a full look.
15. Cardstock Napkin Rings
Materials
- Cardstock
- Scissors
- Glue or tape
Prep Time: 10–15 minutes
Steps
- Cut cardstock into equal strips.
- Wrap each strip around a rolled napkin and secure the ends.
- Place one ring on each table setting.
16. Glitter-Dipped Candle Holders
Materials
- Glass candle holders
- Glue
- Glitter
- Tray or paper sheet
Prep Time: 15 minutes (plus drying)
Steps
- Apply glue to the lower portion of each candle holder.
- Dip the glued area into glitter evenly.
- Shake off excess glitter onto a tray.
- Allow the holders to dry completely before use.
17. Ladder Dessert Display
Materials
- Wooden ladder
- Wooden boards or trays
- Sandpaper
- Cloth
Prep Time: 20–25 minutes
Steps
- Clean the ladder thoroughly before use.
- Lightly sand any rough edges on the ladder.
- Place wooden boards securely across the ladder rungs.
- Arrange desserts evenly on each level.
- Position the ladder display against a stable wall.
18. Mirror Tray Centerpiece
Materials
- Mirror tray
- Floating candles
- Candle holders
- Decorative stones or beads
Prep Time: 10 minutes
Steps
- Place the mirror tray at the center of the table.
- Arrange candle holders evenly on the tray.
- Scatter decorative stones around the candles.
- Light the candles just before guests arrive.
19. Framed Quote Display
Materials
- Photo frames
- Printed quotes
- Paper cutter or scissors
- Tape
Prep Time: 15–20 minutes
Steps
- Select short quotes that match the party theme.
- Print the quotes on clean, thick paper.
- Trim the paper to fit the frames properly.
- Insert the quotes into the frames.
- Secure the backing of each frame tightly.
- Place the frames on tables or shelves.
20. Paper Lantern Decor
Materials
- Paper lanterns
- LED lights
- String or hooks
Prep Time: 10 minutes
Steps
- Insert LED lights inside each lantern.
- Attach string or hooks securely to the lanterns.
- Hang the lanterns at varying heights.
21. Tassel Chair Decor
Materials
- Yarn or tassels
- Scissors
- Ribbon
Prep Time: 15 minutes
Steps
- Cut yarn into equal lengths if making tassels.
- Tie tassels together using ribbon.
- Secure the tassels to the back of each chair.
- Adjust placement so they hang evenly.
22. Pressed Flower Place Cards
Materials
- Pressed flowers
- Cardstock
- Glue
- Tweezers
- Pen
Prep Time: 20–25 minutes
Steps
- Cut cardstock into small card-sized rectangles.
- Write guest names neatly on each card.
- Apply a small amount of glue to the card surface.
- Use tweezers to place pressed flowers carefully.
- Press gently to secure the flowers in place.
- Allow the cards to dry completely before use.
23. Painted Bottle Centerpieces
Materials
- Glass bottles
- Acrylic paint
- Paintbrush
- Newspaper
Prep Time: 15 minutes (plus drying time)
Steps
- Clean and dry each glass bottle thoroughly.
- Paint the bottles evenly using long brush strokes.
- Place the bottles upside down to dry.
- Arrange the dried bottles as table centerpieces.
24. Streamer Chandelier
Materials
- Crepe streamers
- Hoop or cardboard ring
- String
- Tape
Prep Time: 25–30 minutes
Steps
- Cut streamers into equal lengths.
- Attach one end of each streamer to the hoop.
- Space the streamers evenly around the ring.
- Tie string securely to the top of the hoop.
- Hang the chandelier from the ceiling.
25. Silhouette Wall Art
Materials
- Black cardstock
- Scissors
- Tape
Prep Time: 10–15 minutes
Steps
- Cut shapes or figures from the cardstock.
- Arrange the silhouettes on the wall.
- Secure them in place using tape.
26. Mini Message Boards
Materials
- Mini boards
- Chalk or markers
- Cloth
Prep Time: 5–10 minutes
Steps
- Wipe each board clean before writing.
- Write short messages or directions clearly.
- Allow the writing to dry if needed.
- Place the boards around the party space.
27. Balloon Ombre Wall
Materials
- Balloons in different shades
- Balloon pump
- Double-sided tape or balloon dots
Prep Time: 30–40 minutes
Steps
- Inflate balloons in all selected colors and sizes.
- Sort the balloons by shade from light to dark.
- Apply adhesive dots to the back of each balloon.
- Start attaching balloons from the lightest shade.
- Gradually transition to darker shades as you move across.
- Fill any gaps with smaller balloons.
28. Decorative Straw Toppers
Materials
- Paper cutouts
- Drinking straws
- Tape or glue
Prep Time:10 minutes
Steps
- Cut small shapes from paper.
- Attach each shape to a straw using tape or glue.
- Place the straws into drinks before serving.
29. Wooden Crate Signage
Materials
- Wooden crates or boards
- Paint or marker
- Paintbrush
- Cloth
Prep Time: 20 minutes (plus drying)
Steps
- Wipe the surface of the wood clean.
- Paint or write short messages on the crate.
- Allow the paint or ink to dry fully.
- Touch up any uneven areas if needed.
- Place the crates near entrances or tables.
30. Hanging Greenery Hoops
Materials
- Embroidery hoops or metal rings
- Faux greenery
- Floral wire
- String
Prep Time: 20–25 minutes
Steps
- Wrap greenery around the hoop evenly.
- Secure the greenery using floral wire.
- Tie string firmly to the top of the hoop.
- Hang the hoops from the ceiling or wall hooks.
Finishing Touches!
Bringing a party together becomes easier when creativity leads the way instead of spending.
The ideas shared show how diy party decorations on a budget can shape a festive setting using simple materials and clear planning.
These decorations offer flexibility, making them suitable for different themes and age groups.
With a bit of preparation, the entire setup can feel intentional and inviting. Every celebration has its own story, and small handmade details help tell it.
Share your experience, favorite decoration, or a personal tip in the comments below.

James McLaren, with a rich background in architecture from the University of Manchester, has been contributing his expertise to the world of creative construction and home innovation for over 20 years. His journey began as a project manager for a leading construction firm, where he honed his skills in bringing complex designs to life. James joined our platform as a freelancer in 2019, quickly becoming a favorite for his insightful and practical advice. He has been a pivotal force to our wing ever since, bringing our readers a blend of technical know-how and creative flair. Beyond his professional life, James is an avid woodworker and enjoys restoring vintage furniture, a hobby that complements his professional insights beautifully.