Do your linoleum floors look old and worn out? I felt the same way about mine last year. Like many homeowners, I wanted to change my floors but didn’t have the money for new flooring.
Here’s some good news: painting your linoleum floors is a budget-friendly option that works well. I tried it myself and learned plenty of useful tips along the way.
In this guide, I’ll share my experiences and show you how to paint your floors without spending too much money.
By the time you finish reading, you’ll know exactly what supplies you need, how to prepare your floor, and the steps to get lasting results.
Let’s make your old floors look fresh and new!
What is Linoleum Flooring
I often get asked about linoleum flooring, and I’ll tell you what I know from working with it. Linoleum is a natural floor covering made from linseed oil, cork dust, wood flour, and tree resins.
It’s different from vinyl, though people often mix them up.
Is Linoleum Right for You?
From my experience, linoleum works great if you want:
- A floor that lasts 20-40 years with good care
- An eco-friendly option that’s made from natural materials
- Something easy to clean and maintain
- A floor that can handle lots of foot traffic
- A cost-effective choice compared to hardwood or tile
But here’s what you should think about:
- It can get scratched if you drag heavy furniture
- Direct sunlight might fade its color over time
- It needs regular cleaning to stay in good shape
I picked linoleum for my kitchen because it’s comfortable to stand on and doesn’t cost much. Plus, it comes in many patterns and colors, so you can match it with your room’s style.
How to Paint Linoleum Floors
Tools & Materials Required
- TSP cleaner
- Fine to medium-grit sandpaper
- Paint rollers and brushes
- Floor primer
- Acrylic floor paint or epoxy coating
- Scrub brush
- Degreaser or wax stripper
Step-by-Step Process for Painting
- Check Your Floor: I always start by looking at the floor’s condition. Take time to check for cracks or waves. If you find big cracks or the floor feels unsteady, you might need new flooring instead of paint.
- Clean Thoroughly: First, I use TSP cleaner with a scrub brush to remove all dirt and grease. If the floor still looks shiny, I apply a degreaser. Then, I rinse it well and let it dry completely.
- Sand the Surface: Using medium-grit sandpaper, I sand every inch of the floor, including the corners. This helps the paint stick better. Make sure to clean up all the dust afterward.
- Apply Primer: I use a special floor primer and put it on with a roller. For tight spots, I use a brush. You might need more than one coat. Let it dry based on what the label says – this usually takes a few days.
- Paint Time: Roll on your chosen floor paint or epoxy coating. Use brushes for edges and corners. Wait a full week before moving heavy stuff back – this is really important for the paint to set properly.
Pro tip: I always check the floor at night with a flashlight to spot any dents I might have missed during the day.
DOWNLOAD THE ENTIRE PAINTING LINOLEUM FLOOR GUIDE FROM THIS PDF
An Approximate Cost Breakdown Analysis
| Item | Cost Range |
|---|---|
| TSP Cleaner | $8 – $12 |
| Medium-Grit Sandpaper | $10 – $15 |
| Paint Rollers and Brushes | $15 – $25 |
| Floor Primer (1 gallon) | $25 – $35 |
| Floor Paint (1 gallon) | $30 – $45 |
| Degreaser | $7 – $12 |
| Cleaning Supplies | $10 – $15 |
| Total Cost (Standard Kitchen) | $105 – $159 |
| Extra Costs You Might Need | |
| Extra Paint for Second Coat | $30 – $45 |
| Protective Gear (Gloves, Masks) | $10 – $15 |
| Drop Cloths | $5 – $10 |
| Patching Compound | $8 – $12 |
Money-Saving Tips
- Buy supplies during hardware store sales
- Get the right amount of paint first to avoid waste
- Use leftover cleaning supplies from other projects
- Share or borrow tools from friends if possible
Remember: These prices might change based on where you live and the brands you pick. I found that middle-range products work well without breaking the bank.
How to Choose the Right Pattern & Design
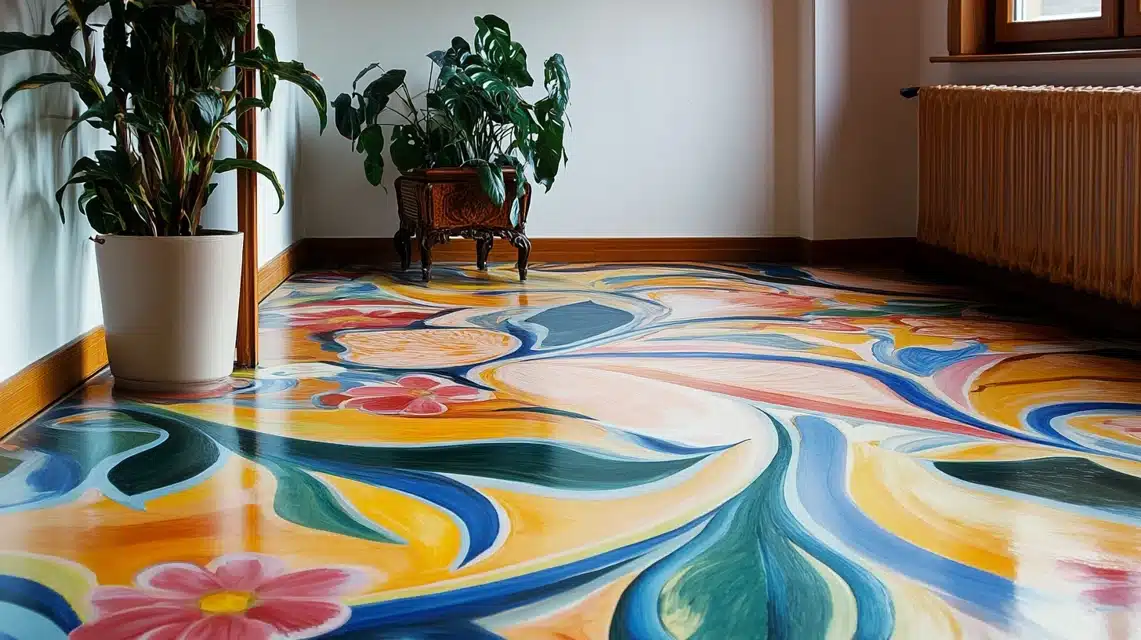
Let me share what I learned about picking patterns when I painted my kitchen floor. It’s easier than you might think!
1. Room Size Matters
- Small kitchen? I suggest light colors and simple patterns. They make the space look bigger.
- Large kitchen? You can try bolder patterns without making the room feel cramped.
2. Light and Color
- Got lots of natural light? The paint colors will look brighter than you expect.
- Less light? Go one shade lighter than what you want.
3. Popular Options I’ve Tried
- Solid color with a matte finish
- Basic checkerboard pattern
- Simple geometric shapes
- Faux tile design
- Stenciled borders
4. Practical Tips from My Experience
- Test your chosen colors in a small corner first
- Look at the test spot during different times of day
- Think about your cabinets and wall colors
- Keep it simple if this is your first time
- Pick patterns that hide small imperfections
5. What Works with What
- Light cabinets? Medium to dark floor colors create a nice contrast
- Dark cabinets? Lighter floor colors balance things out
- Busy wallpaper or decor? Stick to solid colors for the floor
Remember: The simpler the pattern, the easier to touch up later if needed. I learned this hard with my first attempt at a complex design!
Certain Tips for a Complete Finishing Look
After painting many floors, here’s what I’ve learned about getting that perfect finish. These tips really make a difference!
| Category | Tips |
|---|---|
| Sealing Your Work | Wait 24 hours after painting |
| Use a clear floor sealer for extra protection. | |
| Apply 2-3 thin coats instead of one thick coat. | |
| Let each coat dry fully. | |
| Smart Finishing Moves | Work from the far corner toward the exit |
| Keep pets and kids away for at least 48 hours. | |
| Open windows for good airflow | |
| Remove painter’s tape while the paint is still a bit wet | |
| Protect Your New Floor | Put felt pads under furniture legs |
| Use mats near sinks and entry points. | |
| Clean spills right away | |
| Sweep or vacuum often to prevent scratches | |
| Watch Out For | Don’t rush the drying time |
| Skip heavy cleaning for the first two weeks. | |
| Avoid sliding furniture across the floor. | |
| Keep an eye out for any chips or peeling | |
| Last Step Tips | Take photos of your work |
| Keep leftover paint for touch-ups. | |
| Write down which products you used | |
| Mark your calendar for future maintenance. |
These steps helped me get better results than I expected. Take your time with each one – it’s worth it!
Some Aftercare & Maintenance Tips to Follow
- Use a soft broom or vacuum on the painted floor daily to sweep up dirt and small bits that could scratch.
- Place a good-quality doormat at each entrance to catch dirt before it reaches your painted floor.
- Clean the floor weekly with warm water and mild soap, but don’t soak the surface – a damp mop works best.
- Check the floor monthly for tiny chips or worn spots and fix them fast before they get bigger.
- Keep window shades drawn during peak sunlight hours to stop your floor’s color from fading too quickly.
- Put small rugs in spots with lots of foot traffic, like near the sink or stove, but make sure they have non-slip backing.
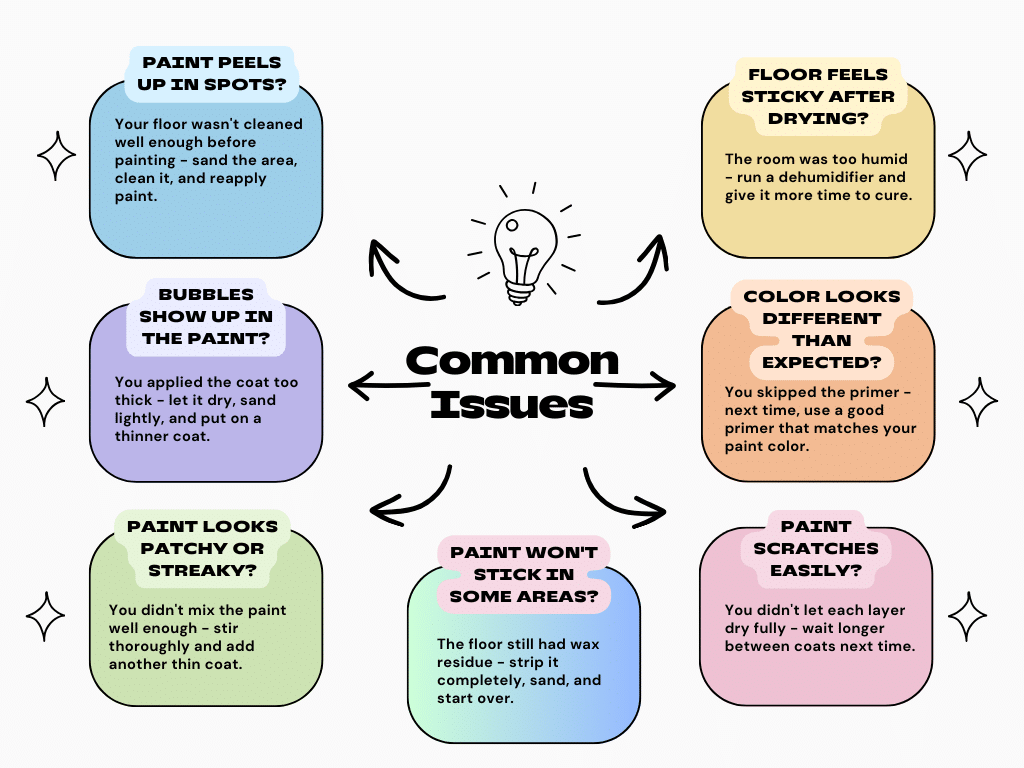
Conclusion
I’ve painted quite a few linoleum floors over the years, and I can say this: it’s a project worth trying. With proper prep work and the right materials, you can transform your old floor into something that looks fresh and new.
Remember, patience is key here. Take time with each step, especially the cleaning and priming. Your floor will thank you later!
Want to explore more budget-friendly home improvements?
- Check out my other guides on DIY Cabinet Painting Under $100
- How to Refresh Your Bathroom Tiles on a Budget
You’ll find plenty of money-saving tips there too!
Got questions about your floor project? Leave a comment below. I’d love to hear about your experience and help where possible!
Frequently Asked Questions
How Durable is a Painted Linoleum Floor?
With proper preparation and sealing, your painted linoleum floor can last 3-5 years. I’ve found that regular maintenance and quick fixes for any chips help extend its life significantly.
Do I Need to Sand or Prime the Floor Before Painting?
Yes, you absolutely need both steps. I always sand to help the paint stick better and use a primer to create a strong base. Skipping either step leads to paint peeling quickly.
Is It Possible to Paint Over Linoleum Flooring?
Yes, you can paint over linoleum floors. I’ve done it many times. Just make sure your floor isn’t badly damaged and follow all preparation steps for the best results.

