Window frames are critical barriers that protect your home from external elements and moisture damage.
Interior window frame rot can compromise your home’s structural integrity and aesthetic appeal.
Recognizing the signs of wood decay early prevents extensive and expensive repairs.
Moisture, fungal growth, and environmental challenges contribute to window frame deterioration over time.
Homeowners must stay vigilant and proactive in maintaining these vulnerable structural components.
Understanding the repair process empowers you to protect your property effectively.
Understanding Rotted Window Frames
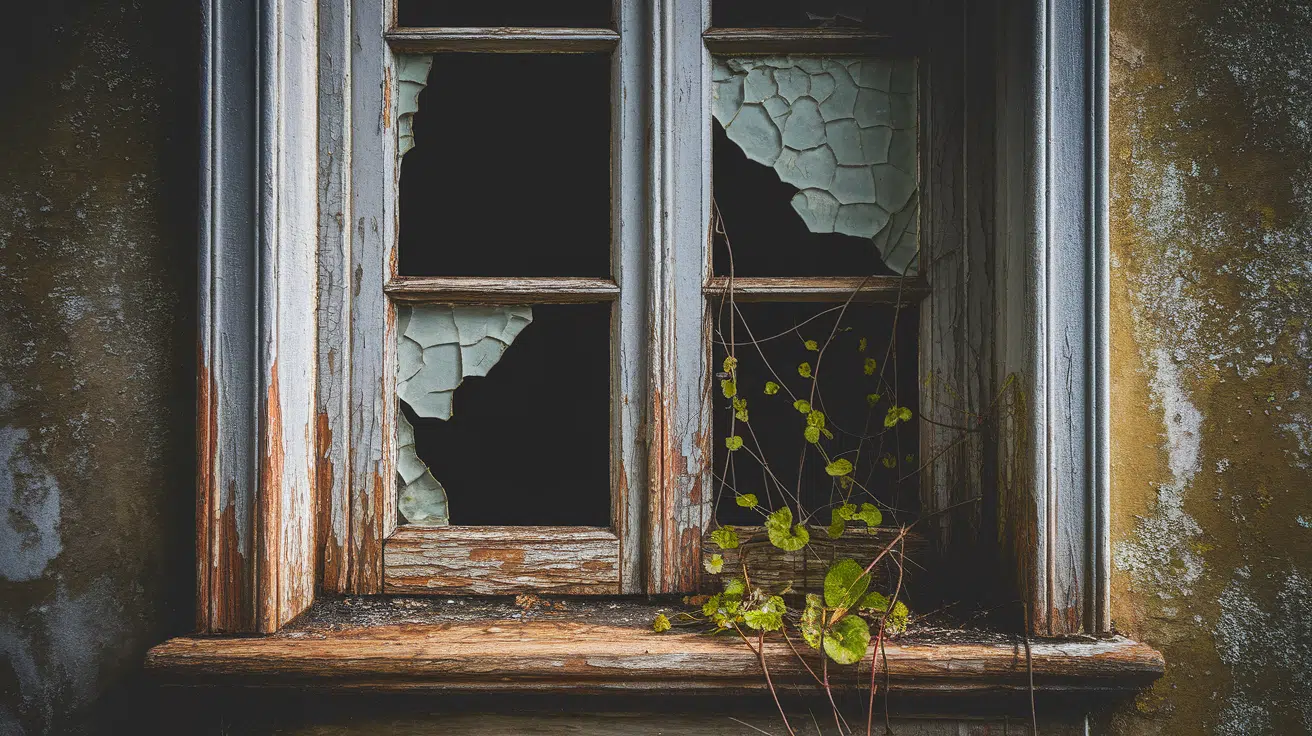
Rotted window frames are wooden structures that have deteriorated due to moisture, fungal growth, and prolonged exposure to environmental challenges.
Wood rot occurs when moisture penetrates the frame, creating an ideal environment for fungal decay to thrive.
Signs of window frame rot include soft, discolored wood that crumbles easily when touched or pressed.
Visual indicators involve dark spots, swelling, peeling paint, and visible mold or mildew around window edges.
Wooden frames near bathrooms, kitchens, or areas with high humidity are particularly susceptible to rotting problems.
Regular inspection and maintenance can help prevent extensive damage to window frames.
Signs of a Rotted Window Frame

Identifying window frame rot early can save homeowners significant repair costs and prevent further structural damage.
Recognizing the warning signs is crucial for maintaining your home’s integrity and preventing extensive wood deterioration.
Key indicators of window frame rot include:
- Soft Spots: Areas of wood that feel mushy or give way when pressed, signaling advanced decay.
- Visible Cracks: Deep fissures or splitting wood that expose the frame to more moisture and potential damage.
- Decayed Wood Around Joints: Deterioration at connection points, indicating structural weakness and potential complete frame failure.
Prompt identification and professional assessment can help address window frame rot before it becomes a major structural issue, protecting your home’s value and appearance.
Tools and Materials Required
Repairing rotted window frames demands specific tools and materials to ensure a successful restoration.
Proper preparation and selection of high-quality supplies are crucial for achieving a durable and professional-looking repair.
| Tool/Material | Purpose | Additional Details |
|---|---|---|
| Putty Knife | Remove rotted wood | Flexible blade for precise scraping and cleaning of damaged areas |
| Wood Filler | Patch up holes | Waterproof epoxy-based filler provides strong, long-lasting repair solution |
| Sandpaper | Smooth surface | Multiple grits (120-220) for progressive smoothing and preparation |
| Paint | Seal and protect frame | Exterior-grade, moisture-resistant paint with primer for maximum protection |
| Protective Gloves | Ensure personal safety | Prevent skin contact with chemicals and sharp tools |
| Protective Mask | Avoid inhaling particles | Important during sanding and wood removal processes |
Investing in quality tools and taking time with each repair step ensures a robust solution that extends the life of your window frames and prevents future damage.
Step-by-Step Guide: Repair Rotted Window Frame Interior.
By following the process carefully and taking your time with each step, you’ll ensure the repair is thorough, secure, and aesthetically pleasing.
This guide will walk you through the steps, offering helpful tips to make the process easier and more efficient.
Now, let’s get started with the first step in the repair process!
STEP 1: Assess and Remove Rotted Wood

Start by inspecting the window frame to identify areas with soft or rotted wood.
Gently peel away the decaying sections using a chisel to expose the underlying damage.
Focus on the corners and edges that show signs of deterioration.
This step will help determine the extent of the repair required.
STEP 2: Clear the Area of Damaged Wood

Once you’ve located the rotted wood, continue scraping and chiseling until you’ve removed all the decayed material.
Be thorough, as the damage may extend farther than initially visible.
This ensures you’re left with a clean, solid surface to work with and prevents further rot from spreading.
STEP 3: Apply Adhesive for Secure Bonding

After cleaning the area, apply Typon glue along the surface to provide adhesion.
This will help secure the new pieces in place during the repair.
It is crucial to give the glue time to set before proceeding to the next step, ensuring a strong bond between the existing and new material.
STEP 4: Insert Foam for Air Sealing

To prevent air infiltration and protect against weather damage, apply door and window foam into the crevices of the frame.
This foam will fill gaps and offer insulation, ensuring the window remains energy-efficient and sealed from external elements, such as drafts and moisture.
STEP 5: Fit and Attach Replacement Wood

Cut and fit new wood to replace the rotted sections.
Use a shim to align the new board correctly against the window frame.
Secure the wood with screws, ensuring it fits snugly and is level with the surrounding structure.
This step restores the frame’s strength and stability.
STEP 6: Fill Gaps with Wood Putty

Once the new boards are in place, fill any small gaps or imperfections with wood putty.
Use a putty knife to smooth out the filler, ensuring a seamless finish.
Allow the putty to dry fully before moving on to the sanding process for a refined surface.
STEP 7: Sand, Prime, and Paint the Frame

After the wood putty has dried, sand the area to achieve a smooth, even finish.
Prime the wood before applying a coat of paint to match the existing window frame.
If necessary, repaint the entire section for a more uniform look, ensuring it’s sealed and protected from the elements.
Video Tutorial
For more information, check out this video tutorial by HouseBarons
Cost and Time Estimates
Before starting any window frame repair, it’s helpful to have an understanding of the associated costs and time commitments.
This will allow you to plan ahead and ensure you have all the necessary materials and tools.
Below is a rough estimate based on the transcription provided, covering the key steps involved in the process:
| TASK | ESTIMATED COST | ESTIMATED TIME |
|---|---|---|
| Removing rotted wood | $10 – $20 (tools, gloves) | 30 – 60 minutes |
| Applying Typon glue and G Dlex Ultra | $5 – $15 (adhesives) | 15 – 30 minutes |
| Installing replacement boards | $10 – $30 (wood boards) | 45 – 60 minutes |
| Adding foam for insulation | $5 – $10 (foam spray) | 15 – 30 minutes |
| Sanding and applying wood filler | $5 – $15 (wood filler) | 30 – 60 minutes |
| Painting and finishing | $10 – $25 (paint, brushes) | 60 – 90 minutes |
Total Estimated Cost: $45 – $115
Total Estimated Time: 3 – 4 hours
These are general estimates and may vary depending on the materials used, the size of the window, and the complexity of the repair.
Always factor in extra time for drying and settling between steps.
Tips for Preventing Future Rot
Window rot can quickly compromise your home’s structural integrity and aesthetic appeal.
Moisture is the primary culprit behind wood decay, silently damaging window frames over time.
Proactive maintenance is your best defense against costly repairs and potential structural issues.
Prevention strategies include:
- Check exterior drainage patterns around window frames
- Apply water-resistant sealants to exposed wood surfaces
- Inspect windows quarterly for early signs of damage
- Keep window areas clean and free from debris
- Maintain paint or protective coating on window frames
By implementing these simple preventative measures, homeowners can significantly extend the life of their windows.
Small, consistent efforts protect your investment and maintain your home’s beautiful exterior appearance.
The Bottom Line
Successful window frame repair requires patience, precision, and a systematic approach to restoration.
Investing time in careful maintenance saves significant money on future replacement costs.
Professional-quality repairs extend the lifespan of your windows and home’s overall structure.
Proper techniques ensure your window frames remain strong, functional, and visually appealing.
Regular inspections and preventative measures are key to long-term window frame health.
Commit to ongoing maintenance to protect your home’s most vulnerable architectural elements.

Holding a Master’s in Construction Management from Purdue University, William Ray has dedicated more than two decades to studying and applying construction principles. His professional journey includes a tenure with a prominent construction firm, where he specialized in project management and building technologies. William brought his knowledge to our team, providing in-depth insights into practical construction techniques. As the leader of our beginner’s guide to building since 2019, he has a knack for breaking down intricate processes into easily digestible content. When not involved in writing or onsite consultations, William enjoys woodworking and volunteering in community building projects, which aligns with his passion for hands-on construction and community service.