Building a steady setup makes a noticeable difference when practicing or sighting in a firearm.
A DIY shooting bench offers a simple way to create a solid, comfortable shooting position without relying on store-bought options.
With the right design and materials, a homemade bench can be customized for height, stability, and use location.
From fixed benches for private ranges to portable and adjustable options, this project fits different shooting needs and spaces.
This guide walks through shooting bench basics, common designs, build steps, and practical design tips.
Each section focuses on straightforward construction and usability, helping create a bench that feels stable, comfortable, and ready for repeated use.
What is a Shooting Bench ?
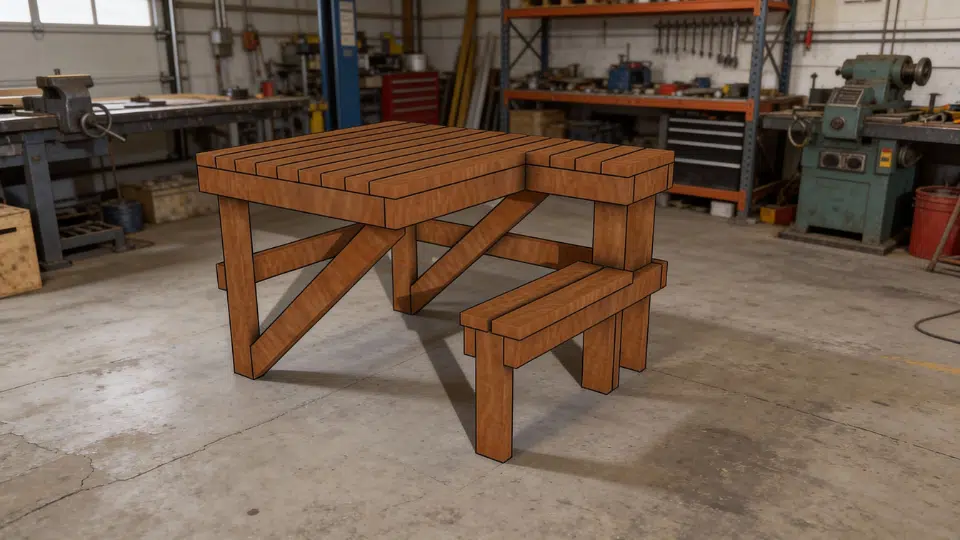
A shooting bench is a sturdy, flat platform designed to support a firearm and provide a stable shooting position.
It is commonly used for target practice, sighting in rifles, and improving shooting consistency.
The bench helps reduce movement by supporting both the shooter and the firearm, which can improve accuracy and comfort during shooting sessions.
Shooting benches are often paired with a seat or stool positioned at a fixed height to maintain a consistent posture.
They are commonly found at shooting ranges, private properties, and outdoor practice areas.
Depending on the design, a shooting bench can be permanent or portable and may be built from wood, metal, or a combination of materials to suit different shooting needs.
Types of DIY Shooting Benches
DIY shooting benches come in several practical designs, each built to suit different spaces, shooting habits, and mobility needs.
Choosing the right type depends on where the bench will be used, how often it needs to be moved, and the level of stability required.
1. Fixed Shooting Bench
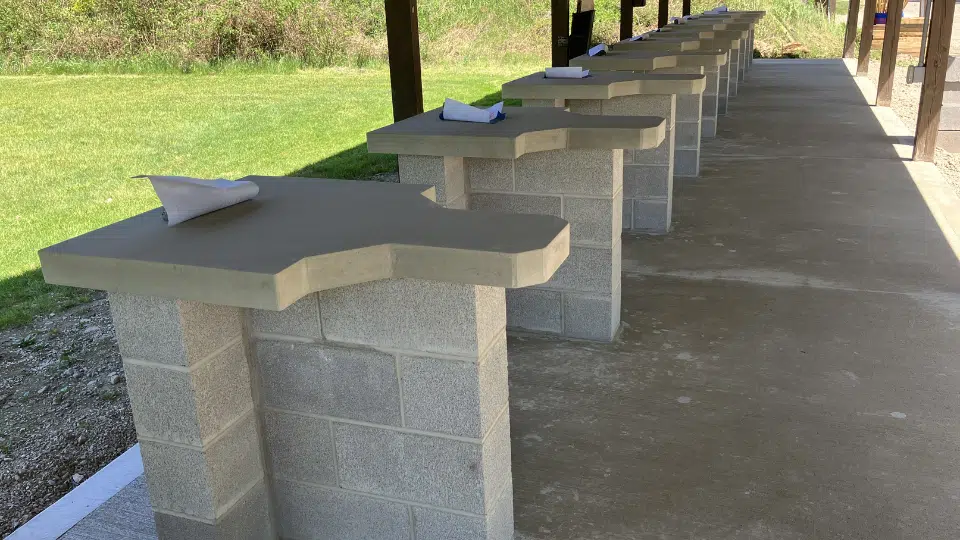
A fixed shooting bench is built for permanent placement, usually on a private range or dedicated shooting area.
This type is anchored to the ground or set on a concrete base, providing maximum stability and consistent shooting positions.
Fixed benches are ideal for repeated practice sessions where movement or storage is not a concern.
2. Portable Shooting Bench
Portable shooting benches are designed to be moved easily between locations.
These benches use lighter materials and simpler frames while still maintaining a stable shooting surface.
A portable design works well for users who need to transport the bench to different ranges or store it when not in use.
3. Adjustable Shooting Bench

An adjustable shooting bench allows changes in seat height or bench height to accommodate different shooters.
This design improves comfort and shooting posture, especially during longer sessions.
Adjustable benches are useful when multiple users share the same bench or when flexibility is needed for different shooting positions.
Each of these DIY shooting bench types can be customized in size, height, and materials to match individual shooting preferences and available space.
DIY Shooting Bench Build Steps
Before going further deep into the DIY process, follow this list to get the tools needed to build a diy shooting bench:
| Tool | Purpose |
|---|---|
| Measuring tape | Measuring lumber lengths and spacing |
| Pencil | Marking cut lines and drill points |
| Miter saw or circular saw | Cutting lumber to size |
| Drill / driver | Driving screws and drilling bolt holes |
| Drill bits | Creating pilot holes and bolt openings |
| Clamps | Holding pieces in place during assembly |
| Level | Ensuring bench and seat alignment |
| Socket wrench | Tightening carriage bolts |
| Router with round-over bit | Smoothing exposed edges |
| Sander | Finishing surfaces before use |
Step 1: Cut and Prepare the Frame
Begin by cutting all lumber needed for the bench frame, seat supports, and center braces.
Add 45-degree cuts to the ends of the seat beams and center support beams for a cleaner finish.
Completing all cuts before assembly helps maintain accuracy and speeds up the build.
Step 2: Assemble the Main Bench Frame
Lay out the frame pieces according to the design and use the 4×4 legs as spacers to position the front and rear legs evenly.
Attach the frame using 2½-inch screws, placing fasteners on both sides of each joint.
Center the middle support beams and secure them to increase rigidity.
Step 3: Secure Legs and Add Structural Bracing
Attach all four legs using screws first, then reinforce them with carriage bolts and washers.
Add a front cross brace approximately 10 inches from the ground to reduce movement.
Install angled support braces from the front cross brace to the seat area to improve overall stability.
Step 4: Install Bench Top and Seat
Attach the bench top boards starting from the center and working outward, keeping boards tight together.
Secure them along all support beams. Mount the seat frame at a comfortable height between 20 and 22 inches, ensuring it is level before attaching the seat boards.
Optional seat leg supports can be added for extra stability.
Step 5: Finish and Smooth the Bench
Round over all exposed edges using a router to reduce sharp corners.
Sand the entire bench surface using medium and fine grit sandpaper until smooth. After sanding, the shooting bench is ready for outdoor use or finishing.
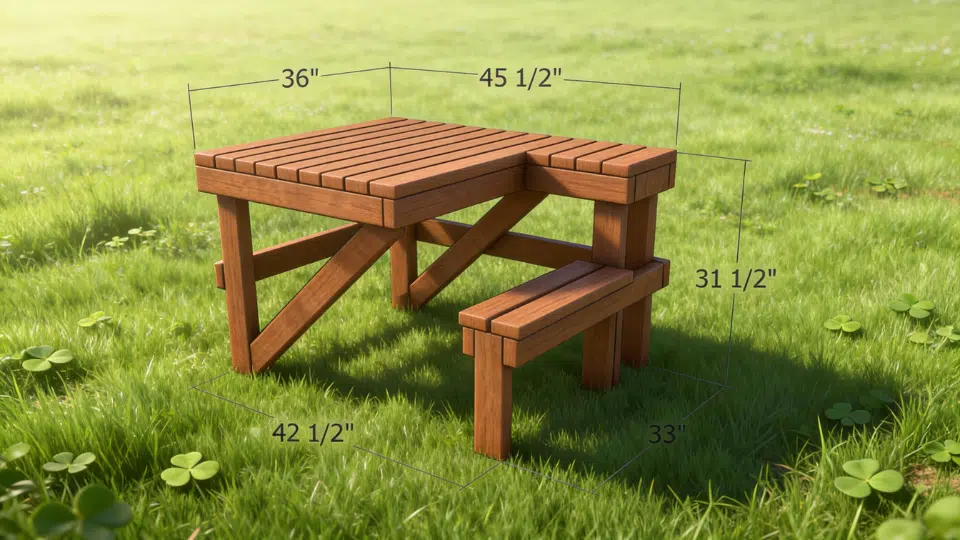
DIY Shooting Bench Cut List
Before making any cuts, having a clear cut list helps keep measurements consistent and reduces material waste.
| Lumber Size | Quantity | Cut Length |
|---|---|---|
| 4×4 | 4 | Legs (bench height as needed) |
| 2×6 | 3 | Bench top center boards – 51 in |
| 2×6 | 6 | Bench top side boards – 36 in |
| 2×4 | 6 | Frame and center supports (length varies) |
| 2×4 | 2 | Front cross brace |
| 2×4 | 2 | Angled support braces |
| 2×4 | 4 | Seat support legs |
| 2×6 | 6 | Seat boards – 8½ in |
Design Tips for a DIY Shooting Bench
A few smart design choices can make the shooting bench more comfortable, stable, and easier to use.
- Aim for a bench height that keeps the shooting surface comfortable when seated, as this helps maintain a steady posture during longer sessions.
- Choose a bench top size that gives enough room for the firearm and accessories without feeling crowded.
- Prioritize stability over portability if the bench will stay in one place, since added weight and bracing reduce movement.
- Use strong leg bracing and cross supports to prevent wobble, especially on uneven ground.
- Consider adding a seat at a height that allows feet to rest flat for better balance. Rounded edges improve comfort and reduce wear over time.
- If the bench will be used outdoors, select materials and finishes that handle moisture and sun exposure well.
Conclusion
A well-built shooting bench becomes part of the shooting routine, not just another DIY project.
Taking the time to plan the design, choose sturdy materials, and follow the build steps carefully pays off every time the bench is used.
A stable surface, comfortable seating position, and solid bracing help reduce distractions and allow better focus during practice.
Whether placed permanently or used as a movable setup, a DIY shooting bench offers flexibility that store-bought options often lack.
With proper construction and thoughtful design choices, the finished bench delivers dependable support and lasting performance, making each shooting session more comfortable, controlled, and enjoyable over the long run.
Frequently Answered Questions
What Is the Ideal Shooting Bench Height for Most Users?
Most shooting benches work best between 32 and 36 inches high, depending on seat height and shooting posture, allowing comfortable arm support without leaning forward.
Can a Diy Shooting Bench Be Used on Uneven Ground?
Yes, but adding adjustable feet, ground pads, or leveling blocks helps maintain stability and prevents rocking on uneven surfaces.
What Type of Wood Lasts Longest for Outdoor Shooting Benches?
Pressure-treated lumber or cedar performs well outdoors, especially when sealed properly to resist moisture, sun exposure, and long-term wear.

James McLaren, with a rich background in architecture from the University of Manchester, has been contributing his expertise to the world of creative construction and home innovation for over 20 years. His journey began as a project manager for a leading construction firm, where he honed his skills in bringing complex designs to life. James joined our platform as a freelancer in 2019, quickly becoming a favorite for his insightful and practical advice. He has been a pivotal force to our wing ever since, bringing our readers a blend of technical know-how and creative flair. Beyond his professional life, James is an avid woodworker and enjoys restoring vintage furniture, a hobby that complements his professional insights beautifully.