
Small construction and renovation projects often look simple from the outside. A homeowner may want to remodel a basement, replace a deck, upgrade a staircase, repair a driveway, install new railings, or open up a wall to improve the layout of a room. The project may not involve a large commercial crew or months of planning, but it still depends on one basic principle: the right equipment must be available at the right time.
For small contractors, renovation teams, and experienced property owners managing a project, equipment planning can make the difference between a smooth job and a frustrating one. Delays often happen because a team realizes too late that it does not have the right lift, saw, drill, safety gear, hauling tool, or access equipment. What begins as a one-day task can quickly turn into a week of rescheduling, extra labor costs, and unhappy clients.
A good construction equipment checklist is not only about heavy machinery. It includes hand tools, power tools, access equipment, safety gear, measuring tools, site preparation equipment, cleanup tools, and project-specific materials. The goal is to think through the work before it begins so the team is not forced to improvise under pressure.
This is especially important for small contractors and renovation crews because they usually work with limited time, space, and labor. A large construction company may have backup machinery, multiple crews, and a full procurement team. Smaller teams often have to be more careful. Every missing tool matters. Every delay affects the schedule. Every wrong equipment choice can reduce profit.
Below is a practical construction equipment checklist designed for general renovation and small construction projects. It covers the equipment categories most teams should consider before starting work.
Quick Construction Equipment Checklist for Small Contractors
A basic construction equipment checklist should include:
- Hand tools
- Power tools
- Measuring and layout tools
- Safety gear and personal protective equipment
- Access equipment such as ladders, scaffolds, and lifts
- Site preparation tools
- Material handling equipment
- Demolition and removal tools
- Fastening and anchoring supplies
- Cleanup and waste management tools
- Backup batteries, blades, bits, and fasteners
- Project-specific materials and components
- Storage and transportation systems
This checklist can be adjusted based on the type of project. A bathroom renovation will not need the same equipment as a driveway repair. A deck project will not need the same setup as a stair railing installation. The best approach is to build a repeatable equipment planning process that can be customized for each job.
What Equipment Do Small Contractors Need?
Small contractors usually need hand tools, power tools, measuring tools, safety gear, ladders or scaffolding, demolition tools, material handling equipment, cleanup supplies, and project-specific materials. The exact equipment depends on the project scope, site conditions, crew size, and whether the work involves demolition, framing, installation, finishing, or outdoor construction.
The most important thing is not to carry every tool to every job. The goal is to bring the right tools for the actual work being done. This requires planning before the crew arrives on site.
Start With the Scope of the Project
Before choosing tools or equipment, the team should understand the full scope of the project. This sounds obvious, but many equipment problems begin with unclear planning.
A bathroom renovation may require demolition tools, plumbing tools, tile saws, dust control equipment, moisture protection, and cleanup supplies. A deck project may require post-hole diggers, circular saws, levels, fastening tools, ladders, and hauling equipment. A staircase upgrade may require cutting tools, measuring tools, safety supports, balusters, brackets, and finish materials. Each project has its own equipment needs.
The first step is to break the job into stages. These may include site preparation, demolition, framing, installation, finishing, cleanup, and inspection. Once the stages are clear, it becomes easier to identify what equipment is needed for each part of the work.
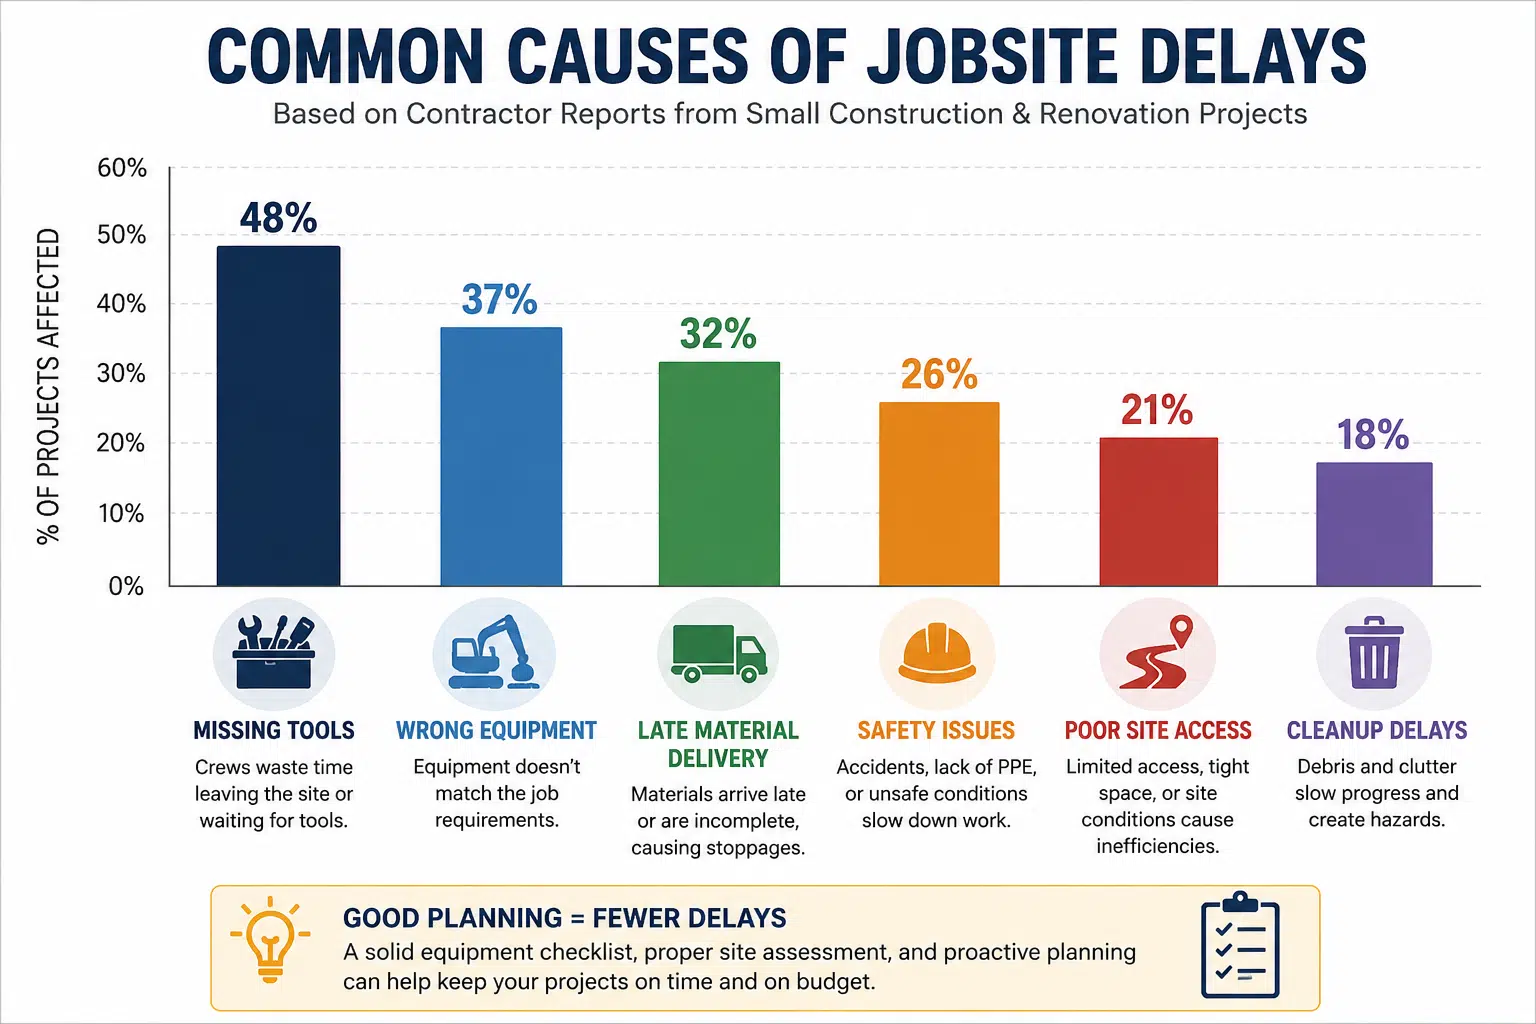
This helps prevent one of the most common mistakes in small construction projects: planning only for the main task and forgetting the supporting tasks. A crew may remember the saws and drills but forget dust barriers. They may rent a compact loader but forget the right attachment. They may order the main materials but forget fasteners, blades, anchors, or protective gear.
Good equipment planning starts with a simple question: what will the crew physically need to do from the first hour on site to the final cleanup?
Check the Site Before Choosing Equipment
Before a contractor decides which tools, machines, or materials are needed, the site itself should be reviewed. Every construction or renovation project is affected by the condition of the property. Access, slope, drainage, soil condition, nearby roads, overhead obstacles, and available working space can all change the type of equipment a crew needs.
This is especially important for outdoor renovation, land improvement, driveway work, grading, drainage repair, fencing, deck construction, and larger residential projects. A compact machine may be useful on one property but difficult to operate on another if the access path is narrow or the ground is uneven. In the same way, a project that looks simple on paper may require extra hauling equipment, leveling tools, or drainage planning once the site conditions are reviewed.
“Before any equipment is selected, contractors should understand the land itself. Access, slope, drainage, road frontage, and flood risk can all affect what machinery is practical for a project,” says Daniel Apke, Founder of Land Portal.
For small contractors, this kind of planning can prevent expensive mistakes. If the crew arrives with equipment that cannot safely enter the site or does not match the ground conditions, the project may be delayed before the real work begins. Site review also helps contractors explain costs more clearly to clients because the equipment plan is based on real jobsite needs, not guesswork.
A simple site checklist should include entry points, surface condition, available parking, material drop-off areas, drainage concerns, overhead obstacles, underground utilities, and space for waste removal. Once these details are clear, the contractor can choose equipment more confidently.
Core Hand Tools Every Crew Should Have
Hand tools are still the foundation of most construction and renovation work. Even when power tools and machinery are involved, basic hand tools are used throughout the day for measuring, adjusting, fastening, trimming, marking, and fixing small issues.
A small contractor’s basic hand tool kit should usually include hammers, screwdrivers, pliers, utility knives, tape measures, levels, squares, chalk lines, pry bars, clamps, wrenches, and hand saws. These tools may seem simple, but they are used constantly.
Measuring tools deserve special attention. Many mistakes in renovation work happen because measurements are rushed or not checked properly. A strong tape measure, laser measure, level, framing square, and marking tools can prevent costly errors. In finished spaces, even a small measurement mistake can affect cabinets, railings, flooring, trim, doors, and fixtures.
Hand tools should also be organized. A crew wastes time when tools are scattered across the site or stored in different vehicles. Toolboxes, belts, labeled cases, and jobsite carts can improve efficiency. Organization is not only about neatness. It directly affects productivity.
Small contractors should also inspect hand tools regularly. Damaged handles, dull blades, loose heads, and worn measuring tapes can create safety risks and poor workmanship. Replacing small tools before they fail is usually cheaper than dealing with mistakes or injuries.
Power Tools for Faster and Cleaner Work
Power tools help small teams complete work faster and with better consistency. The right power tool can reduce labor strain, improve accuracy, and keep the project on schedule.
Common power tools for renovation teams include cordless drills, impact drivers, circular saws, reciprocating saws, oscillating multi-tools, angle grinders, nail guns, sanders, rotary hammers, and table saws. Depending on the project, teams may also need tile saws, miter saws, concrete saws, or specialty cutting tools.
Cordless tools are especially useful for small projects because they are flexible and easy to move around the site. However, battery planning matters. A crew should have enough charged batteries and chargers to avoid downtime. Nothing slows work like waiting for a battery to charge in the middle of a task.
Blades and bits are another important detail. A contractor may have the right saw but the wrong blade. Cutting wood, metal, tile, concrete, or composite materials requires different blades and accessories. Using the wrong one can damage the material, slow the work, or create a safety hazard.
Power tools should match the material and the level of finish required. Rough demolition work may call for speed and strength, while finish work requires control and precision. A general audience may think of power tools as interchangeable, but experienced contractors know that tool selection affects both quality and safety.
Equipment for Site Preparation
Site preparation is one of the most overlooked parts of small construction projects. Before the main work begins, the crew may need to clear space, protect surfaces, move furniture, remove debris, set up dust control, and create safe access.
Basic site preparation equipment can include tarps, plastic sheeting, floor protection, temporary barriers, dust extractors, shop vacuums, fans, lighting, extension cords, and portable workbenches. For outdoor projects, crews may also need wheelbarrows, shovels, rakes, compactors, post-hole diggers, and small loaders.
Protection is especially important in renovation work because the crew is often working inside or around an existing property. Floors, walls, landscaping, windows, and finished surfaces can be damaged if the site is not prepared correctly.
Dust control should also be part of the checklist. Cutting, sanding, drilling, and demolition can create fine dust that spreads quickly. Dust barriers, vacuum attachments, masks, and air filtration can keep the site cleaner and safer. This is important for workers, clients, and anyone living or working near the renovation area.
Lighting is another basic but important need. Many mistakes happen because workers are trying to complete detailed work in poor lighting. Portable lights can improve safety and accuracy, especially in basements, garages, crawl spaces, and partially finished areas.
Choosing Equipment That Fits the Job
Not every project requires large machinery, but many small construction jobs become easier when the right equipment is used. Skid steers, compact excavators, lifts, loaders, trenchers, and material handling equipment can save time and reduce physical strain when used correctly.
The mistake many small teams make is choosing equipment based only on availability or price. The better approach is to match the equipment to the worksite, the task, and the crew’s skill level. A machine that is too large for the site can cause access problems. A machine that is too small may not handle the job efficiently. A tool that the crew does not know how to operate can create safety risks.
“Small contractors lose time when they treat equipment as an afterthought. The right machine, attachment, or tool should be planned before the crew arrives, not after the job has already slowed down,” says Sean Cope, Owner of EquipXR.
This point is especially important for renovation teams that move between different types of jobs. One week may involve interior demolition, the next may involve grading, trenching, or material movement. Instead of relying on a fixed list of tools for every project, contractors should build a flexible equipment planning process.
That means asking practical questions before the job begins. How much space is available? What materials need to be moved? Will equipment need to fit through gates, doors, or narrow paths? Is the ground stable? Are there overhead power lines, finished surfaces, or access restrictions? Does the crew need attachments or accessories?
Equipment should solve a real jobsite problem. It should not be chosen just because it is common or available. For small contractors, this mindset helps control costs while still improving efficiency.
Access Equipment: Ladders, Scaffolds, and Lifts
Many renovation tasks require workers to reach higher areas safely. Painting, siding, gutter work, framing, lighting, ceiling repairs, deck work, and stairwell projects may all require access equipment.
The most common options include ladders, step ladders, extension ladders, scaffolding, work platforms, and lifts. Each one has a purpose, but each also comes with safety rules.
A ladder may be enough for a short task, but it is not always the best choice for work that requires long periods of standing, heavy tools, or movement from side to side. Scaffolding or a work platform may be safer and more efficient. For exterior work or high areas, a lift may be the better option if the site allows it.
Small crews should inspect access equipment before each use. Ladders should have stable feet, clean rungs, and no cracks or bends. Scaffolding should be properly assembled and placed on stable ground. Workers should avoid makeshift solutions, such as standing on buckets, chairs, boxes, or unstable surfaces.
Access planning also affects productivity. If workers have to climb up and down constantly to get tools or materials, the job slows down. Tool belts, work platforms, and organized staging areas can reduce wasted movement.
Safety Gear Is Part of the Equipment Checklist
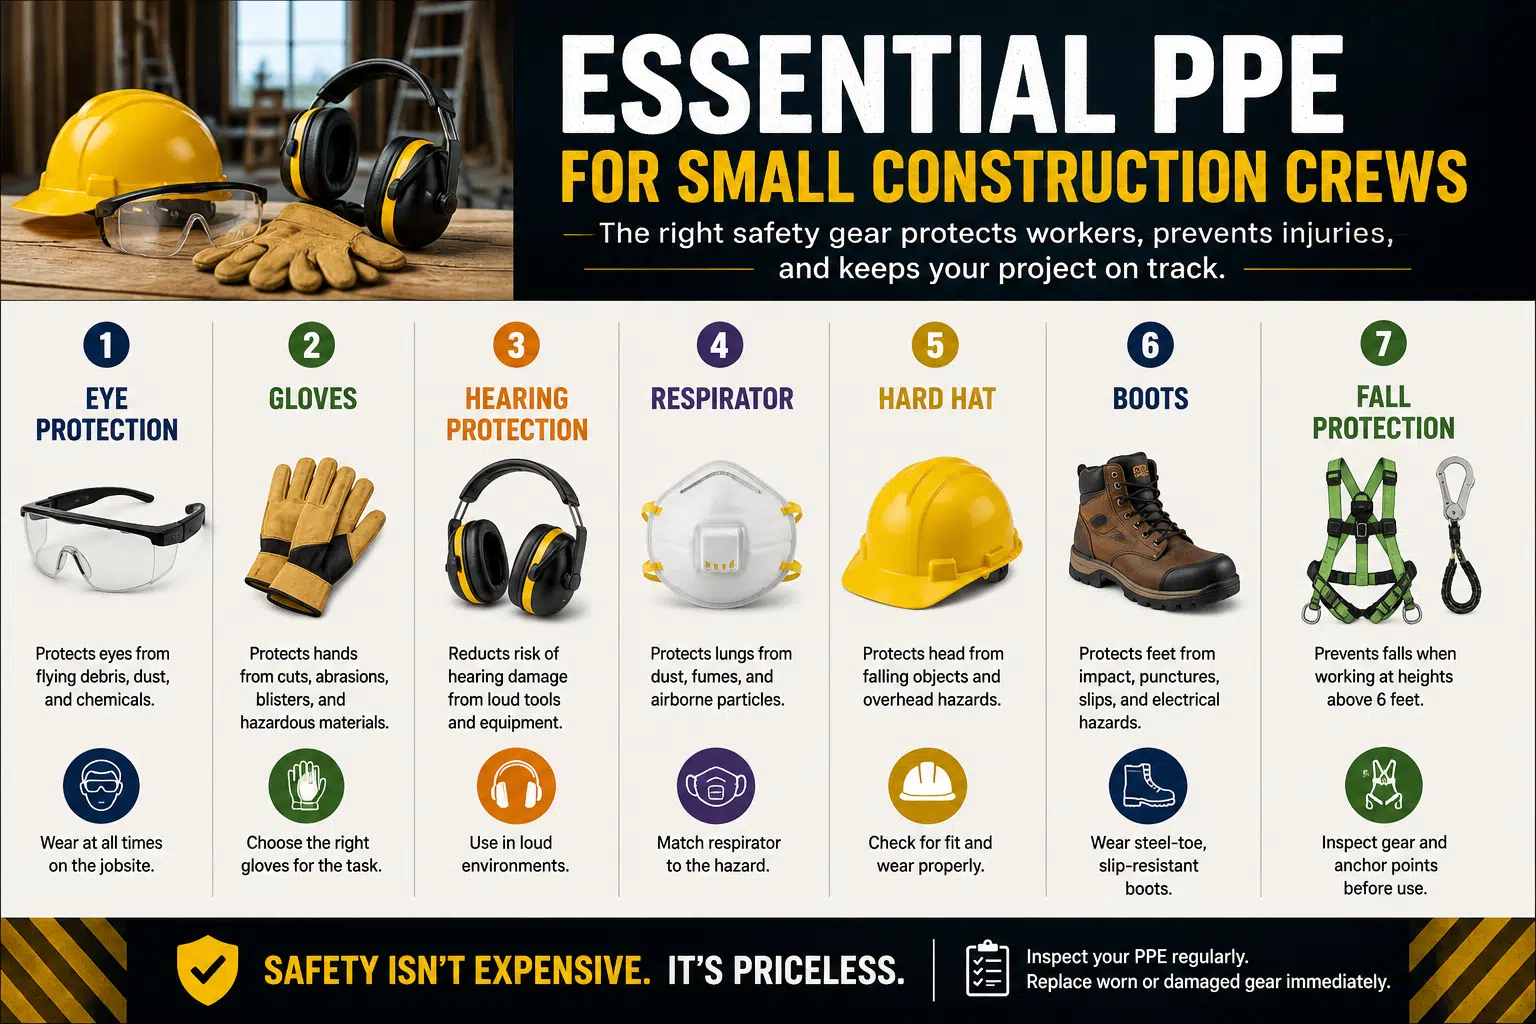
Safety gear should never be treated as optional. It is part of the construction equipment checklist because it protects workers and helps keep the project running.
Basic personal protective equipment may include hard hats, safety glasses, gloves, hearing protection, dust masks or respirators, steel-toe boots, high-visibility clothing, and fall protection. The exact gear depends on the project.
“Construction crews often focus on preventing accidents, but they should also plan for what happens if an accident does occur. Clear site access, emergency contacts, first-aid supplies, and a response plan can make a big difference when time matters,” says Sharon Amos, Director at Air Ambulance 1.
For demolition work, eye protection, gloves, masks, and sturdy footwear are especially important. For cutting and grinding, hearing and eye protection are essential. For work at height, fall protection may be required. For dusty environments, respiratory protection may be necessary.
Safety equipment should be available before work begins, not purchased after a problem appears. Crews should also make sure the gear is in good condition and fits properly. Poorly fitting gloves, fogged safety glasses, or uncomfortable masks often lead workers to remove them, which defeats the purpose.
A safe jobsite is also a more professional jobsite. Clients notice when a crew is organized and careful. Safety planning builds trust and reduces the chance of delays, injuries, and liability problems.
Material Handling and Moving Equipment
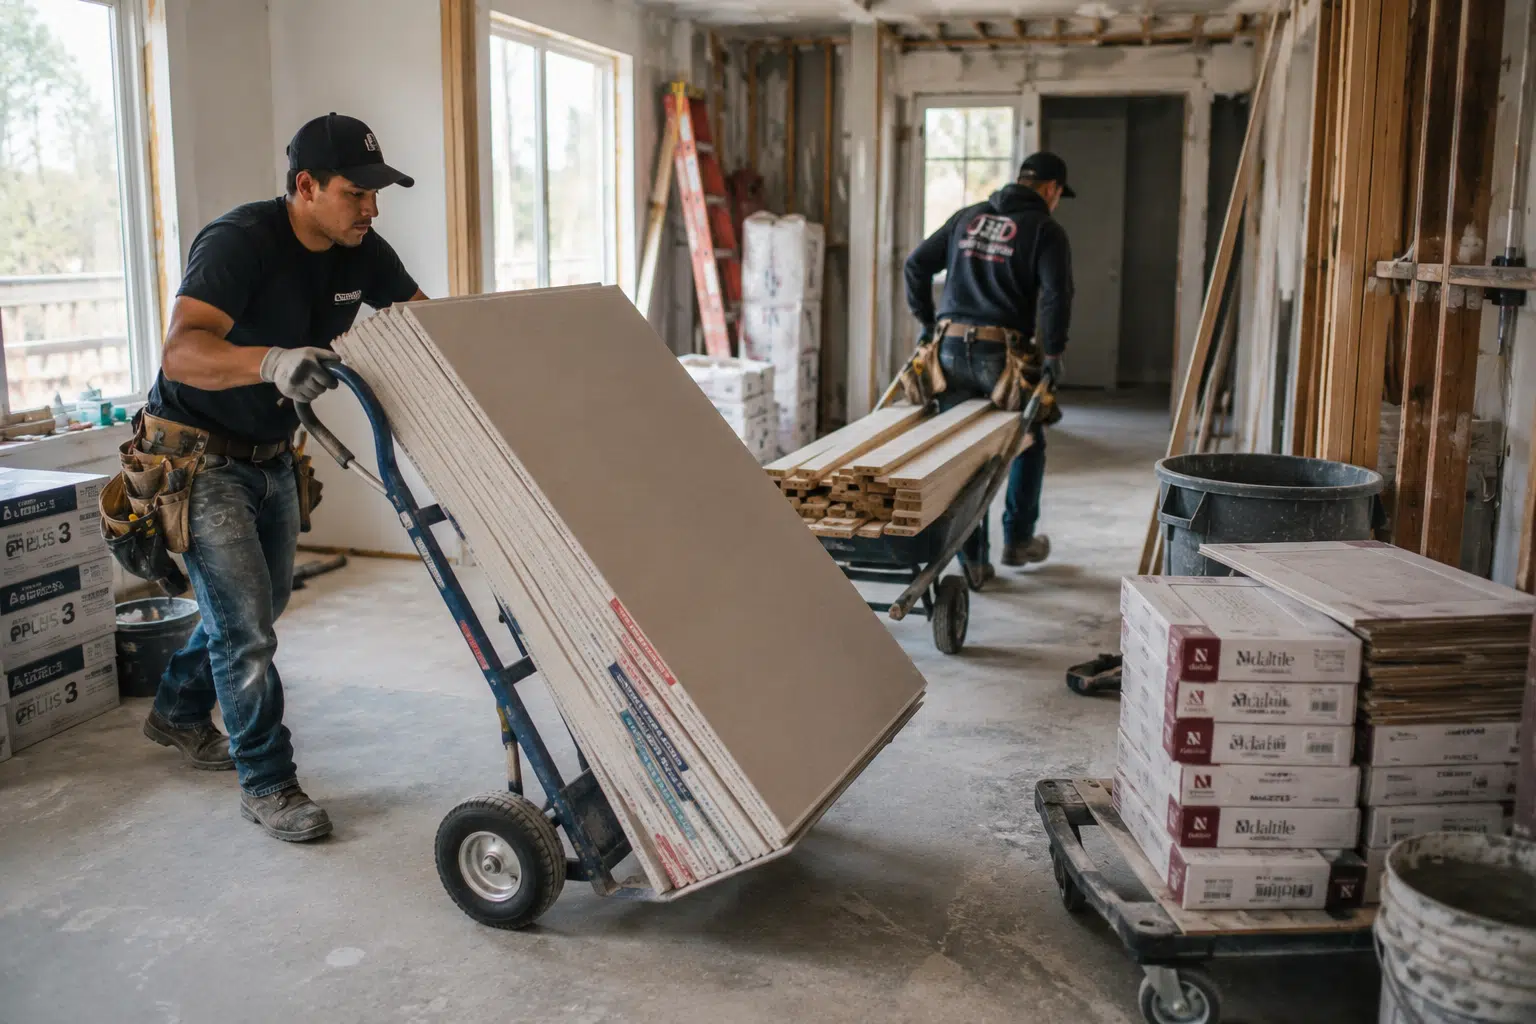
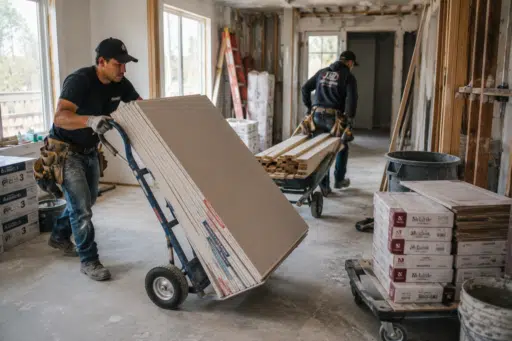
Moving materials is one of the most physically demanding parts of construction work. Lumber, drywall, tile, concrete bags, railing parts, cabinets, doors, windows, soil, and debris can all be heavy and awkward to carry.
Material handling equipment helps reduce strain and improve speed. Depending on the project, this may include dollies, carts, wheelbarrows, hand trucks, panel carriers, hoists, straps, ramps, pallet jacks, or compact loaders.
For small contractors, this category is often overlooked because moving materials feels like basic labor. But poor material handling can lead to injuries, damaged materials, and wasted time. A team that carries everything by hand may finish the day exhausted before the skilled work is even complete.
Planning material delivery is also important. Materials should be placed where they are accessible but not blocking work areas. If supplies are dropped too far from the work zone, the crew loses time moving them. If they are placed in the wrong spot, they may create hazards or get damaged.
Good material handling is not only about strength. It is about workflow. The easier it is to move materials safely, the more efficient the project becomes.
Demolition and Removal Tools
Many renovation projects begin with removal. Old flooring, cabinets, drywall, railings, fixtures, decks, concrete, or damaged materials may need to come out before new work can begin.
Demolition equipment can include pry bars, sledgehammers, reciprocating saws, demolition hammers, rotary hammers, dumpsters, trash bags, wheelbarrows, dust control systems, and protective barriers. The right setup depends on the type and size of demolition.
Small crews should plan demolition carefully because it can affect the rest of the project. Removing materials too aggressively can damage structures, wiring, plumbing, or finished surfaces. In older homes, there may also be concerns about lead paint, asbestos, mold, or hidden damage. When hazardous materials may be present, professional testing and proper handling are important.
Debris removal should also be planned before demolition starts. A site can become unsafe quickly if broken materials pile up in walkways. Dumpsters, hauling services, and cleanup tools should be part of the schedule.
Demolition is not just destruction. It is controlled removal. Good equipment helps crews work faster while protecting the parts of the property that need to remain.
Fastening and Anchoring Equipment
Fastening is a major part of construction and renovation work. Whether the team is installing framing, decking, railings, cabinets, fixtures, or trim, the right fasteners and fastening tools matter.
Common fastening equipment includes drills, impact drivers, nail guns, screw guns, staple guns, concrete anchors, masonry bits, screws, bolts, brackets, adhesives, and clamps. The choice depends on the material and the load requirements.
A common mistake is using fasteners that are convenient rather than appropriate. Wood, metal, concrete, brick, and composite materials all require different fastening methods. Outdoor projects may require corrosion-resistant fasteners. Structural work may require specific anchors or hardware. Finish work may require fasteners that hold securely without damaging appearance.
Contractors should also keep extra fasteners on site. Running out of screws, anchors, nails, or brackets can stop work for something very small. A well-stocked fastening kit saves time and reduces interruptions.
Project-Specific Materials Should Be Planned Early
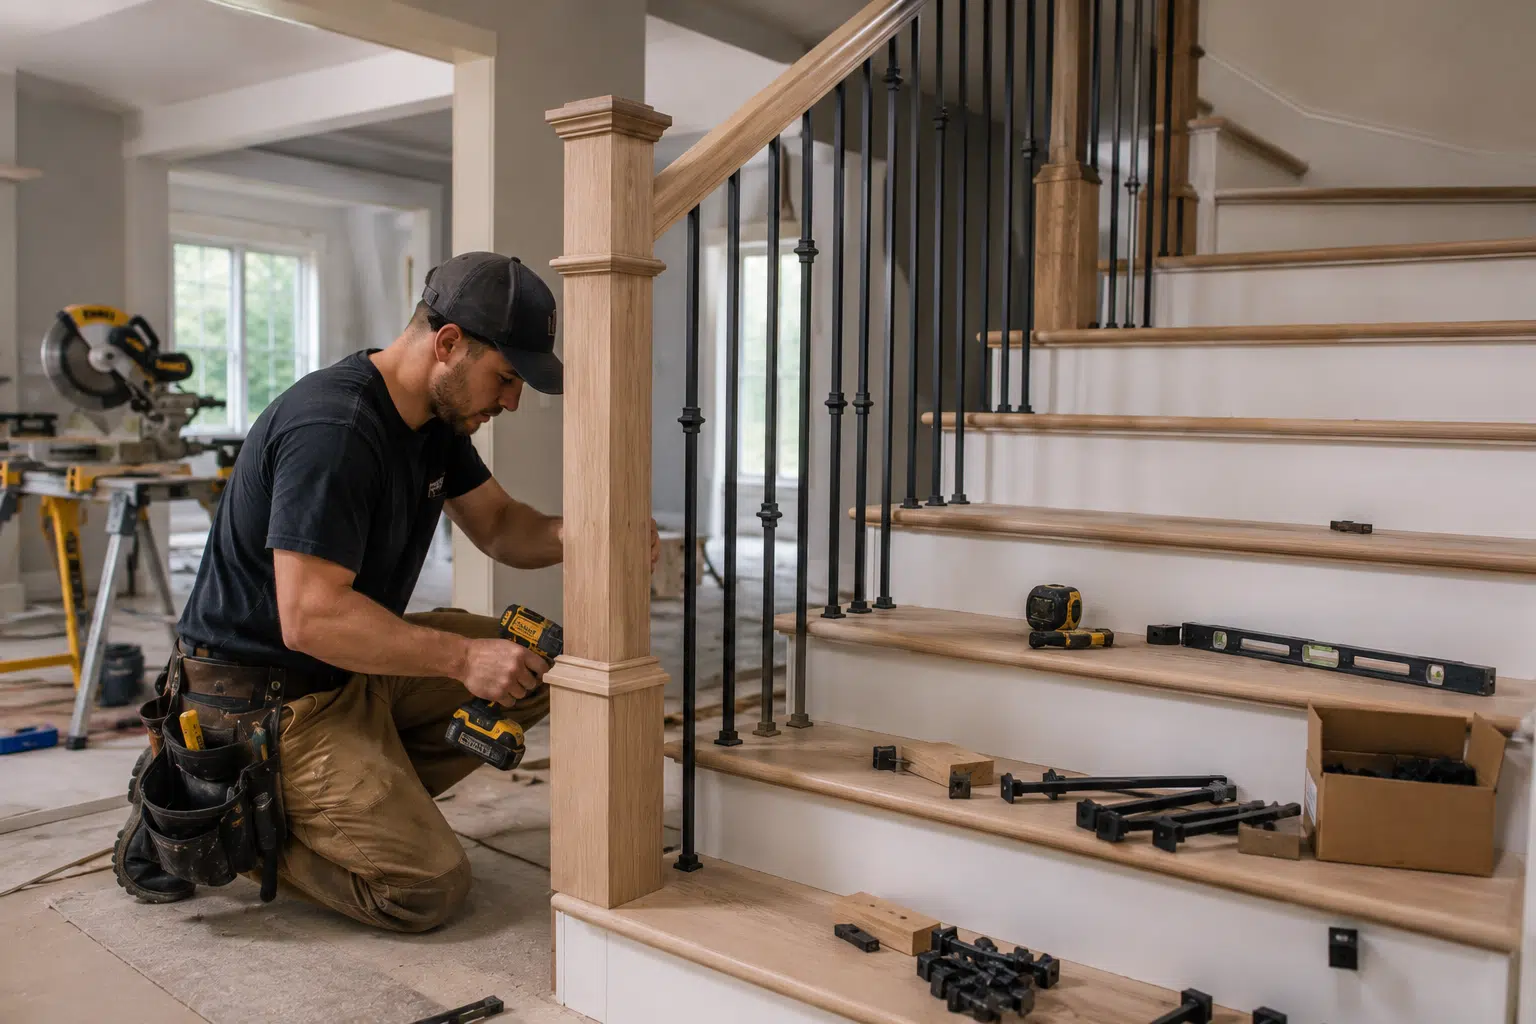
Equipment is only one part of a successful construction project. The crew also needs the correct materials and components before work begins. This is where many small renovation projects run into trouble.
A team may have all the right tools but still lose time because a key part is missing, the wrong size was ordered, or the material does not match the installation method. This can happen with flooring, decking, railings, trim, doors, cabinets, tile, hardware, and many other products.
For stair and railing work, planning is especially important because measurements, spacing, safety, and appearance all have to work together. Balusters, handrails, fasteners, brackets, and finishing details should be checked before the installation starts.
“For stair and railing work, materials need the same level of planning as tools. Balusters, fasteners, measurements, and finish compatibility should be confirmed before installation starts, because one missing part can delay the whole project,” says Andrew Pho, General Manager at Mister Baluster.
This is a useful reminder for small contractors and renovation teams. A jobsite can have the right saws, drills, ladders, and safety gear, but the project can still stall if the materials are incomplete.
Project-specific materials should be reviewed during the planning stage. Contractors should confirm dimensions, quantities, finish options, compatibility, lead times, and installation requirements. They should also check whether specialty tools are needed for certain materials.
This kind of preparation helps avoid last-minute changes that can affect both schedule and quality.
Measuring and Layout Equipment
Accurate layout is one of the most important parts of construction work. Poor layout can create problems that show up later in the project, when they are more expensive to fix.
Measuring and layout equipment may include tape measures, laser measures, levels, laser levels, framing squares, chalk lines, marking pencils, plumb bobs, angle finders, and templates. For more advanced work, digital measuring tools and layout systems may be useful.
Renovation work often involves uneven floors, out-of-square walls, old framing, and hidden surprises. This makes measuring even more important. Unlike new construction, where everything may be built from a clean plan, renovation teams often have to adapt to existing conditions.
The best practice is to measure more than once and confirm before cutting, drilling, or ordering materials. This is especially true for stairs, railings, cabinetry, tile, doors, windows, and built-ins.
Good layout tools also help with communication. When marks are clear and measurements are documented, the whole team can work with fewer misunderstandings.
Cleanup Equipment and Waste Management
Cleanup should be part of the equipment checklist from the beginning. A messy jobsite is not only unprofessional; it can also be unsafe and inefficient.
Basic cleanup equipment may include brooms, dustpans, shop vacuums, dust extractors, trash bags, dumpsters, magnetic sweepers, buckets, rags, cleaning solutions, and protective containers for sharp waste. Outdoor projects may require wheelbarrows, tarps, and hauling equipment.
Small crews should clean throughout the project, not only at the end. Keeping walkways clear reduces trip hazards. Removing dust improves working conditions. Organizing waste helps prevent damage to finished work.
Clients also notice cleanup habits. A renovation project can be stressful for homeowners or building occupants. A crew that keeps the site clean shows respect for the property and builds confidence.
Waste disposal should be planned properly. Some materials can go into regular construction waste, while others may require special handling. Paint, chemicals, old insulation, treated wood, and hazardous materials should be managed according to local rules.
Construction Equipment Checklist by Project Type
Different projects require different tools. A general contractor tool checklist is helpful, but small teams should also build equipment lists for common project types.
Bathroom Renovation
A bathroom renovation may require demolition tools, cordless drills, impact drivers, tile saws, plumbing tools, moisture protection, dust barriers, shop vacuums, floor protection, lighting, PPE, and cleanup supplies.
Because bathrooms are small and often connected to finished living areas, dust control and surface protection are especially important. Crews should also plan for tight access, water shutoff, material staging, and safe debris removal.
Deck Repair or Installation
A deck project may require circular saws, drills, impact drivers, post-hole diggers, levels, framing squares, ladders, fasteners, brackets, hauling tools, and safety gear.
Outdoor conditions also matter. Contractors should check the ground, access paths, weather, material delivery areas, and whether any compact equipment is needed for digging, grading, or moving materials.
Stair or Railing Upgrade
A stair or railing project may require tape measures, laser levels, saws, drills, clamps, balusters, handrails, brackets, fasteners, finishing tools, and safety supports.
This type of project depends heavily on accurate measuring. Small mistakes in spacing, angle, or alignment can affect both appearance and safety. Materials should be checked before the installation starts.
Driveway or Outdoor Repair
Driveway repair, drainage work, or outdoor improvement may require shovels, rakes, compactors, concrete tools, wheelbarrows, drainage tools, compact loaders, protective barriers, and safety equipment.
Site conditions are especially important here. Slope, soil, water flow, access, and nearby surfaces can all change the equipment plan.
Interior Demolition
Interior demolition may require pry bars, sledgehammers, reciprocating saws, dust barriers, respirators, gloves, safety glasses, dumpsters, shop vacuums, and debris removal tools.
The key is controlled removal. Crews should avoid damaging wiring, plumbing, structural elements, or finished areas that need to remain.
Plan Around People Using the Property
Construction and renovation planning should also consider who will be using the property during or after the work. This is especially important for guest-facing spaces such as vacation homes, rental properties, boutique stays, and hospitality-style properties. In these settings, a renovation project does not only affect the structure. It also affects access, comfort, noise, cleanliness, and the overall experience of the space.
Small contractors should think about how equipment, materials, and work schedules may impact the people using the property. Loud cutting tools, blocked entrances, exposed materials, dust, poor lighting, or unfinished areas can create problems if the property is still being used or prepared for guests.
“For guest-facing properties, renovation equipment planning should include more than tools. Crews need to think about where materials are staged, how noise is scheduled, how dust is controlled, and whether the space still feels safe and organized for people using it,” says Luciano Armanasco, Founder & Tour Host at Our Dolce Vita.
This is why communication matters. Contractors should explain which areas will be unavailable, where equipment will be stored, how long noisy work may take, and when cleanup will happen. For property owners, this makes it easier to plan around bookings, guest arrivals, inspections, or daily use.
A project that is well organized is not only easier for the crew. It is also less stressful for the people who depend on the property.
Backup Equipment and Replacement Parts
Even well-planned projects can face equipment problems. Tools break. Batteries fail. Blades get dull. Bits snap. Extension cords stop working. A small issue can delay the entire crew if there is no backup plan.
Small contractors should keep backup essentials available whenever possible. This may include extra blades, drill bits, batteries, chargers, extension cords, fasteners, PPE, tape measures, pencils, and basic repair items.
For frequently used tools, having a backup can be worth the cost. If a cordless drill or saw fails during a busy project, the lost time may cost more than the tool itself.
Maintenance also matters. Tools should be cleaned, charged, sharpened, and stored properly. Equipment should be inspected before being loaded for the job. A checklist can help make sure nothing important is forgotten.
The goal is not to carry every tool on every job. The goal is to know which items are critical enough that failure would stop work.
Storage and Transportation
Small contractors often work from vans, trucks, trailers, or compact storage spaces. This makes transportation and organization a major part of equipment planning.
Tools should be stored in a way that protects them from damage and makes them easy to find. Heavy tools should be secured during transport. Sharp tools should be covered. Batteries and chargers should be kept dry and protected from extreme conditions.
A disorganized vehicle can slow down the entire day. Workers may spend too much time searching for tools, unloading unnecessary items, or discovering that something was left behind.
Tool storage systems, labeled bins, racks, and checklists can make a big difference. Contractors who repeat similar jobs can create standard loadout lists for common project types, such as bathroom renovations, deck repairs, railing installations, flooring jobs, or demolition work.
Better organization also presents a more professional image. Clients may not understand every detail of construction, but they can see when a crew is prepared.
Renting Versus Owning Equipment
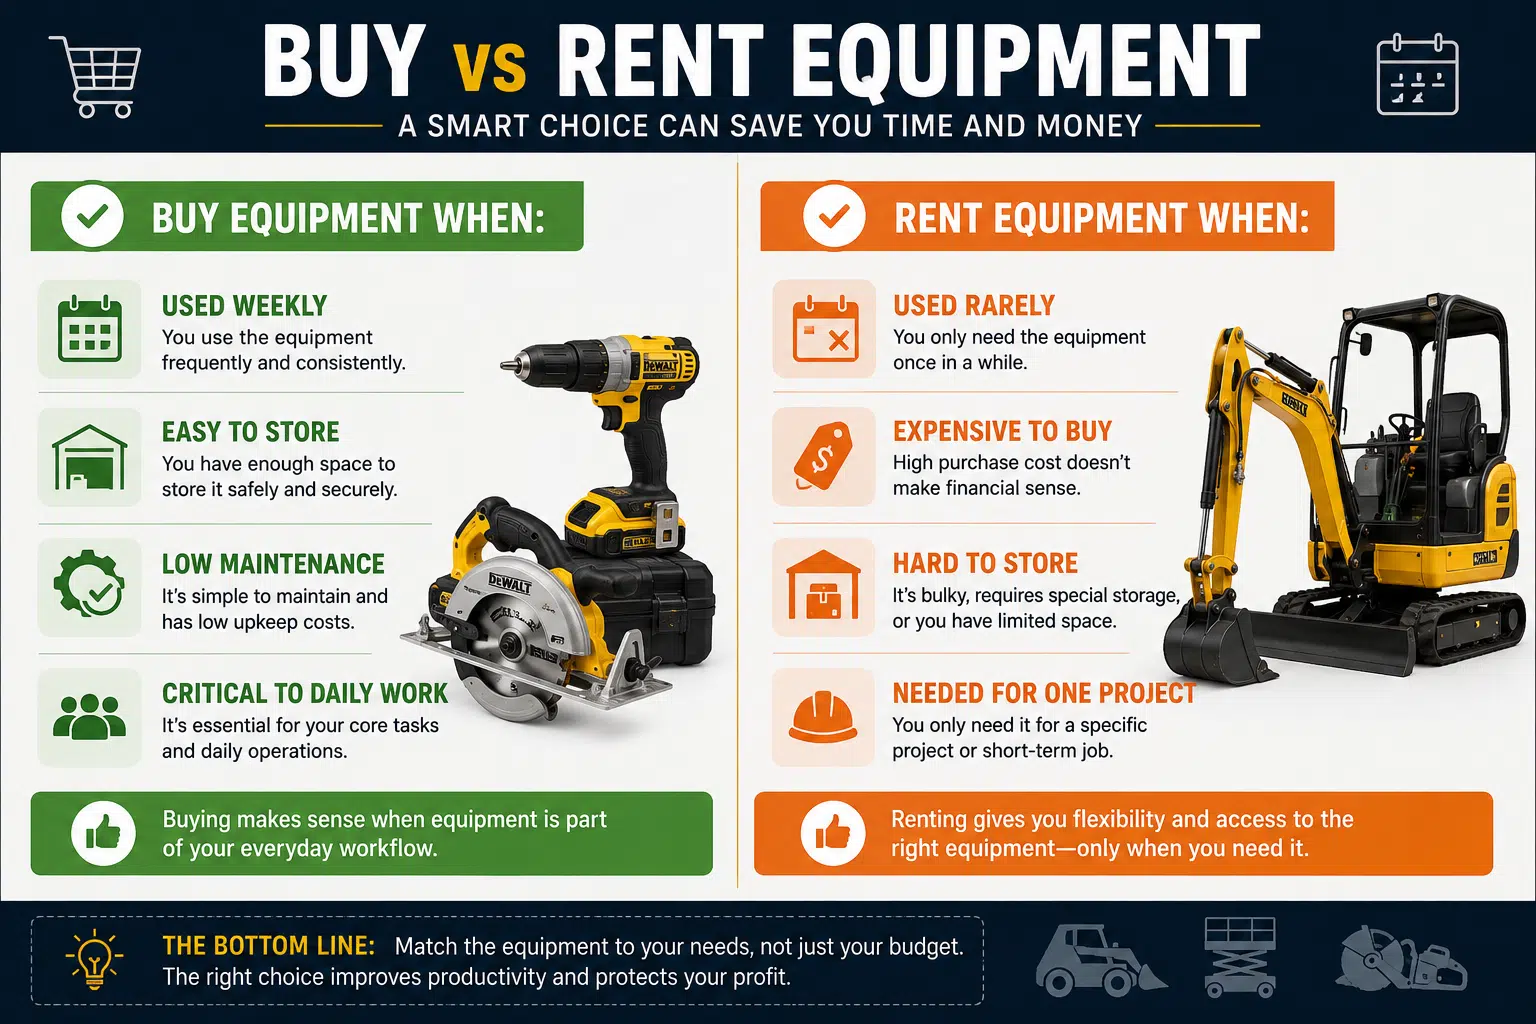
Small contractors often have to decide whether to rent or own certain equipment. There is no single answer. The right choice depends on how often the equipment is used, how expensive it is, how much maintenance it requires, and how much storage space is available.
Owning equipment can make sense for tools used every week. Drills, saws, ladders, vacuums, and basic hand tools are usually worth owning. Specialty equipment, large machines, or rarely used tools may be better to rent.
Renting can reduce upfront costs and give contractors access to equipment that fits a specific job. It can also help teams avoid maintenance and storage issues. However, renting requires planning. The equipment must be available when needed, and the crew must understand how to use it safely.
The decision should be based on real business needs, not guesswork. Contractors should track how often they use certain tools and how much downtime they experience when equipment is unavailable. Over time, this helps them decide what to buy and what to rent.
Building a Repeatable Equipment Checklist
The best equipment checklist is not a one-time document. It should become part of the contractor’s workflow.
After each project, the team can review what worked and what was missing. Were there delays because of equipment? Did any tools go unused? Was anything rented too late? Were the right safety supplies available? Did the crew have enough batteries, blades, fasteners, and cleanup tools?
This feedback helps improve future planning. Over time, contractors can create different checklists for different job types. A deck repair checklist will not be the same as a bathroom renovation checklist. A stair railing checklist will not be the same as a concrete repair checklist. But each one can follow the same basic structure.
A useful checklist should include hand tools, power tools, safety gear, access equipment, material handling tools, project-specific materials, cleanup supplies, and backup items. It should also include who is responsible for bringing or ordering each item.
When equipment planning becomes repeatable, teams make fewer mistakes. They also look more professional, work more efficiently, and protect their profit margins.
Final Jobsite Equipment Checklist
Before starting a small construction or renovation project, contractors should confirm:
- The project scope is clear
- The site has been inspected
- Tools match the materials being used
- Safety gear is available and in good condition
- Ladders, scaffolds, or lifts are suitable for the work
- Fasteners, blades, batteries, and bits are stocked
- Materials have been checked for size and compatibility
- Dust control and surface protection are ready
- Cleanup and waste removal are planned
- Backup tools or replacement parts are available
- Equipment is loaded, organized, and ready before arrival
- Crew members know who is responsible for each part of the setup
This final check can prevent many common jobsite delays. It also helps small contractors show up prepared, organized, and ready to work.
FAQs About Construction Equipment Checklists
What should be included in a construction equipment checklist?
A construction equipment checklist should include hand tools, power tools, measuring tools, safety gear, access equipment, material handling tools, demolition tools, cleanup supplies, backup parts, and project-specific materials.
Why is equipment planning important for small contractors?
Equipment planning helps small contractors avoid delays, reduce labor costs, improve safety, and complete projects more efficiently. It also helps crews avoid last-minute rentals, missing tools, and poor material planning.
Should small contractors rent or buy equipment?
Small contractors should usually buy tools they use every week and rent expensive or specialty equipment that is only needed for certain projects. Renting can be useful for large machines, specialty tools, and equipment that requires storage or maintenance.
What safety equipment should every small construction crew have?
Basic safety equipment includes gloves, safety glasses, hearing protection, dust masks or respirators, hard hats, steel-toe boots, high-visibility clothing, and fall protection when working at height.
How can contractors avoid missing tools on a jobsite?
Contractors can avoid missing tools by using repeatable checklists, organizing tools by project type, checking equipment before loading, assigning responsibility to crew members, and reviewing the site before work begins.
What is the most overlooked equipment category in small renovation projects?
Site preparation and cleanup equipment are often overlooked. Dust barriers, shop vacuums, floor protection, lighting, dumpsters, and waste removal tools may not seem as important as saws or drills, but they can strongly affect safety, efficiency, and client satisfaction.
Final Thoughts
Small construction and renovation projects may not always require large crews or heavy machinery, but they still require serious planning. The right equipment helps teams work safely, finish tasks faster, and deliver better results.
For small contractors, the biggest advantage often comes from preparation. A clear construction equipment checklist helps the crew avoid missing tools, wrong equipment choices, poor material planning, and unnecessary delays. It also helps workers stay organized from site preparation to final cleanup.
The most successful renovation teams do not treat equipment as an afterthought. They plan it the same way they plan labor, materials, timing, and budget. They understand that every tool, machine, fastener, ladder, safety item, and cleanup supply plays a role in the finished project.
A strong checklist is simple, but it is powerful. It keeps the project moving, protects the crew, supports quality work, and gives clients more confidence in the people they hired.

Holding a Master’s in Architecture from the University of Texas at Austin, Emily Rodriguez has dedicated more than two decades to the art and science of building renovation. Starting her journey in historic preservation, she developed a profound respect for blending old with new in building design. Emily became a vital part of our team in 2019, renowned for her insightful and innovative renovation tips. She has been leading our DIY home improvement series since ever since, where she shares her wealth of knowledge in turning outdated spaces into modern havens. When not engaged in writing or consulting, Emily is a passionate advocate for heritage conservation and enjoys exploring vintage architecture, a hobby that complements her professional expertise.