Are you planning to add a new drawer in your cabinet, or do you just want to upgrade the existing ones? Well, you better be aware of how to build a drawer.
Fortunately, there are many simple ways to build a drawer without any hassles. Also, interestingly, everyone seems to design their drawers differently. And, without a doubt, that is the beauty of it: You can design your drawer just the way you like it.
If you are new to woodworking and are keen to learn how to build a drawer, we are here with our detailed guide. You just need to follow some simple rules to make your drawer a masterpiece. So, without any further ado, let’s get started to explore the step-by-step guide to building a drawer.
Things to Remember Before Starting to Build a Drawer Box
Learning how to build a drawer may not be rocket science, but it is also not a piece of cake. You should be aware of some of the basic things that shouldn’t be ignored while making a drawer. No matter how you are designing your drawer, these things are always important to consider.
These are the following things to always remember before starting to build a drawer.
- An Inset or An Overlay Drawer: The first thing to ensure is whether you want an inset or an overlay drawer, as this will decide the overall length. Both types need different measurements and, thus, should be decided beforehand.
- The Type Of Drawer Slides: Make sure to decide on the drawer slides before going deep into how to build a drawer. This will surely keep the design and implementation simple and hassle-free. Side-mounted drawers are still the most desired choice; however, undermount drawer slides are also becoming popular.
- Use of Edge Banding: Edge banding is really essential, especially when you are using plywood for designing a drawer. Ensure that edge banding is applied before assembling the drawer to get a more professional look with a solid frame.
- The Storage Weight: Before finalizing the dimensions of the drawer, be very specific in deciding the overall storage weight it will hold. You surely don’t want your drawer’s bottom to fall out as you put the things in.
If you are building a drawer to hold some solid items, you would need to make it strong and sturdy. On the other hand, if the drawer will only hold some minor objects, a lightweight drawer will also be acceptable.
- Be Specific About the Dimensions: Another important thing to keep in mind as you plan to learn how to build a drawer is the dimensions. You don’t really want to mess up with the dimensions and regret that later. Take all the specific dimensions from different angles and locations to get them right. Don’t ignore even the smallest of dimensions when building a drawer.
- Be Gentle with Assembling: It might look easy, but assembling the drawer needs your undivided attention. As it is the final stage, you really don’t want anything to go wrong, do you? Maintain the front and back between the sides as you assemble your drawer. This not only enhances the overall look of the drawer but also makes it strong and stable for use. Your drawer will last for years with the exact same strength as expected.
- Design a Square Drawer: Lastly, be very sure that your drawer is square. If it is not a square, it won’t fit in the desired space, and that can be really irritating. Thus, measure the drawer from corner to corner in every direction possible.
No matter how well-prepared you think you are to make a drawer, you cannot completely understand how to build a drawer without these basic factors. Take a moment to be absolutely sure of these considerable factors to build exactly the drawer you want.
How to Measure the Drawer Box Size?
The correct measurement of the drawer box size is the key to success in building a masterpiece drawer. Let us get this straight: you cannot move ahead with the wrong dimensions of the drawer. Therefore, you should be extremely careful to get the right measurements of the drawers.
Measuring a drawer isn’t as simple as measuring a square or a box. It needs attention to detail for accuracy. Here’s how you can get the right measurements of the drawer box size:
1. Drawer Sides
The right measurement of the drawer sides is that they should match the length of the drawer slides. Additionally, the sides should be an inch shorter than the cabinet’s depth.
2. The Front and Back of The Drawer
The exact measurements for the front and back of the drawer come by the width and thickness of the slides and sides.
- Width of the cabinet opening = Thickness of the drawer slides / Full width of the drawer box
- Full width of the drawer box = Thickness of both side pieces / Width of drawer box front and back
This requires a little mathematics, but we are sure you can get this absolutely correct!
3. Drawer Bottom
Lastly, measure the drawer’s bottom with utmost accuracy. If this is not correct, your drawer won’t be able to withstand even a slight weight and will fall out. It can be said that the strength of the drawer depends on the correct measurements of its bottom.
Generally, the bottom size depends upon the chosen assembling method. If you are using plywood for the drawer, the larger side should be erred while the bottom is trimmed for proper fitting.
You can obviously take professional help and assistance to get all these measurements correctly. Avoid proceeding with the wrong dimensions, as it will put all the hard work to waste.
Now, let us get started with the actual procedure to understand how to build a drawer by following some of the easiest steps possible. Are you excited??
How to Build a Drawer – The Procedure
There are different ways in which you can easily build a drawer. Interestingly, you can be as creative and imaginative as you want to build and design a drawer that you want.
Method 1: Building a Drawer with Nails on the Bottom
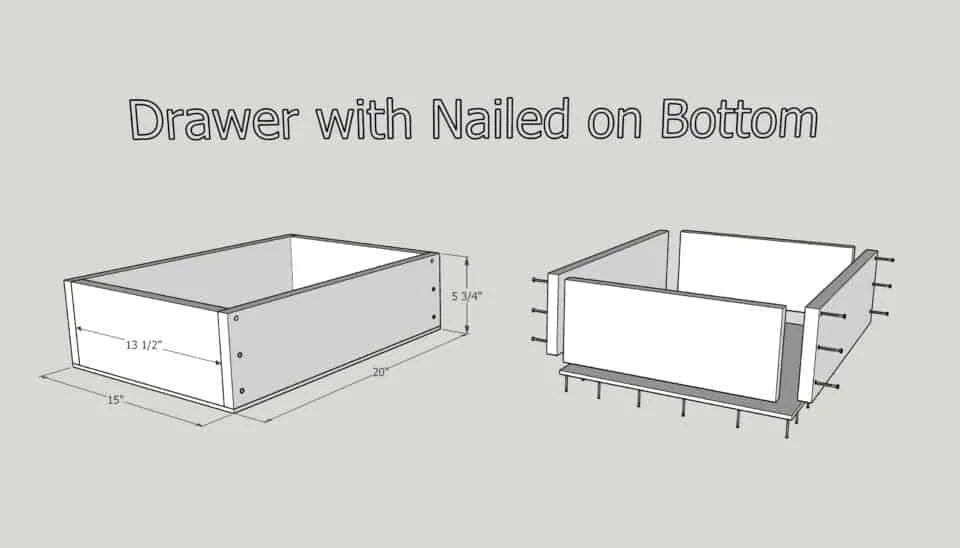
This is one of the easiest ways to build a sturdy drawer without any complications. It is also one of the popular choices for beginners as it is less time-consuming, demands minimal effort, and can easily be assembled. The thing to remember before choosing this method is that it is suitable for only smaller drawers to hold minimal weight.
Required Materials
- 1 X 6 board
- ¼” plywood
- Countersink Bit
- 1 ¼” Wood Screws
- A Drill
- Wood Glue
- Panel Nails
- Hammer
- Square
- Tape Measure
Quick Tip: You can also use pocket holes in the front and back to enhance the beauty of the drawer. The pocket holes ensure that the screw heads are not openly visible to get a cleaner and more attractive look.
1. Predrill
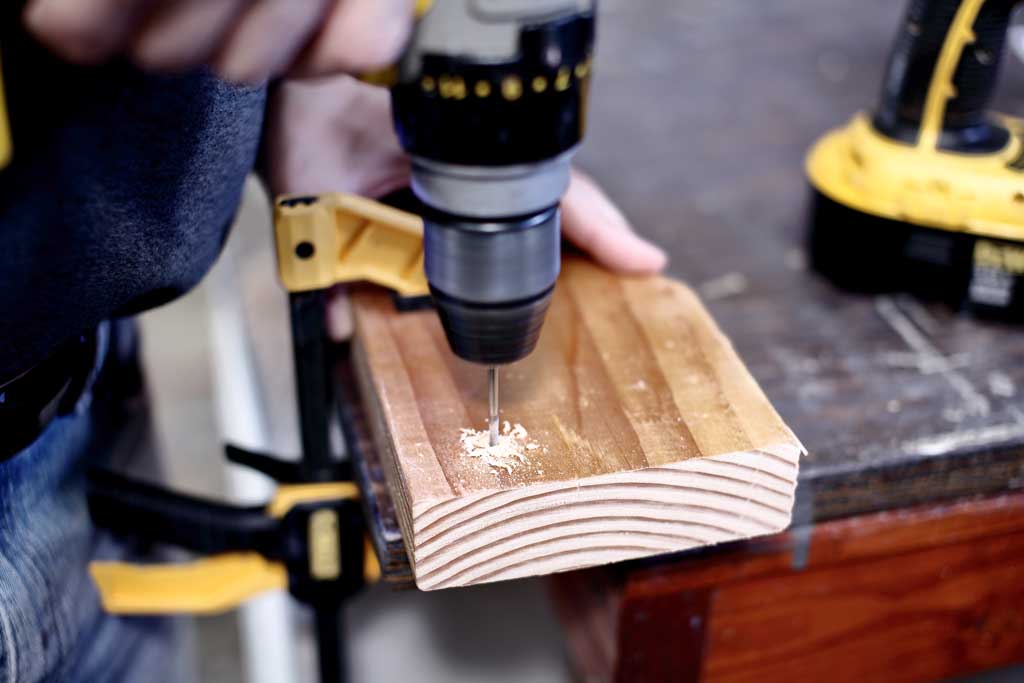
Begin with predrilling the screw holes as it prevents the splitting of wood near the edges. This will not just improve the build quality but also avoid creating a mess. Also, the countersinking of the screws will ensure that the screw heads are well secured with drawer box sides.
Carefully mark a ⅜” line on the longer side piece at both ends and then drill 3 countersink holes along the marked line. Be very careful to follow specific measurements to get the expected results.
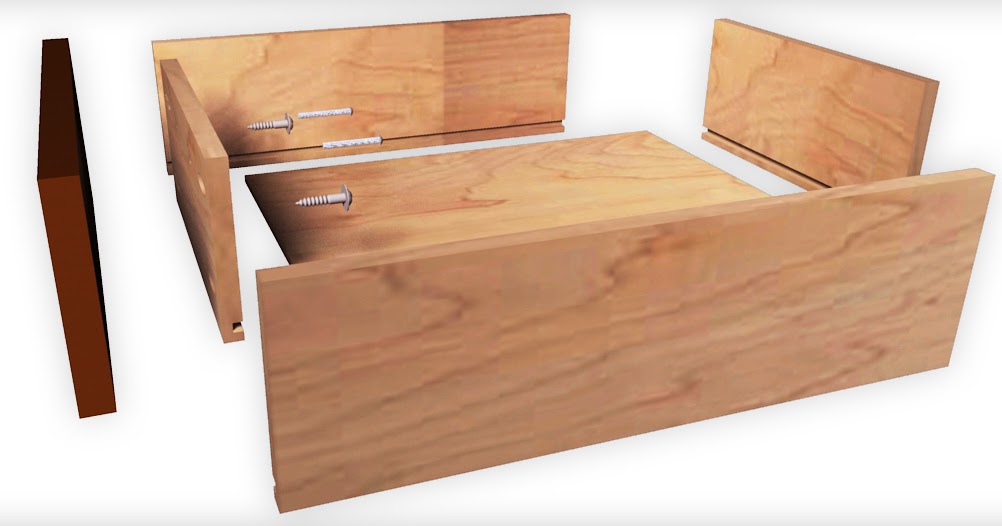
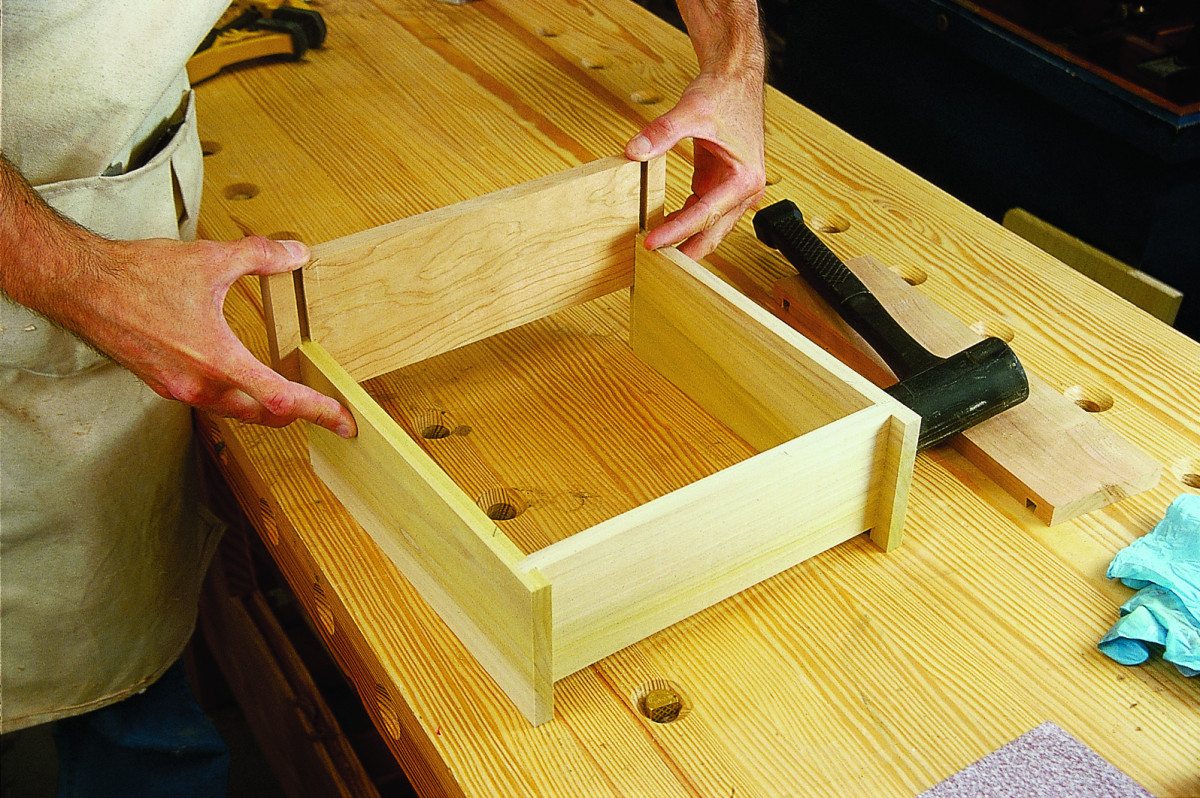
2. Use Screw and Glue
Join the boards using wood glue very firmly and gently. Align all the pieces very precisely at a 90-degree angle using a square. After that, use the 1 ¼” wood screws to perfectly screw the front and back.
Ensure that the screw heads are either at the surface or below the wood surface. You can also make use of brad nails; however, they are not that strong and, thus, not really preferred.
Also, make sure that the drawer is square with perfect measurements from corner to corner in every direction. You can check the numbers. If they are the same, it is a perfect square; otherwise, you need to check your measurements again. Once all the adjustments are made with the measurements, let the glue dry naturally before proceeding with the next step.
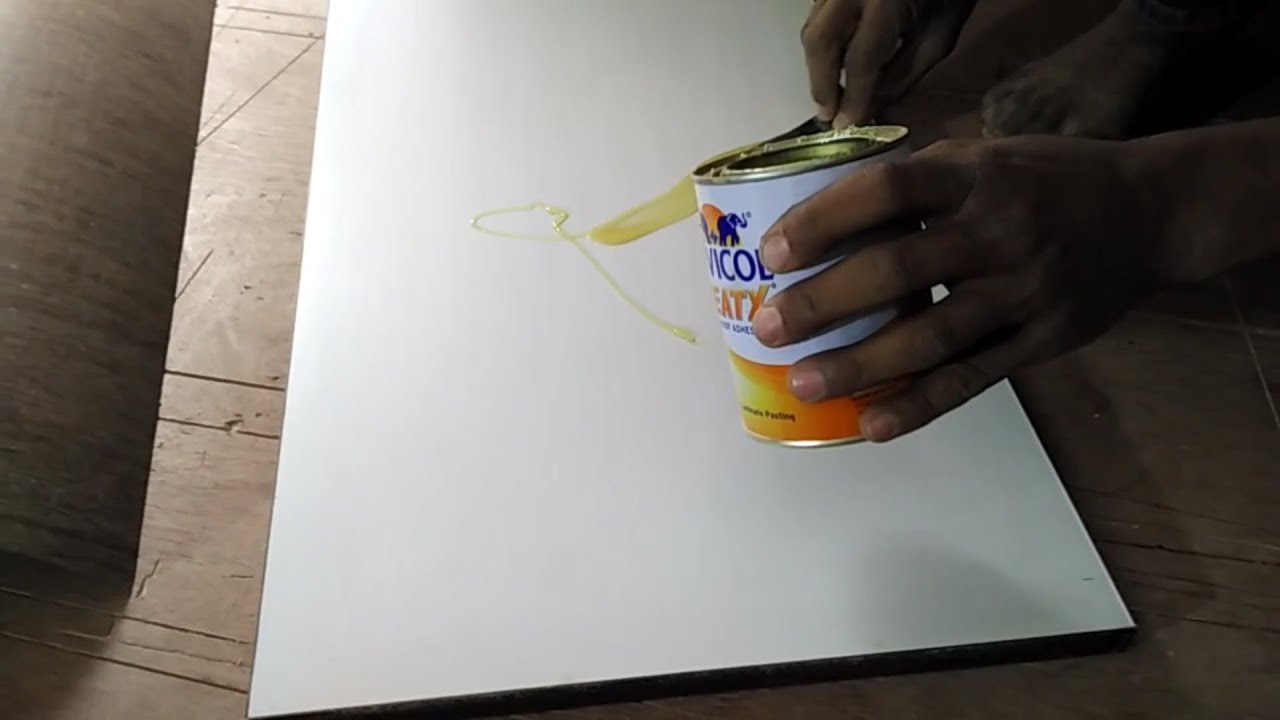
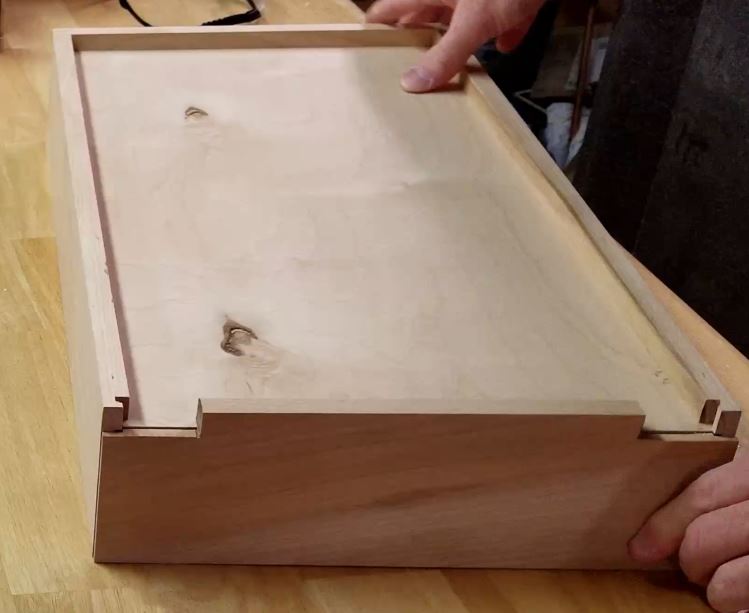
3. Use Glue and Nails on The Bottom
Start with getting the exact dimensions of the box and cut the available ¼” plywood bottom according to that. Use wood glue on the bottom edges and then carefully align the plywood bottom along the sides and corners. Make sure no space is left between them, as then you will not get the desired result.
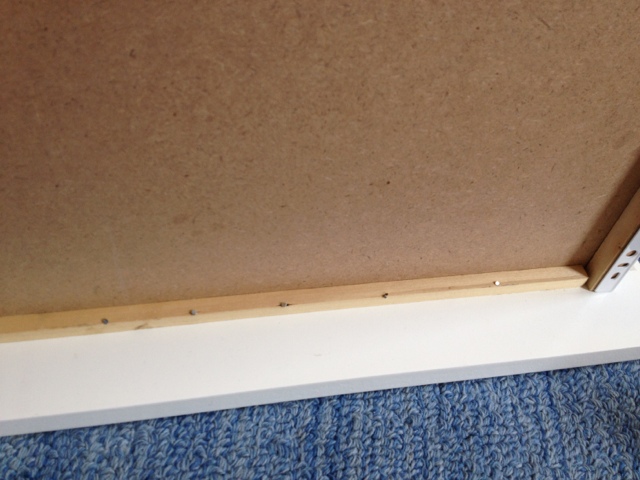
After you have glued the plywood bottom, use panel nails and a hammer to fix the bottom with the box. Ensure that the bottom is perfectly attached to the box without any loose ends. If the attachment is not strong, the bottom might fall out when you put even a slight weight in the drawer.
You can also cover the screw holes using wood fillers and then finally paint the drawer for the final finishing. This is it! That’s all you need to do to build a drawer with nails on the bottom.
Method 2: Building a Drawer with a Recessed Bottom
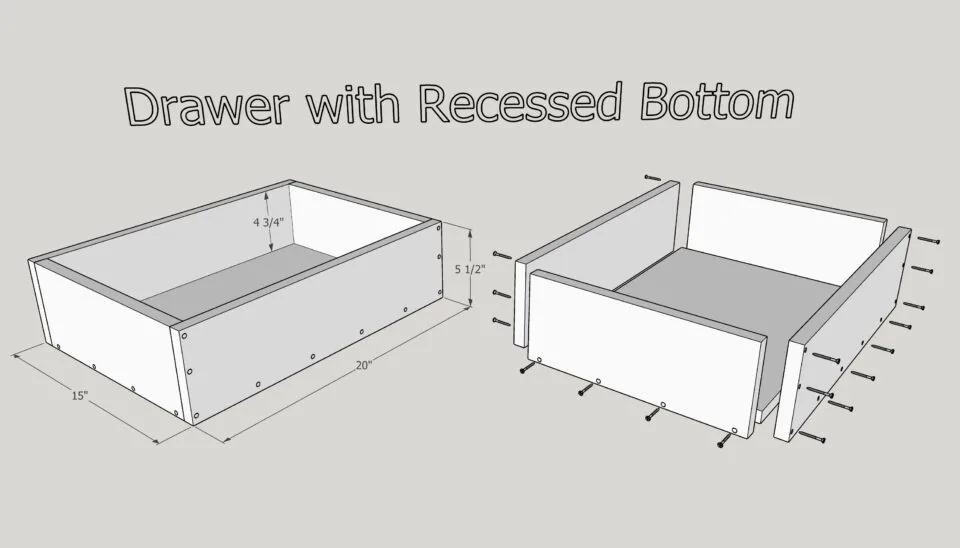
The method is quite easy to follow and results in stronger drawers. It only demands the use of drills and screws to deliver amazing drawers. A much thicker material is used to make the bottom which gets the strength from the screws that keeps it from falling apart or down.
The only concern with this method is that as it uses a thicker material for the bottom, it adds to the overall weight of the drawer.
Required Materials
1. Predrill
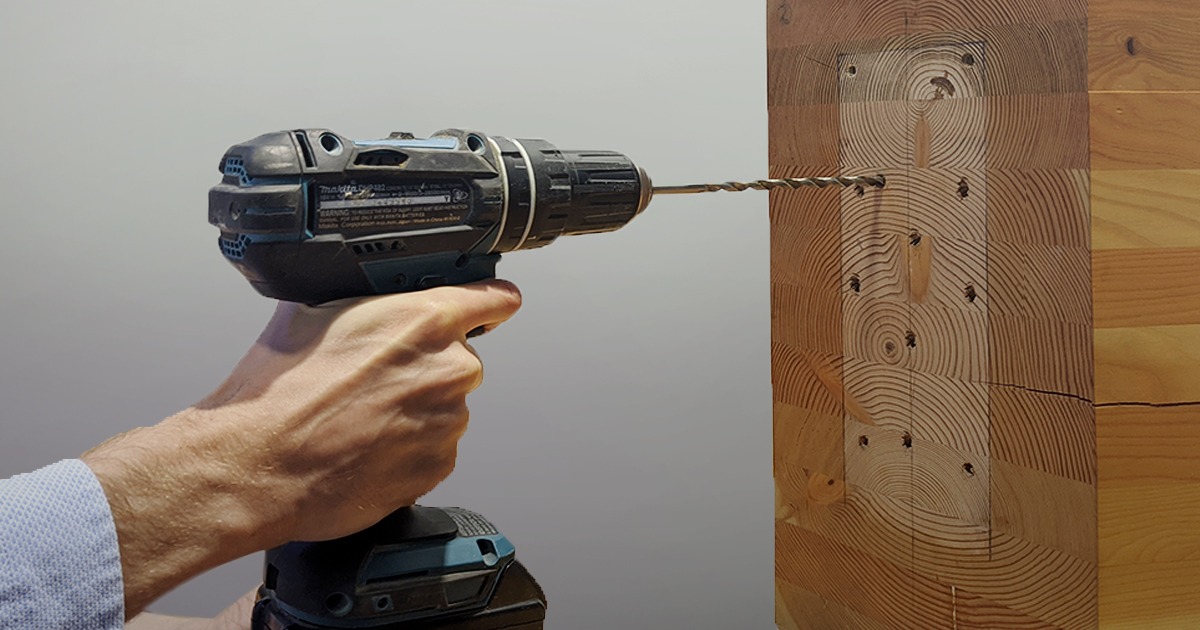
Start with having a line ⅜” from the bottom piece and the ends of the side pieces. Make a mark after every 4 to 6 inches and drill the countersink holes along the line. This prevents the wood from splitting around the corners.
2. Box Assembling
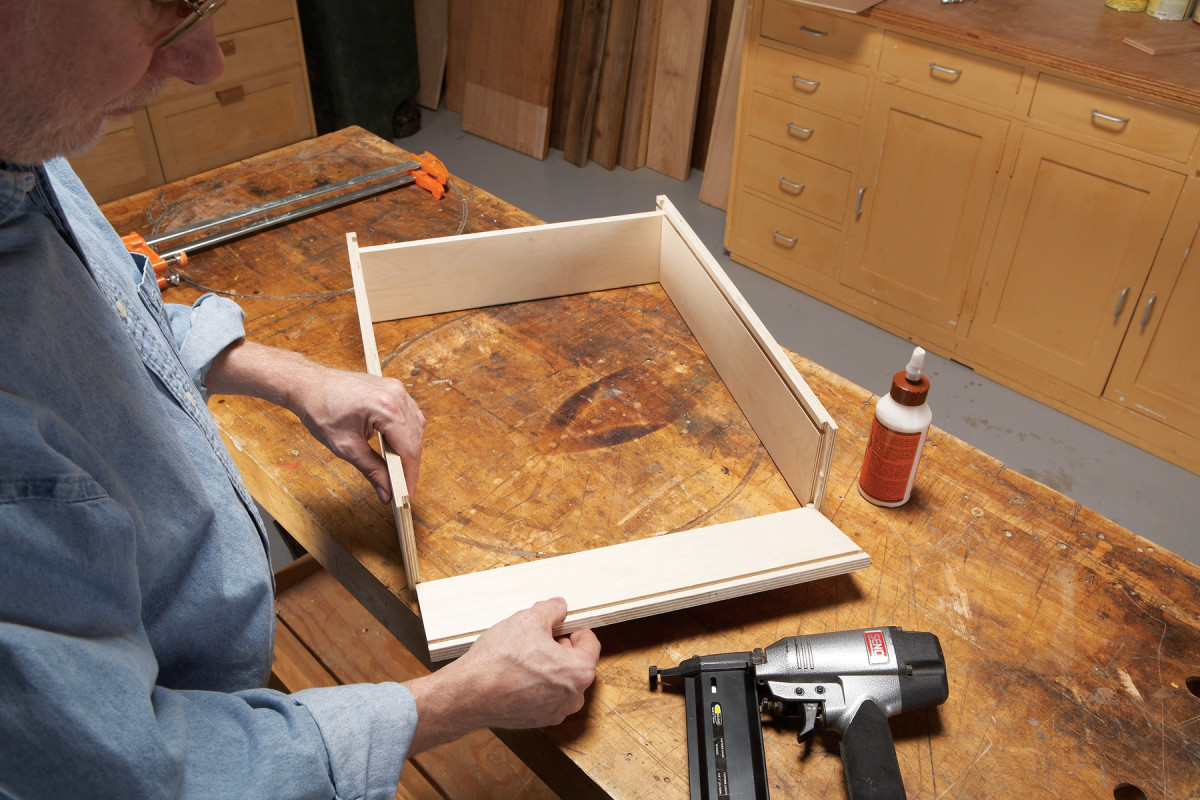
You can follow the same procedure as in the previous method to assemble the outside of the box. Use wood glue where the boards are joined, and then use a square to align all the pieces at a perfect 90-degree angle. Use 1 ¼” wood screws to screw the front and back with the sides without leaving any space in between.
Be very specific to ensure that the box is square. If the dimensions aren’t correct, you can squeeze and shift the larger diagonal using a clamp. Once all adjustments are made for the measurements, allow the glue to dry naturally before moving ahead with the final step.
3. Cut and Attach the Bottom
After the glue is completely dry, take the interior measurements of the box from front to back and side to side. After the dimensions are done, cut ½” to ¾” plywood to make the bottom according to the interior dimensions.
Use the wood glue and apply it on all 4 sides of the bottom and put it on a flat surface. Now, put the drawer box on the bottom to fit in perfectly without any loose ends. Next, put the 1 ¼” wood screws into the predrilled holes to secure the bottom and keep it in place.
Congratulations! Your recessed bottom drawer is now ready and can be used. As these drawers are made with thicker bottoms, they can be used even for storing heavy elements.
Final Thoughts
It is not difficult to understand how to build a drawer; you just need to follow some simple steps, and you are all sorted.
We have covered all the essential details to help you through the process of making a strong, sturdy, and high-quality drawer. Once you ace the art, there is no looking back; you will be making lots of drawers as there is never enough storage.
If you still have doubts, you can write to us in the comment section.

James McLaren, with a rich background in architecture from the University of Manchester, has been contributing his expertise to the world of creative construction and home innovation for over 20 years. His journey began as a project manager for a leading construction firm, where he honed his skills in bringing complex designs to life. James joined our platform as a freelancer in 2019, quickly becoming a favorite for his insightful and practical advice. He has been a pivotal force to our wing ever since, bringing our readers a blend of technical know-how and creative flair. Beyond his professional life, James is an avid woodworker and enjoys restoring vintage furniture, a hobby that complements his professional insights beautifully.