
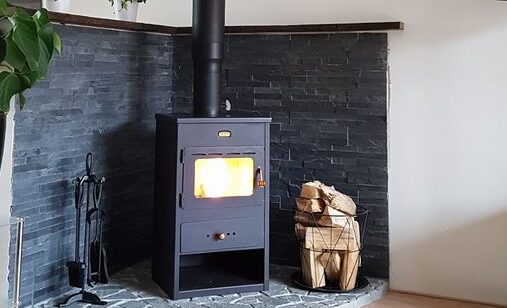
There’s something deeply satisfying about heating your home with wood. The crackling sound, the radiant warmth, and knowing you’re reducing your reliance on fossil fuels all contribute to the appeal of wood stove ownership. But many homeowners hesitate because they assume installation requires professional expertise and deep pockets. The reality? With the right preparation and materials, installing a wood stove and chimney system is well within reach for capable DIYers.
Installing Your Own Wood Stove: A Practical Guide for DIY Homeowners
There’s something deeply satisfying about heating your home with wood. The crackling sound, the radiant warmth, and knowing you’re reducing your reliance on fossil fuels all contribute to the appeal of wood stove ownership. But many homeowners hesitate because they assume installation requires professional expertise and deep pockets. The reality? With the right preparation and materials, installing a wood stove and chimney system is well within reach for capable DIYers.
Why More Homeowners Are Choosing Wood Stoves
Rising energy costs have pushed many Americans to explore alternative heating solutions. Wood stoves offer independence from utility companies and provide reliable heat during power outages. In rural areas where firewood is abundant, the cost savings can be substantial. Even in suburban settings, many homeowners find that supplemental wood heat significantly reduces their monthly heating bills.
Beyond economics, there’s the environmental angle. Modern EPA-certified wood stoves burn far cleaner than their predecessors, achieving efficiency ratings above 75%. When sourced responsibly from local suppliers or your own property, wood becomes a renewable heating resource that doesn’t require cross-country transportation or processing in distant refineries.
The aesthetic value shouldn’t be overlooked either. A wood stove becomes a focal point in your living space, creating ambiance that central heating simply can’t match. During winter gatherings, people naturally gravitate toward the stove, much like our ancestors gathered around communal fires.
Understanding the Components
Before starting your installation, you need to understand what makes up a complete wood stove system. The stove itself is just one piece of the puzzle.
The stove pipe, also called connector pipe, runs from the stove outlet to where it meets the chimney system. This visible section typically uses single-wall or double-wall pipe, depending on your clearance requirements. Single-wall pipe needs 18 inches of clearance to combustible materials, while double-wall reduces that to 6 inches. In tight spaces, double-wall pipe gives you more flexibility in positioning your stove.
The chimney system is where things get more technical. When your installation requires passing through ceilings, walls, or roofs, you need Class A insulated chimney pipe. This isn’t optional or a suggestion from overzealous regulators. Building codes mandate Class A pipe in these locations because it’s specifically designed to withstand extreme temperatures and protect your home’s structure. Class A pipe is UL103HT listed, meaning it’s been tested to handle chimney fire conditions up to 2100°F.
A wood stove chimney kit packages all the necessary components for a complete installation. These kits include the Class A pipe sections, ceiling support box, roof flashing, storm collar, and rain cap. Having everything arrive together eliminates the frustration of discovering you’re missing a critical adapter halfway through installation.
For homes with existing masonry chimneys, a chimney liner provides a safe, code-compliant way to connect your wood stove. Old brick chimneys often have deteriorated mortar joints and sizing issues that make them unsuitable for direct connection to modern stoves. A stainless steel liner creates a smooth, properly sized flue path while protecting the aging masonry from corrosive flue gases.
Planning Your Installation
Successful wood stove installation starts with careful planning. Your stove’s location determines everything else, from pipe routing to clearance requirements.
Start by checking your local building codes and permit requirements. Most jurisdictions require permits for wood stove installations, and for good reason. The permit process ensures your installation meets safety standards and gets properly inspected. While it might seem like bureaucratic hassle, that inspection provides peace of mind and may be required by your homeowner’s insurance.
Your stove needs adequate clearance from walls, furniture, and other combustible materials. Every stove comes with a manufacturer’s clearance specifications. These aren’t suggestions. They’re minimum safe distances determined through rigorous testing. If your stove requires 36 inches to the rear wall and you install it at 30 inches, you’re creating a fire hazard regardless of how unlikely ignition seems.
Floor protection is equally critical. Unless you have a non-combustible floor like concrete or tile, you need a hearth pad under and extending beyond your stove. The pad requirements vary by stove model, but generally you need protection that extends at least 18 inches in front of the loading door and 8 inches to the sides.
Think about your chimney routing carefully. Straight vertical installations create the best draft and are simplest to install. Every elbow or offset you add reduces draft and creates potential cleaning challenges. If your ideal stove location requires multiple elbows to reach an exterior wall, consider whether a different location with a straight vertical run might work better.
For installations through roofs, you need to consider roof pitch and material. Steeper roofs require longer sections of pipe above the roofline to meet the 10-foot, 3-foot, 2-foot rule. This rule states that your chimney must extend at least 3 feet above the roof penetration and be at least 2 feet higher than any part of the building within 10 feet. These requirements ensure adequate draft and keep sparks away from your roof.
The DIY Installation Process
With planning complete and materials on hand, you’re ready to start the physical installation. Take your time with each step. Rushing creates mistakes, and mistakes with wood stove installations can have serious consequences.
Begin by establishing your stove’s exact position and marking the ceiling penetration location if you’re going straight up through the roof. Use a plumb bob to ensure your marks align vertically. Nothing’s more frustrating than cutting your ceiling and discovering the hole doesn’t line up with your roof penetration.
Install the hearth pad first, ensuring it’s level and extends the required distances. If you’re building a custom pad, use materials rated for the temperatures your stove produces. Cement board topped with tile is a popular approach, but verify it meets your stove’s requirements.
Position the stove and connect the first section of stove pipe. Most connections use either twist-lock or slip-fit designs. The crimped end always faces down to keep creosote from leaking out. Some installers use high-temperature silicone on these joints, though it’s not always necessary. What is essential is ensuring connections are fully seated and secured according to manufacturer specifications.
For ceiling penetrations, the ceiling support box does multiple jobs simultaneously. It supports the weight of the chimney above, maintains required clearances to ceiling joists, and provides a fire-safe transition point. Follow the installation instructions precisely regarding framing and insulation clearances. The support box needs solid attachment to your ceiling structure, not just to drywall or plaster.
Once you’ve installed the support box, you can begin assembling the Class A chimney pipe above it. These sections typically lock together with a twist-lock mechanism. Apply even pressure when joining sections to ensure the locking bands fully engage. Each section should support the weight of the section below it without any gaps at the joints.
Working on the roof requires appropriate safety measures. Use proper fall protection, work on calm days, and have a helper available. When cutting the roof penetration, go slow and verify your measurements multiple times. Roof repairs are expensive and frustrating.
The roof flashing and storm collar work together to weatherproof your chimney penetration. The flashing slides down over the pipe and gets positioned to shed water away from the penetration. In many cases, you’ll need to slide some shingles up to get the upper portion of the flashing underneath them. The storm collar then goes on above the flashing and gets sealed with high-temperature silicone to prevent water intrusion.
Your chimney needs to extend high enough above the roofline to meet code requirements and establish good draft. In some cases, this means your chimney extends quite far above the roof, which creates concerns about stability in high winds. Support brackets attached to the roof or chimney can provide additional stability for taller installations.
The rain cap goes on last, preventing water and animals from entering your chimney while allowing smoke to escape freely. Make sure it’s secured properly since wind can dislodge poorly installed caps.
Testing and First Fires
Before lighting your first fire, do a thorough inspection of your entire installation. Check every joint to confirm it’s fully connected and properly aligned. Verify all clearances meet requirements. Look for any gaps where the ceiling support box meets the ceiling or where flashing meets the roof.
Your first fires should be small and modest. This break-in period allows the stove’s paint and interior materials to cure without generating excessive heat. Follow your stove manufacturer’s break-in procedure, which typically involves several small fires over the first few days.
During these initial fires, stay nearby and monitor the installation closely. Check areas around pipe penetrations for excessive heat. Some warmth is normal, but if surfaces are uncomfortably hot to touch, something’s wrong with your clearances or installation.
Pay attention to draft. Good draft pulls air into the stove steadily when you open the loading door. Poor draft causes smoke to spill into the room. If you’re experiencing draft problems, first verify your chimney meets height requirements and that your pipe is properly sealed with no air leaks. Dense cold air settling down the chimney when the stove isn’t running is normal and doesn’t indicate a problem.
Ongoing Maintenance and Considerations
Wood stove ownership requires regular maintenance to stay safe and efficient. Creosote buildup in your chimney creates a fire hazard that increases with time. How quickly creosote accumulates depends on your burning practices, wood moisture content, and how you operate the stove.
Inspect your chimney regularly, especially during your first heating season. Learning how your particular installation accumulates creosote helps you establish an appropriate cleaning schedule. Some installations need cleaning multiple times per season, while others might go a full year between cleanings with proper burning practices.
Burning properly seasoned wood makes an enormous difference. Wet or green wood produces more creosote, burns inefficiently, and can damage your stove over time. Wood should be split and stacked for at least six months, ideally a full year, before burning. A moisture meter takes the guesswork out of determining whether your wood is ready.
Operating your stove correctly also impacts creosote formation. Very low, smoldering fires create more creosote than hot, efficient fires. Modern EPA stoves are designed to burn at specific temperatures for optimal efficiency and emissions. Follow your stove’s operating instructions regarding air control settings and loading practices.
The Satisfaction of DIY Heating
Installing your own wood stove system delivers satisfaction that goes beyond the financial savings. You gain intimate knowledge of how your heating system works and the confidence that comes from completing a complex project successfully.
Every time you load wood you harvested or purchased locally, you’re participating in a more direct relationship with your home’s heating needs. When winter storms knock out power and your neighbors are reaching for extra blankets, you’ll be comfortably warm beside your wood stove.
The initial investment in a quality wood stove and proper chimney system pays dividends for decades. These aren’t appliances that wear out in a few years or need constant repairs. With basic maintenance and care, a well-installed wood stove system will serve your family for generations.
For capable DIYers willing to educate themselves and work carefully, wood stove installation is an achievable project that transforms how you heat your home. The combination of lower heating costs, energy independence, and the simple pleasure of a wood fire makes it a worthwhile endeavor that pays both practical and intangible rewards.

Tommy Hardy, an alumnus of the Georgia Institute of Technology with a degree in Mechanical Engineering, has been a go-to figure in residential upkeep and innovation for over 18 years. His career commenced in a leading home appliance manufacturing company, where he mastered the intricacies of household systems. Joining our platform in 2020, Tommy quickly became a reader favorite for his practical and easy-to-follow guides. He took the helm of our DIY section in 2019, consistently delivering content that empowers homeowners. Beyond his professional pursuits, Tommy is a passionate gardener and enjoys woodworking, skills enhancing his hands-on approach to home care.


