There is something oddly satisfying about watching bubbles drift, twist, and disappear without warning.
That simple joy often comes from a mixture that feels a little quirky, where small changes can lead to very different results.
The best homemade bubble solution is typically made using water, dish soap, and a small add-in like glycerin or sugar.
How these everyday ingredients are combined matters more than expected. A slight change in soap, a short pause before use, or an extra step in mixing can shift the outcome completely.
The sections ahead focus on those subtle details that shape stronger bubbles, smoother surfaces, and longer float time.
What Makes the Best Homemade Bubble Solution?
A high-performing homemade bubble solution depends on a balance of ingredients, preparation method, and resting time.
When these elements work together, the result is bubbles that last longer, stretch further, and resist popping too quickly.
1. Soap Quality and Concentration:
Dish soap forms the bubble film, making it the most critical ingredient.
Soaps with higher surfactant content create stronger, more flexible bubbles.
Using too much soap can cause bubbles to burst easily, while too little soap results in weak films that fail to hold air.
2. Role of Water Type:
Water quality directly affects bubble strength.
Soft or distilled water works better than hard water because minerals in hard water interfere with soap molecules.
Cleaner water allows the bubble film to remain smooth and elastic.
3. Importance of Glycerin or Sugar:
Glycerin or sugar slows down evaporation, which helps bubbles stay intact for a longer time.
These additives thicken the solution slightly, allowing bubbles to stretch without breaking.
Glycerin is more effective, but sugar remains a reliable household option.
4. Resting Time Before Use:
Freshly mixed bubble solutions improve after resting.
Let the mixture sit for several hours or overnight to ensure the ingredients are thoroughly combined.
This resting period leads to stronger bubble walls and more consistent results during use.
How to Make Bubble Solution at Home?
A reliable homemade bubble solution can be prepared using simple ingredients and careful mixing to achieve strong, long-lasting bubbles.
Ingredients Required
|
Step-by-Step Preparation Method
Following a clear, measured process helps each ingredient blend properly, resulting in a bubble solution that performs consistently and lasts longer during use:
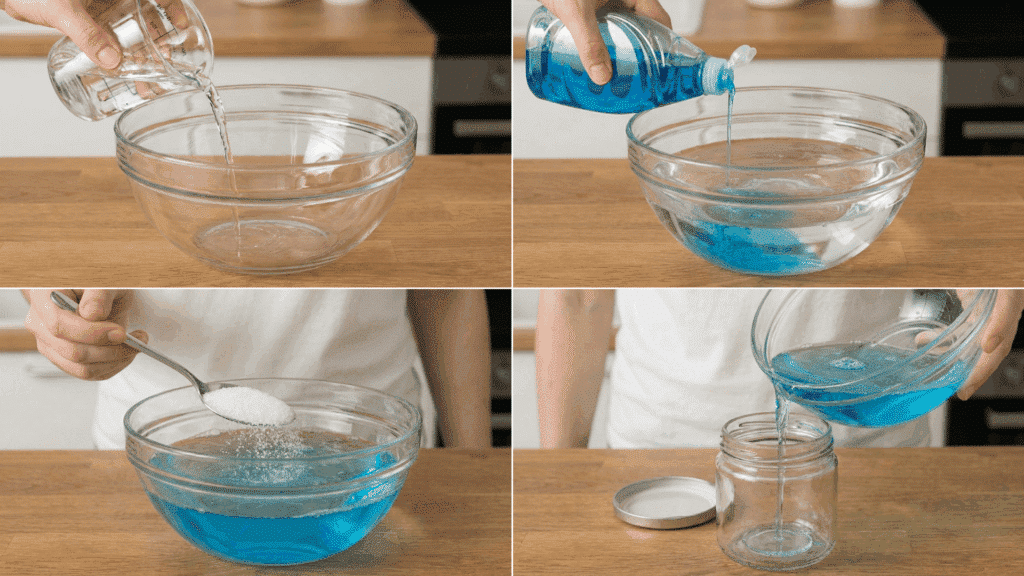
1. Pour the Water Into a Clean Container
Start with a container that has no leftover oil, soap, or dust. Even small residues can affect how bubbles form.
Distilled or soft water works best because it mixes evenly with soap. Using clean water helps create a smoother bubble surface.
Step 2: Add the Dish Soap Slowly
Pour the soap gently along the side of the container. This reduces excess foam and keeps the mixture clear.
Slow pouring helps the soap spread evenly in the water. A steady pace improves the overall consistency of the solution.
Step 3: Stir the Mixture Carefully
Use a spoon or spatula and stir in one direction. Keep the motion slow to avoid creating air bubbles.
Overmixing can weaken the bubble film. Gentle mixing supports better bubble structure.
Step 4: Add Glycerin or Sugar Gradually
Pour in glycerin or sugar a little at a time. Stir until it fully dissolves without clumps.
This step helps slow evaporation when bubbles form. A well-blended mixture leads to longer-lasting bubbles.
Step 5: Transfer and Store the Solution Properly
Pour the solution into a bottle or jar with a tight lid. This keeps dust and air out while the mixture rests.
Sealing the container also helps maintain consistency. Proper storage improves results during use.
Resting Time for Best Results Let the solution sit for at least 4–8 hours before using it. Resting allows the ingredients to settle and bind properly. This improves bubble strength and performance. Overnight resting often produces the best outcome. |
Alternative Homemade Bubble Solution Recipes
Different homemade bubble recipes work better for specific needs, such as quick preparation, larger bubbles, or ingredient limitations.
These variations adjust one or two elements while keeping the process simple and effective:
Bubble Solution without Glycerin
This recipe uses simple pantry ingredients and works well when glycerin is not available.
- Pour 1 cup of distilled or soft water into a clean bowl.
- Add 2 tablespoons of dish soap slowly along the side.
- Stir gently until the soap blends with the water.
- Add 1 tablespoon of sugar and mix until fully dissolved.
- Let the solution rest for several hours before use.
Bubble Solution with Sugar
Sugar helps improve bubble strength by slowing evaporation and thickening the solution slightly.
- Add 1 cup of distilled water to a clean container.
- Pour in 2 tablespoons of dish soap slowly to reduce foam.
- Sprinkle 1 tablespoon of white sugar into the mixture.
- Stir carefully until the sugar dissolves completely.
- Rest the solution for at least 4–6 hours for better results.
Bubble Solution for Giant Bubbles
This thicker mixture supports large, flexible bubbles suitable for outdoor use.
- Pour 4 cups of soft water into a clean, wide container to allow easy mixing.
- Add ½ cup of dish soap slowly along the container wall to limit foam.
- Mix in ¼ cup of glycerin or corn syrup and stir slowly until combined.
- Let the solution rest overnight before using it with large bubble wands.
Tips for Stronger and Longer-Lasting Bubbles
Small changes in ingredients, tools, and conditions can noticeably improve bubble strength and how long they last.
These simple tips help improve bubble quality without changing the recipe:
- Use distilled or soft water to avoid minerals that weaken the bubble film
- Choose a mild dish soap with good surfactant content
- Mix ingredients slowly to prevent foam buildup
- Let the solution rest for several hours before use
- Blow bubbles in calm, slightly humid weather for better results
Next Read: How to Clean an Oven?
Wrapping Up
Making bubbles at home becomes far more enjoyable when the process feels clear and the results stay consistent.
From understanding how soap, water, and add-ins work together to following simple mixing steps and rest time, each part plays a role in bubble quality.
The variations shared also make it easier to adjust based on available ingredients or bubble size goals.
With a little patience and the right approach, a DIY bubble solution can create strong, lasting bubbles using items already on hand.
Tried any version or added a personal twist? Share experiences or favorite methods in the comments below.

James McLaren, with a rich background in architecture from the University of Manchester, has been contributing his expertise to the world of creative construction and home innovation for over 20 years. His journey began as a project manager for a leading construction firm, where he honed his skills in bringing complex designs to life. James joined our platform as a freelancer in 2019, quickly becoming a favorite for his insightful and practical advice. He has been a pivotal force to our wing ever since, bringing our readers a blend of technical know-how and creative flair. Beyond his professional life, James is an avid woodworker and enjoys restoring vintage furniture, a hobby that complements his professional insights beautifully.