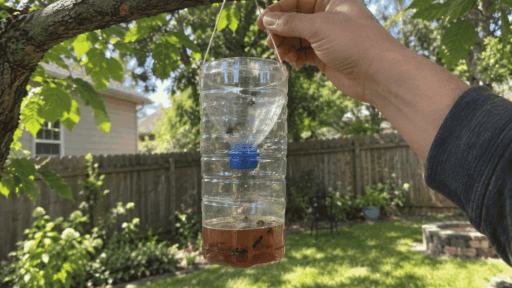
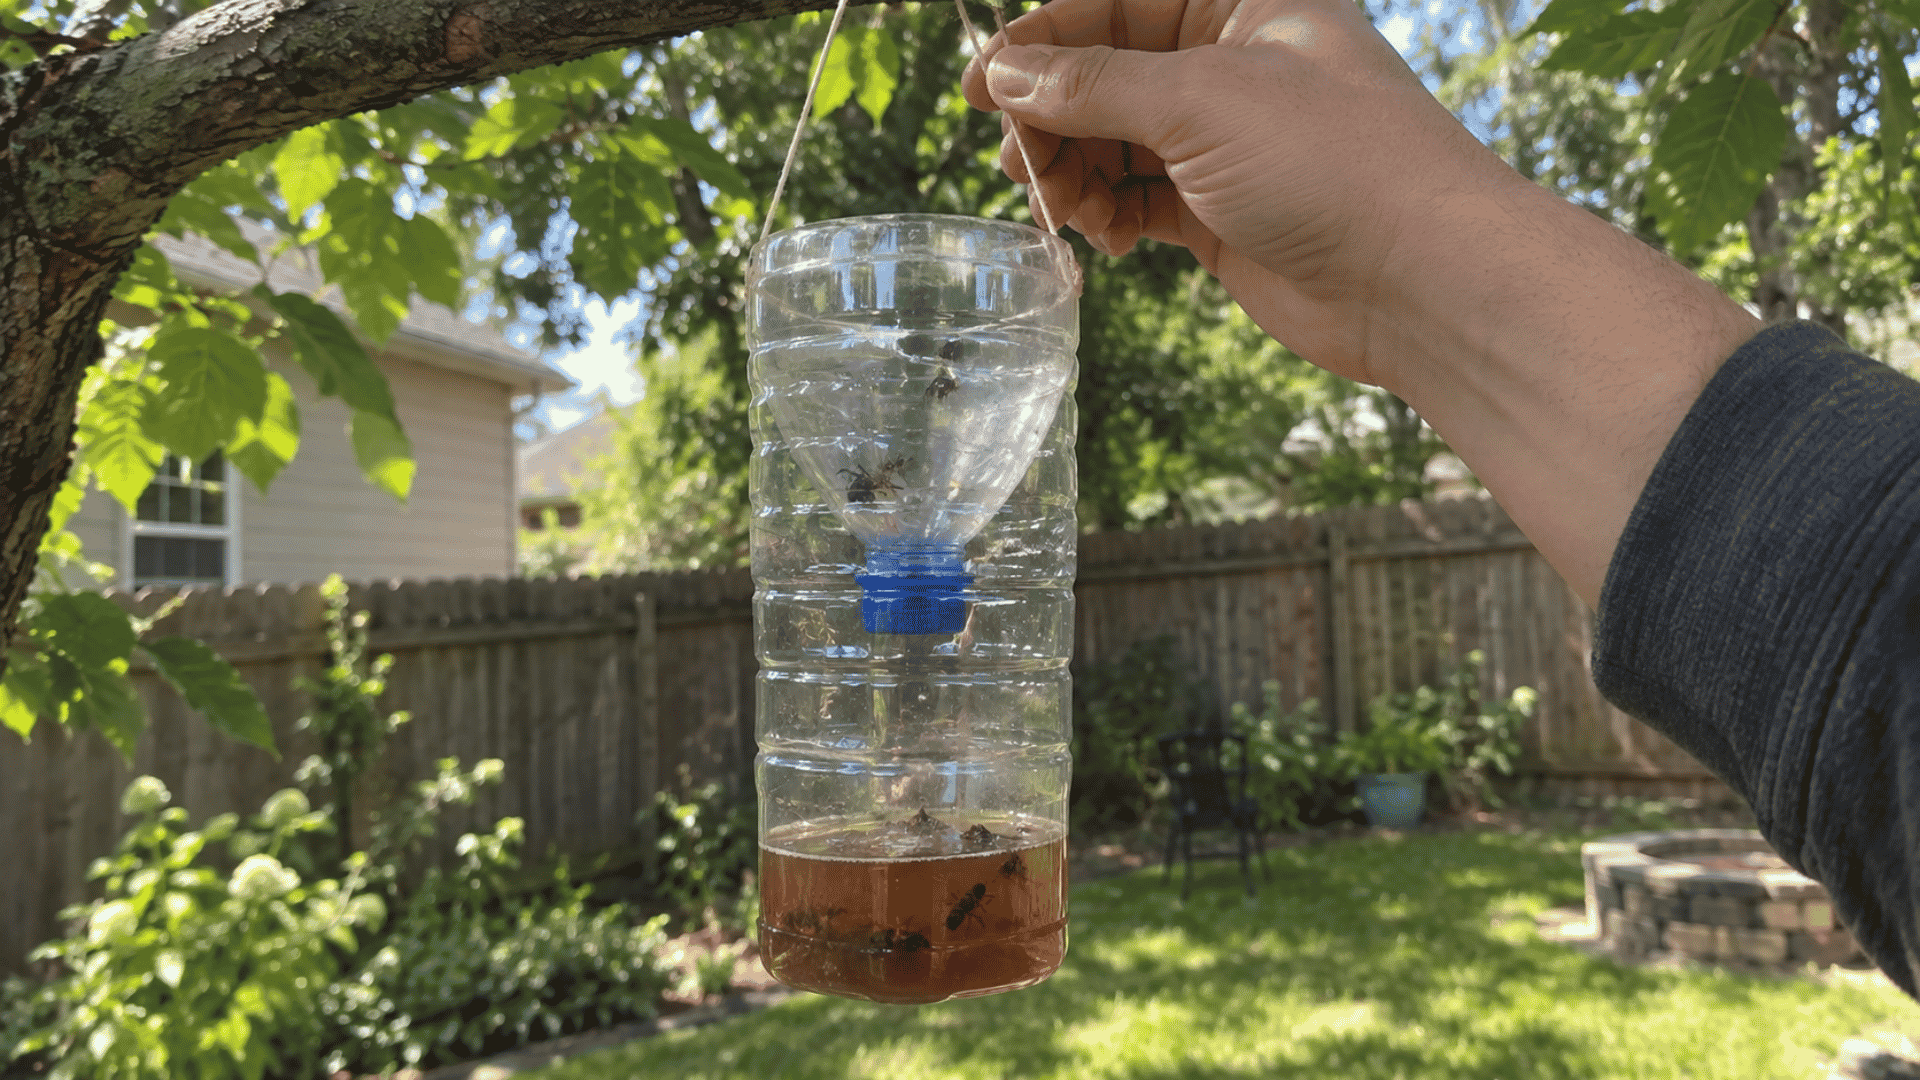

A DIY wasp trap is a homemade setup that uses a container, bait, and a narrow opening to attract and trap wasps. The most common version uses a plastic soda bottle with the top flipped into a funnel, allowing wasps to enter while making it harder for them to escape.
The right materials, bait, and placement can affect how well it works. Sweet and protein baits may attract wasps differently, and seasonal feeding habits can influence which option works best.
You will also find alternative trap methods, placement tips, and practical fixes for a trap that stays empty or attracts little activity.
Read on to learn how to make a DIY wasp trap and keep it working properly.
What You Need to Make a DIY Wasp Trap
A basic DIY wasp trap needs only a few household supplies. A clear 2-liter plastic bottle works well because it is easy to cut, shape into a funnel, and check once the trap is outside.
Gather these materials before you start:
- 1 empty 2-liter plastic soda bottle
- Scissors or a utility knife
- Duct tape or zip ties
- String or wire if you plan to hang the trap
- Water
- Unscented liquid dish soap
- Gloves for handling and cleaning
- Wasp bait
For bait, you can use soda, fruit juice, sugar water, overripe fruit, fresh meat, fish, or a small amount of bacon grease. Keep more than one option available in case the first bait does not attract much activity.
How to Make a DIY Wasp Trap Step by Step
A bottle trap works by turning the cut-off top into a narrow funnel entrance while the bait stays in the lower section. The funnel position, bait level, and placement can all affect how well the trap works.
Here is how to put it together from start to finish.
1. Cut the Top Off the Bottle
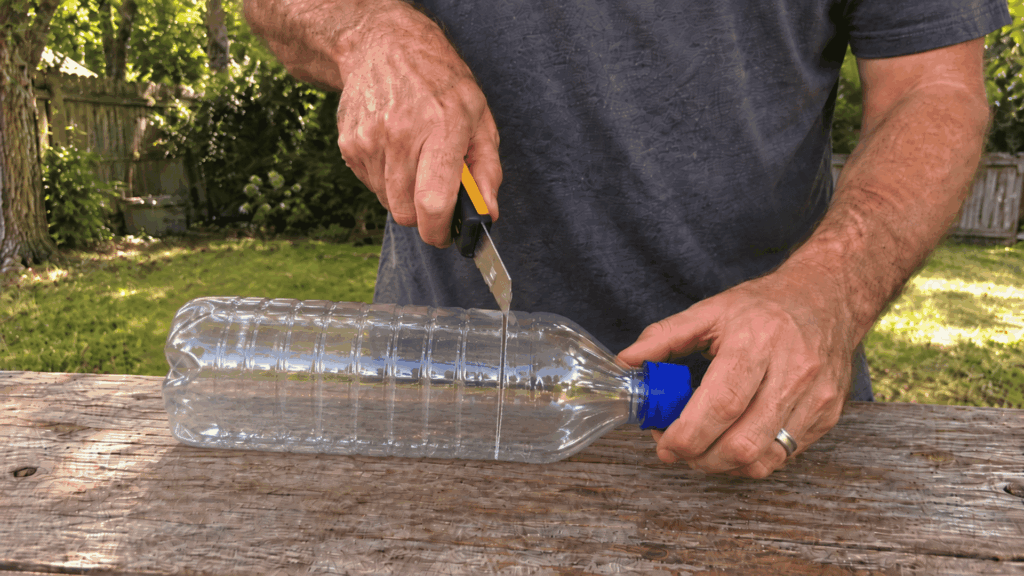
Remove the cap, then cut around the bottle just below the shoulder where the narrow neck widens into the main body.
Keep the cut fairly even so the two pieces fit together properly later. Use scissors for softer plastic or a utility knife carefully. Keep both sections because the upper piece will become the funnel entrance.
2. Turn the Top Into a Funnel
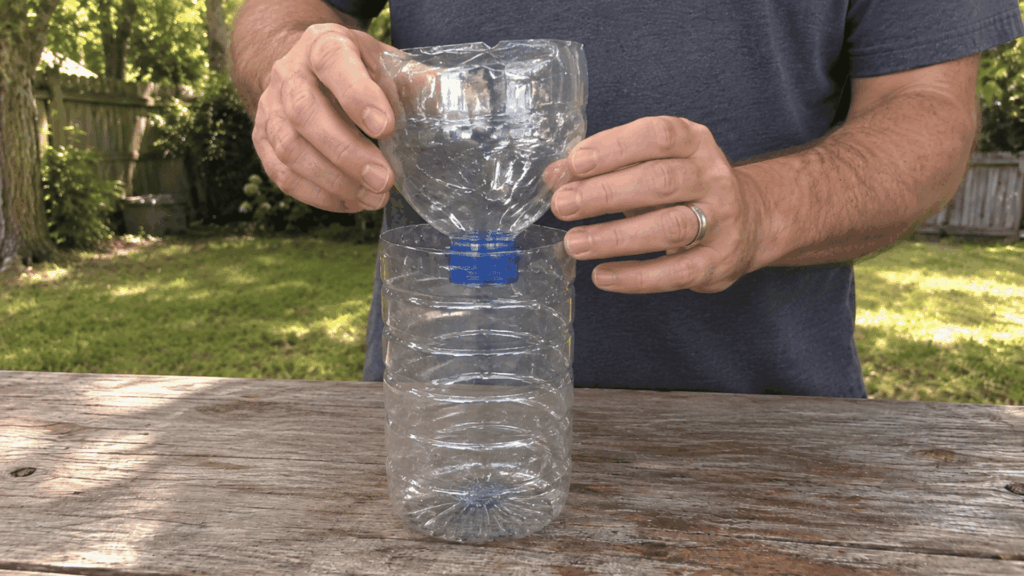
Flip the cut top upside down and place it inside the lower half of the bottle. The neck should point downward without reaching the bait.
This narrow opening guides wasps into the container and makes the exit harder to find. Check that the rim sits evenly against the bottle walls before securing the pieces.
3. Secure the Bottle Pieces
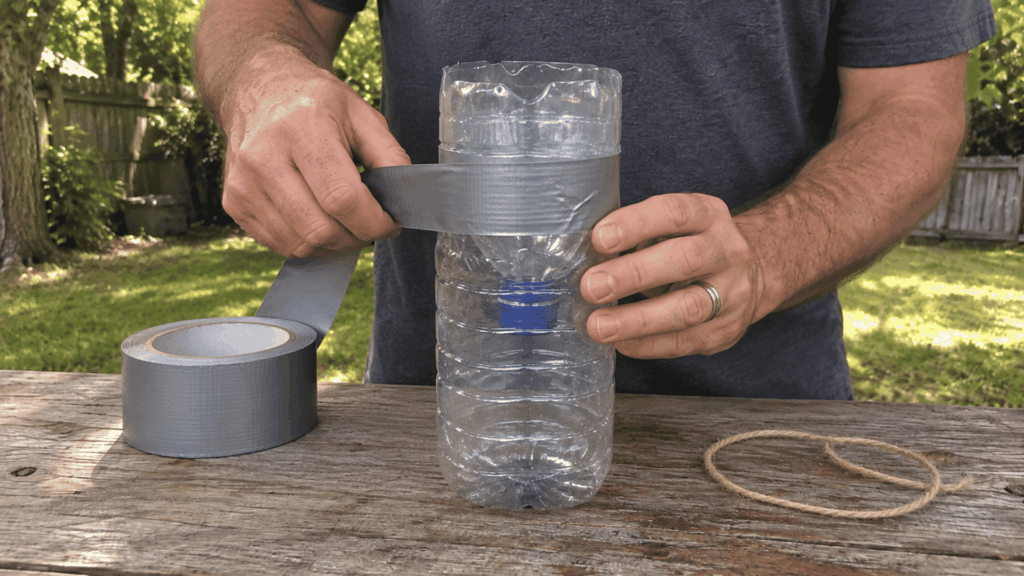
Hold the inverted top in place with duct tape or zip ties. Zip ties are useful if you want to reopen the trap later to clean it or add fresh bait.
For a hanging trap, make two small holes on opposite sides near the upper edge. Thread string or wire through the holes and tie it securely before filling the trap.
4. Add the Wasp Bait
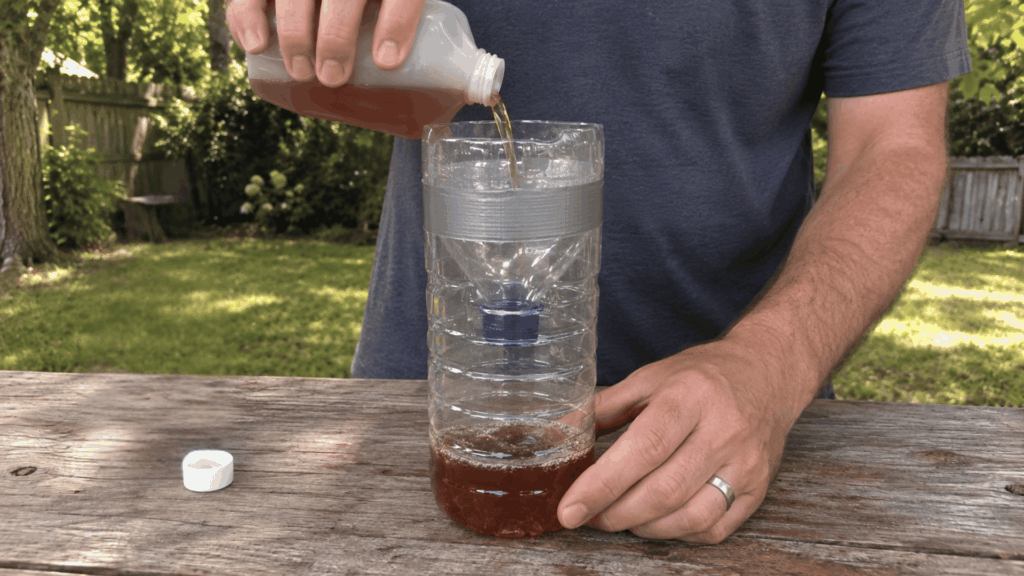
Pour about 1 to 2 inches of liquid bait into the bottom, keeping it below the funnel opening. Add a small amount of unscented dish soap to the liquid.
You can use soda, fruit juice, or another suitable bait, depending on the season and wasp activity. Leave enough space between the bait and funnel neck.
Point to Remember! If the bait reaches the funnel opening, pour some out. The entrance should remain clear so wasps must fly down into the trap.
5. Place the Trap Outdoors
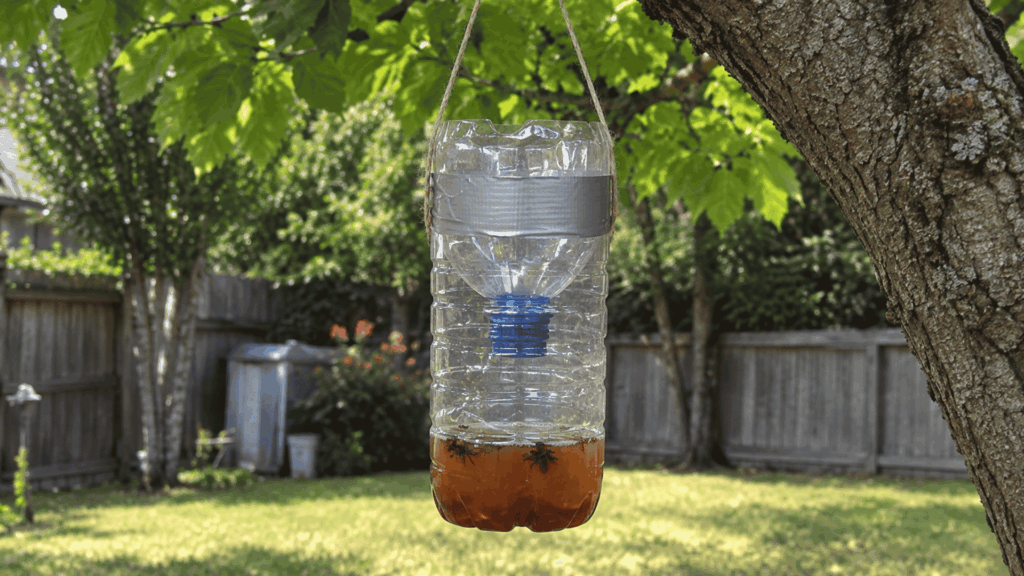
Set or hang the trap where you regularly notice wasp activity, but keep it away from doors, patios, play areas, and outdoor meals.
The outer edge of the yard is usually better than a busy seating area. Check the trap after placement, and move it if wasps continue gathering elsewhere while showing little interest in the bait.
Before leaving the trap in place, give the setup one quick check:
Check | What to Look For |
|---|---|
Funnel | Neck points downward and stays above the bait |
Edges | Bottle pieces fit closely without large gaps |
Bait | Enough to attract wasps without reaching the funnel |
Hanging point | String or wire feels secure |
Placement | Away from people, pets, doors, and food |
What Bait Works Best in a Homemade Wasp Trap?
Bait choice depends on what the wasps are feeding on, so the best option is not always the sweetest or strongest-smelling one.
Start with one bait type, watch the response, and switch only if activity stays low.
1. Sweet Baits Like Soda and Fruit
Soda, fruit juice, sugar water, and overripe fruit can attract wasps that are feeding on carbohydrates. University of Idaho Extension lists diluted fruit juice as a summer bait option for European paper wasps.
Keep the mixture shallow and fresh rather than filling the bottle heavily. If the trap gets little attention, replace the sweet bait instead of adding more to the same mixture.
2. Protein Baits Like Meat and Bacon Grease
Fresh meat, fish, pet food, and small amounts of bacon grease can attract wasps looking for meat-based food. Use a small portion and replace it once it spoils because old bait quickly loses effectiveness outdoors.
Point to Remember! Sugary bait can also attract honey bees. If bees visit the trap, switch from sweet bait and move it farther from bee activity.
3. Choosing Bait Based on the Season
The season can change what wasps are looking for, so bait that works well at one time may get less attention later. Use the season as a starting point, then judge by the actual activity around your trap.
- Spring: Start with meat scraps or another protein bait.
- Summer: Try diluted fruit juice or overripe fruit.
Quick Tip! If the trap stays mostly empty, switch the bait type before changing the trap itself.
What Other Homemade Wasp Traps Can You Make?
A bucket or mason jar can work when you want an alternative to the bottle method. Both use bait to draw wasps in, but the setup differs slightly.
Trap | Container | Setup | Bait |
|---|---|---|---|
Bucket Trap | 5-gallon bucket | Add soapy water and suspend bait 1 to 2 inches above the surface | Meat, fish, ham, or liver |
Jar Trap | Mason jar | Add bait and soapy water, cover the lid opening with foil, then make one small entrance hole. | Sweet or protein bait |
Choose the bucket for a larger outdoor setup. A jar is smaller, easier to move, and simpler to check regularly.
Point to Remember! Keep either trap away from doors, patios, play areas, and outdoor food. Replace the bait when it dries out, spoils, or stops attracting wasps.
Where Should You Put a DIY Wasp Trap?
Place the trap where wasps are active, but away from the spaces people use most. The goal is to draw them toward the trap without pulling them closer to meals, doors, or seating areas.
A good placement usually has these features:
- Yard edge: Position the trap near the outer part of the property rather than beside the patio.
- Away from people: Keep it clear of doors, grills, play areas, and outdoor dining spaces. If insects regularly gather close to the house, these tips can help you pest-proof your porch without harsh chemicals.
- Away from bees: Keep yellowjacket traps at least 20 feet from beehives.
- Easy to check: Choose a spot you can reach safely to clean and add fresh bait.
- Flexible location: If the trap stays empty for several days, move it to another area with visible wasp activity.
Why is Your DIY Wasp Trap Not Working?
If your DIY wasp trap stays empty, the problem is usually the bait, placement, or freshness rather than the bottle itself. Check one thing at a time so you can see what changes the result.
Problem | What to Do |
|---|---|
Bait gets ignored | Switch between sweet and protein bait. |
Trap is in a quiet spot | Move it closer to visible wasp activity, but away from people and food. |
Bait is old | Replace it when it dries out, spoils, or loses its smell. |
Wasps keep returning | A nearby nest may be feeding the area. Traps reduce foraging wasps but do not remove the nest. |
Point to Remember! If a nest is creating a sting risk, use professional pest control instead of moving the trap closer.
Finalizing the Trap
A homemade trap does not need to be complicated. For most yards, a clear bottle, inverted funnel, suitable bait, and careful placement are enough to test a basic DIY wasp trap.
Start with the bottle design, then watch what happens rather than repeatedly adding more bait. If catches stay low, change the bait or move the trap. Protein can be a useful starting point in spring, while fruit-based bait may work better in other situations, depending on the species.
Keep every trap away from patios, doors, children, pets, and active nests. Remember, trapping controls some foraging wasps but may not eliminate a nearby colony.
If you have tested a homemade trap, comment below with the bait and season you used it.
Frequently Asked Questions
Can Rain Ruin a Homemade Wasp Trap?
Heavy rain can dilute liquid bait and make it less effective. Check the trap after storms and replace watered-down bait if wasp activity drops.
Can You Use Apple Cider Vinegar in a Wasp Trap?
Yes. Apple cider vinegar can be used with sweet bait and dish soap, although its effectiveness varies depending on the wasps and nearby food.
When Should You Put Out a Wasp Trap?
Spring is a useful time to start trapping, especially when queens become active. Traps can remain useful through summer as wasp activity increases.
How Do You Empty a Wasp Trap Safely?
Make sure no live wasps remain before opening it. Wear gloves, empty the contents outdoors, rinse the container, then add fresh bait before replacing it.

Stephanie Grace, a graduate with a degree in Fine Arts from the Savannah College of Art and Design, has been inspiring DIY enthusiasts with her creative and practical guidance for over 14 years. Her career in design and crafting began in a small artisan workshop, where she developed a passion for transforming everyday materials into beautiful and functional items. Stephanie joined our website in 2018, rapidly gaining popularity for her easy-to-follow DIY tutorials and innovative project ideas. Since then, she has been the creative mind behind our DIY section, helping readers bring their artistic visions to life. Outside her professional pursuits, Stephanie enjoys pottery and urban gardening, hobbies that showcase her love for hands-on creativity and nature.