
Painting for beginners can feel a bit overwhelming at first. There are brushes, colors, and techniques to think about, and it’s easy to wonder how to start painting the right way.
This blog keeps things simple and practical. It focuses on acrylics and walks through the basics without complicating things.
From setting up your space to putting your first strokes on canvas, everything is broken into easy steps. By the end, getting started won’t feel confusing anymore; it’ll feel doable and even a little exciting.
Why is Acrylic Painting Good for Beginners?
Acrylic paints are often the first choice for painting for beginners, and it’s easy to see why. They are simple to use, don’t need complex tools, and let beginners focus on learning rather than managing materials.
They work beautifully on canvas, paper, wood, and more, so you’re never really limited. That said, like every medium, they do come with a couple of downsides worth knowing about before you dive in.
Acrylics May Suit You If:
- You are a complete beginner and want to keep things simple
- You prefer easy cleanup without extra effort
- You are working with a small budget
- You like trying different textures and mixed media
- You want to avoid strong smells or harsh chemicals
Get Your Supplies: The Shopping List
You’ll find everything on this list at your local art store, and most of it is pretty affordable. The main suggestion is to keep it simple and purchase quality where it actually matters, like your brushes, canvas, and paint.
| Item | Purpose / Notes |
|---|---|
| Acrylic paints | Main medium for painting; versatile and beginner-friendly |
| Brushes (flat, round, fan) | Different shapes help create various strokes and textures |
| Canvas | Surface for painting; choose a good quality for better results |
| Palette | Used for mixing colors easily |
| Water cup and cloth | For cleaning brushes and controlling paint consistency |
| Easel | Holds your canvas upright for better posture and control |
| Palette knife | Useful for mixing paint and creating textured effects |
| Spray bottle | Keeps paint moist and helps with blending techniques |
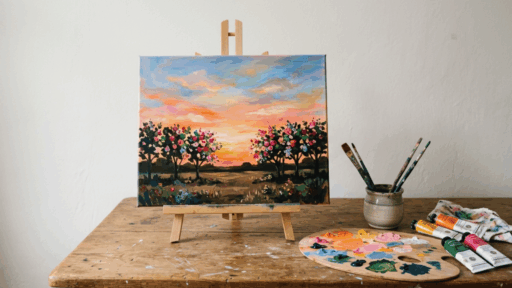
How to Start Painting: Step-by-Step Process
You are now ready to create your first painting. Keep things simple and focus on learning the process, not perfection.
Step 1: Sketch the Basic Outline
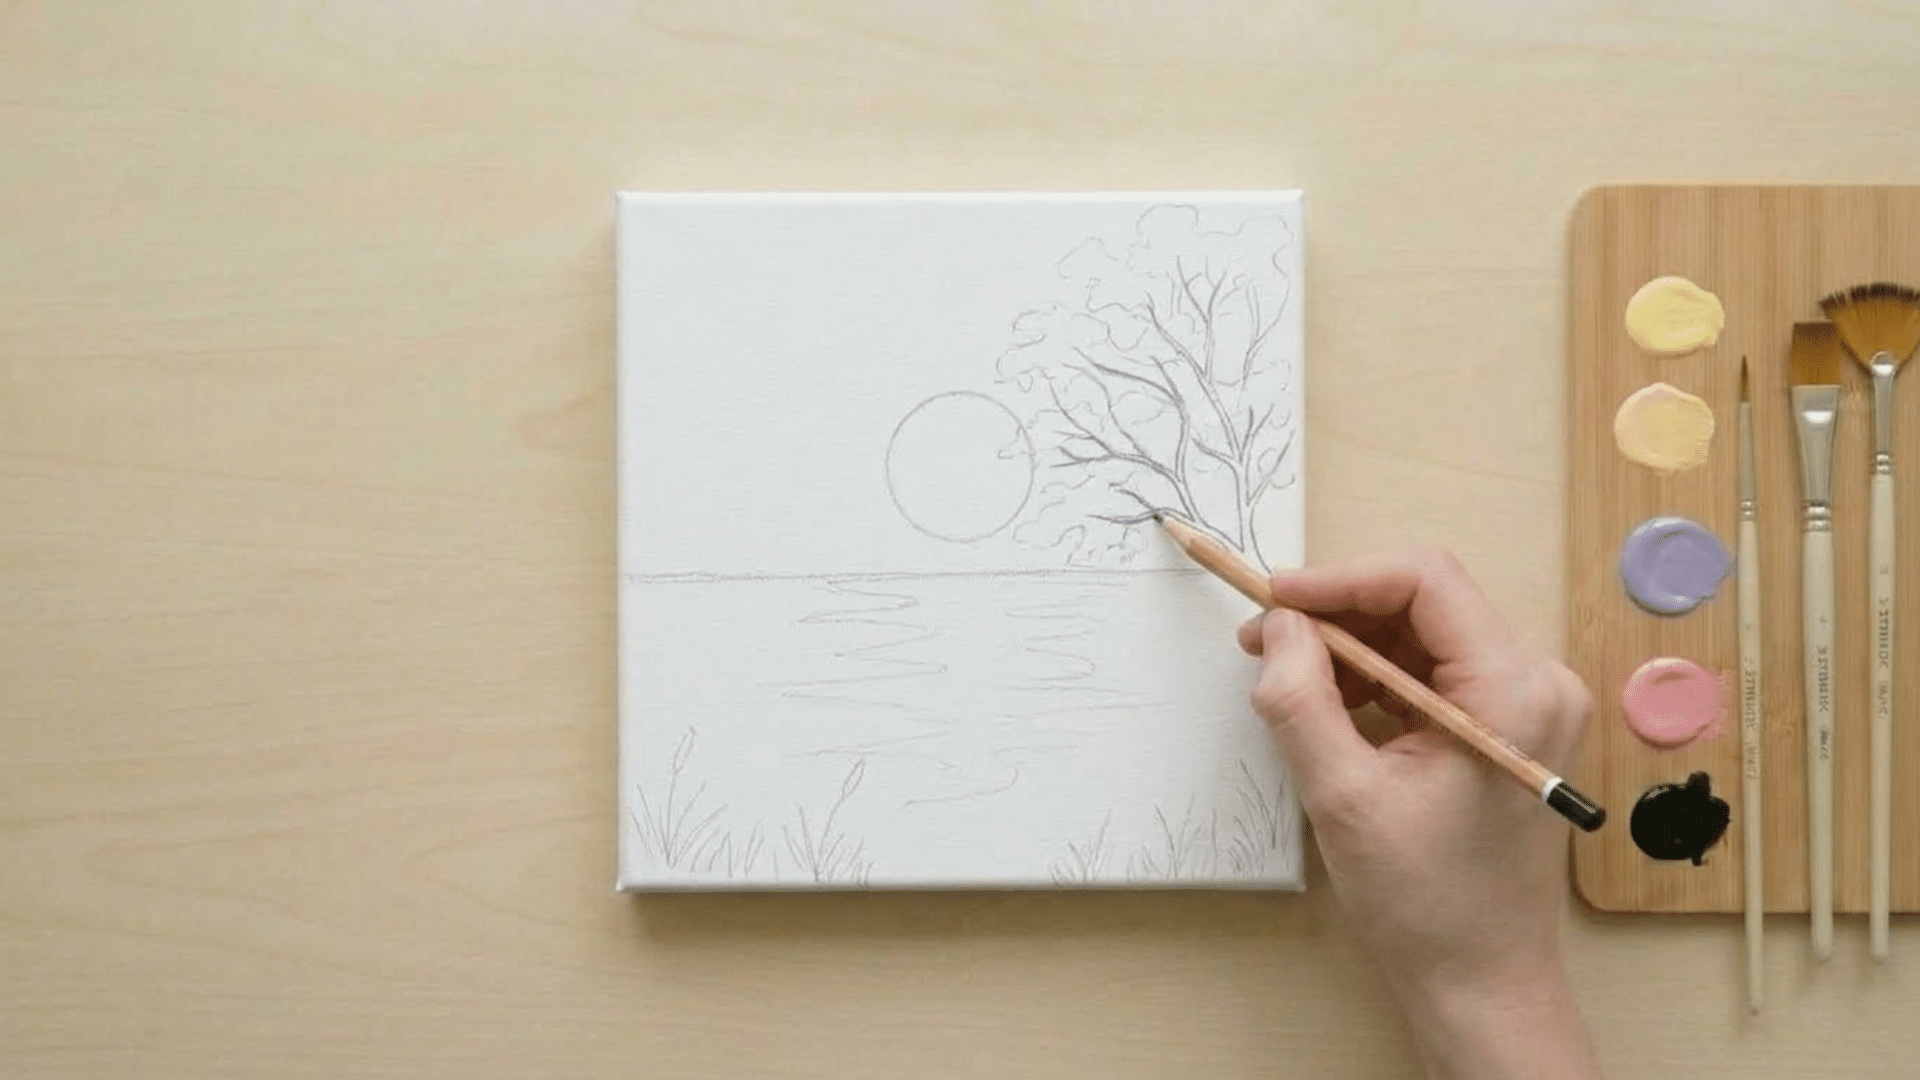
Begin with a light pencil sketch on your canvas. Draw a straight horizon line slightly below the center. Then lightly sketch a circle for the moon above the horizon.
On one side, outline the rough shape of the tree, don’t add details, just the main trunk and branch directions.
At the bottom, loosely mark where the grass and bushes will go. Keep everything soft and minimal so it won’t show through the paint.
Step 2: Paint the Sky Gradient
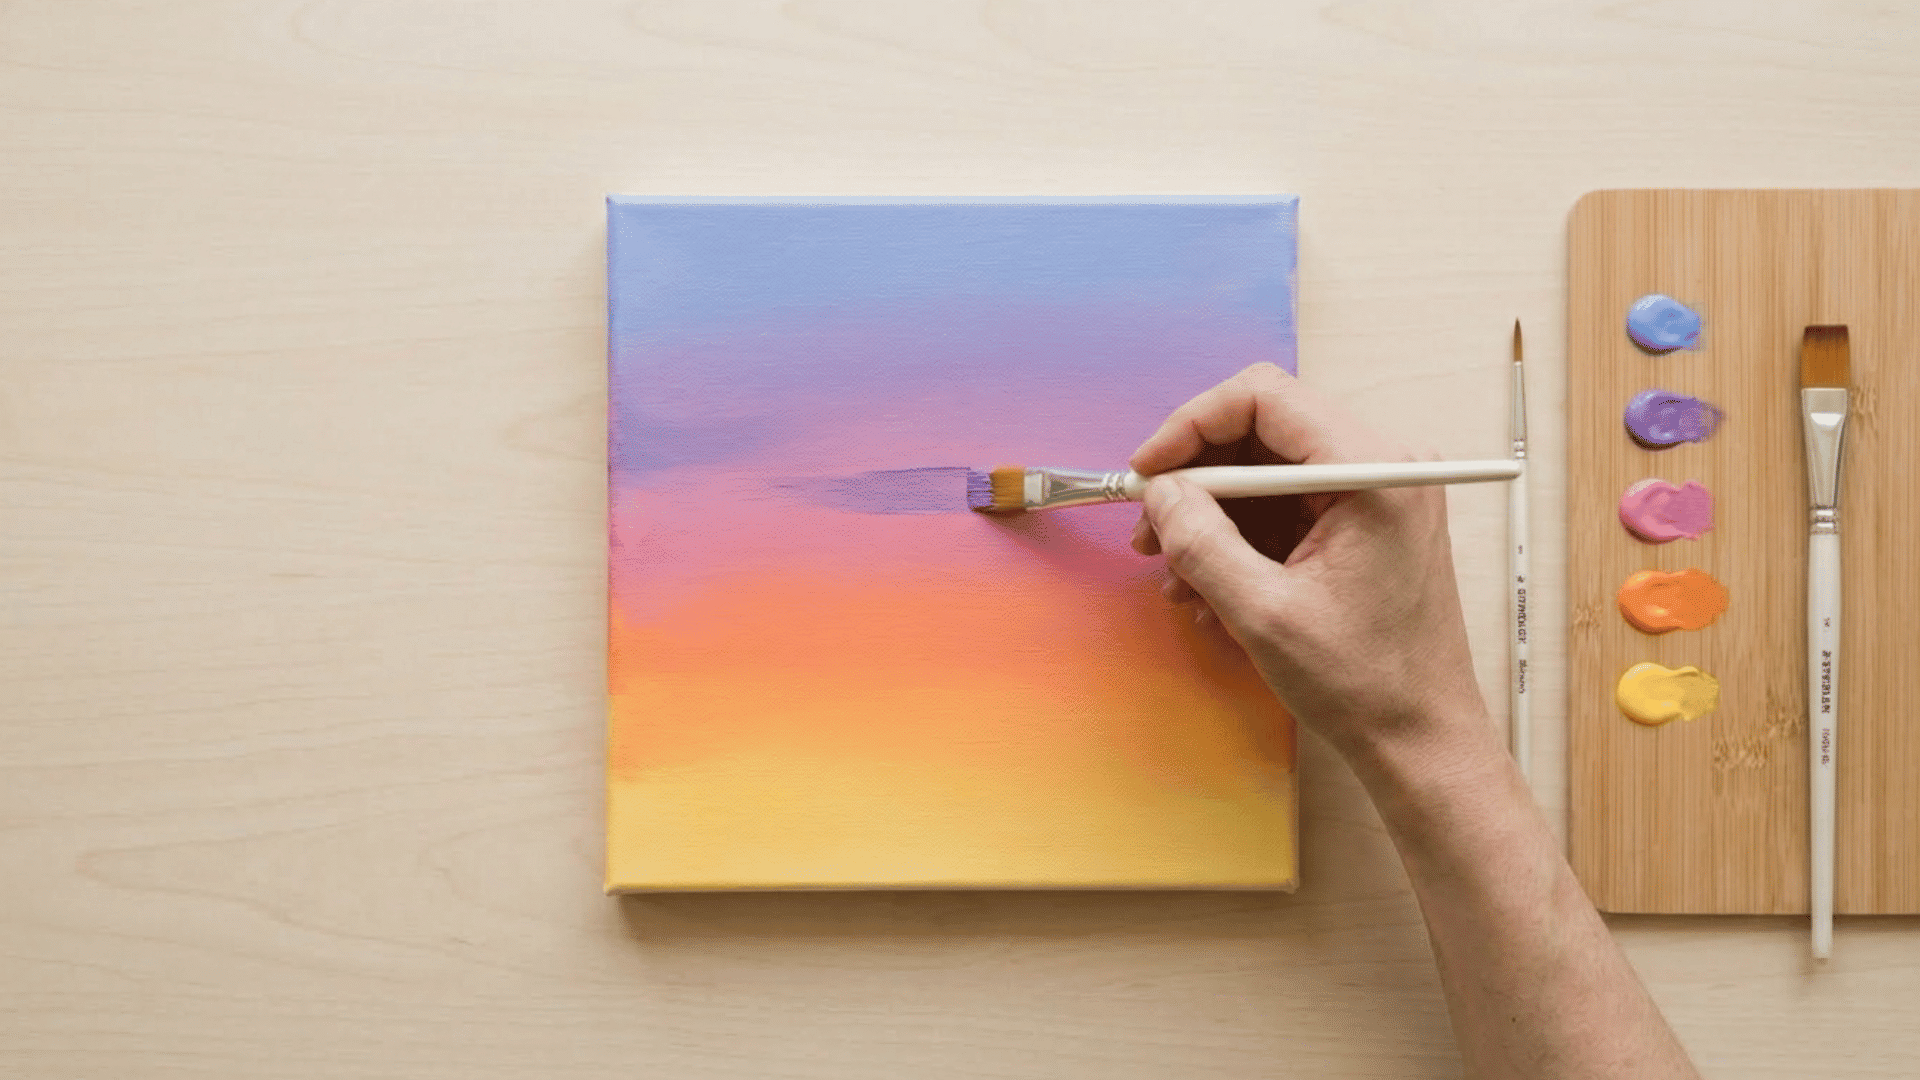
Start from the bottom with bright yellow near the horizon. Move upward into orange, then pink, then purple, and finally a soft blue at the top.
Use horizontal strokes and blend each color gently into the next while the paint is still wet. Keep your brush slightly damp for smoother blending. This gradient is the base of your entire painting.
Step 3: Paint the Moon
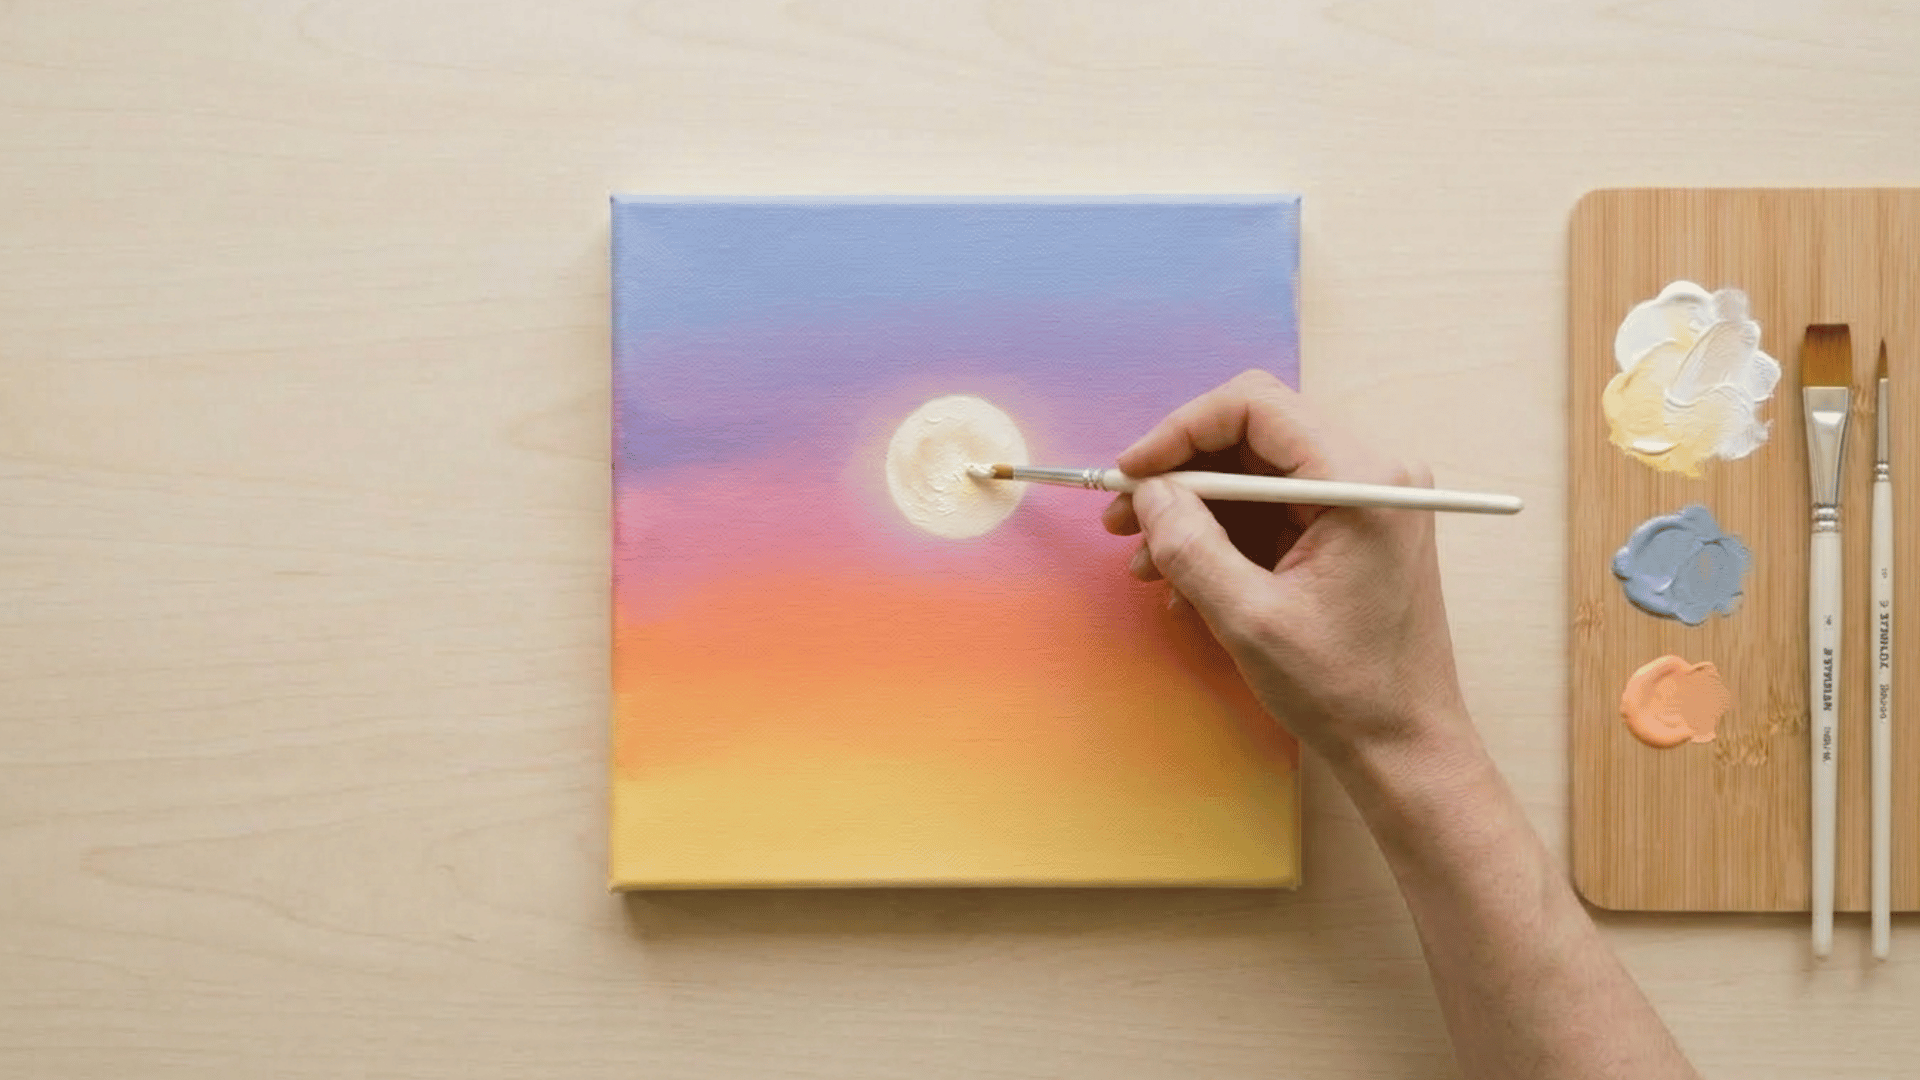
Use white paint to create a round moon slightly above the horizon. You can lightly sketch a circle first if needed. Fill it in, then dab a little yellow and soft gray to give it texture.
Keep the edges slightly soft so it blends naturally into the sky.
Step 4: Add the Water Reflection Glow
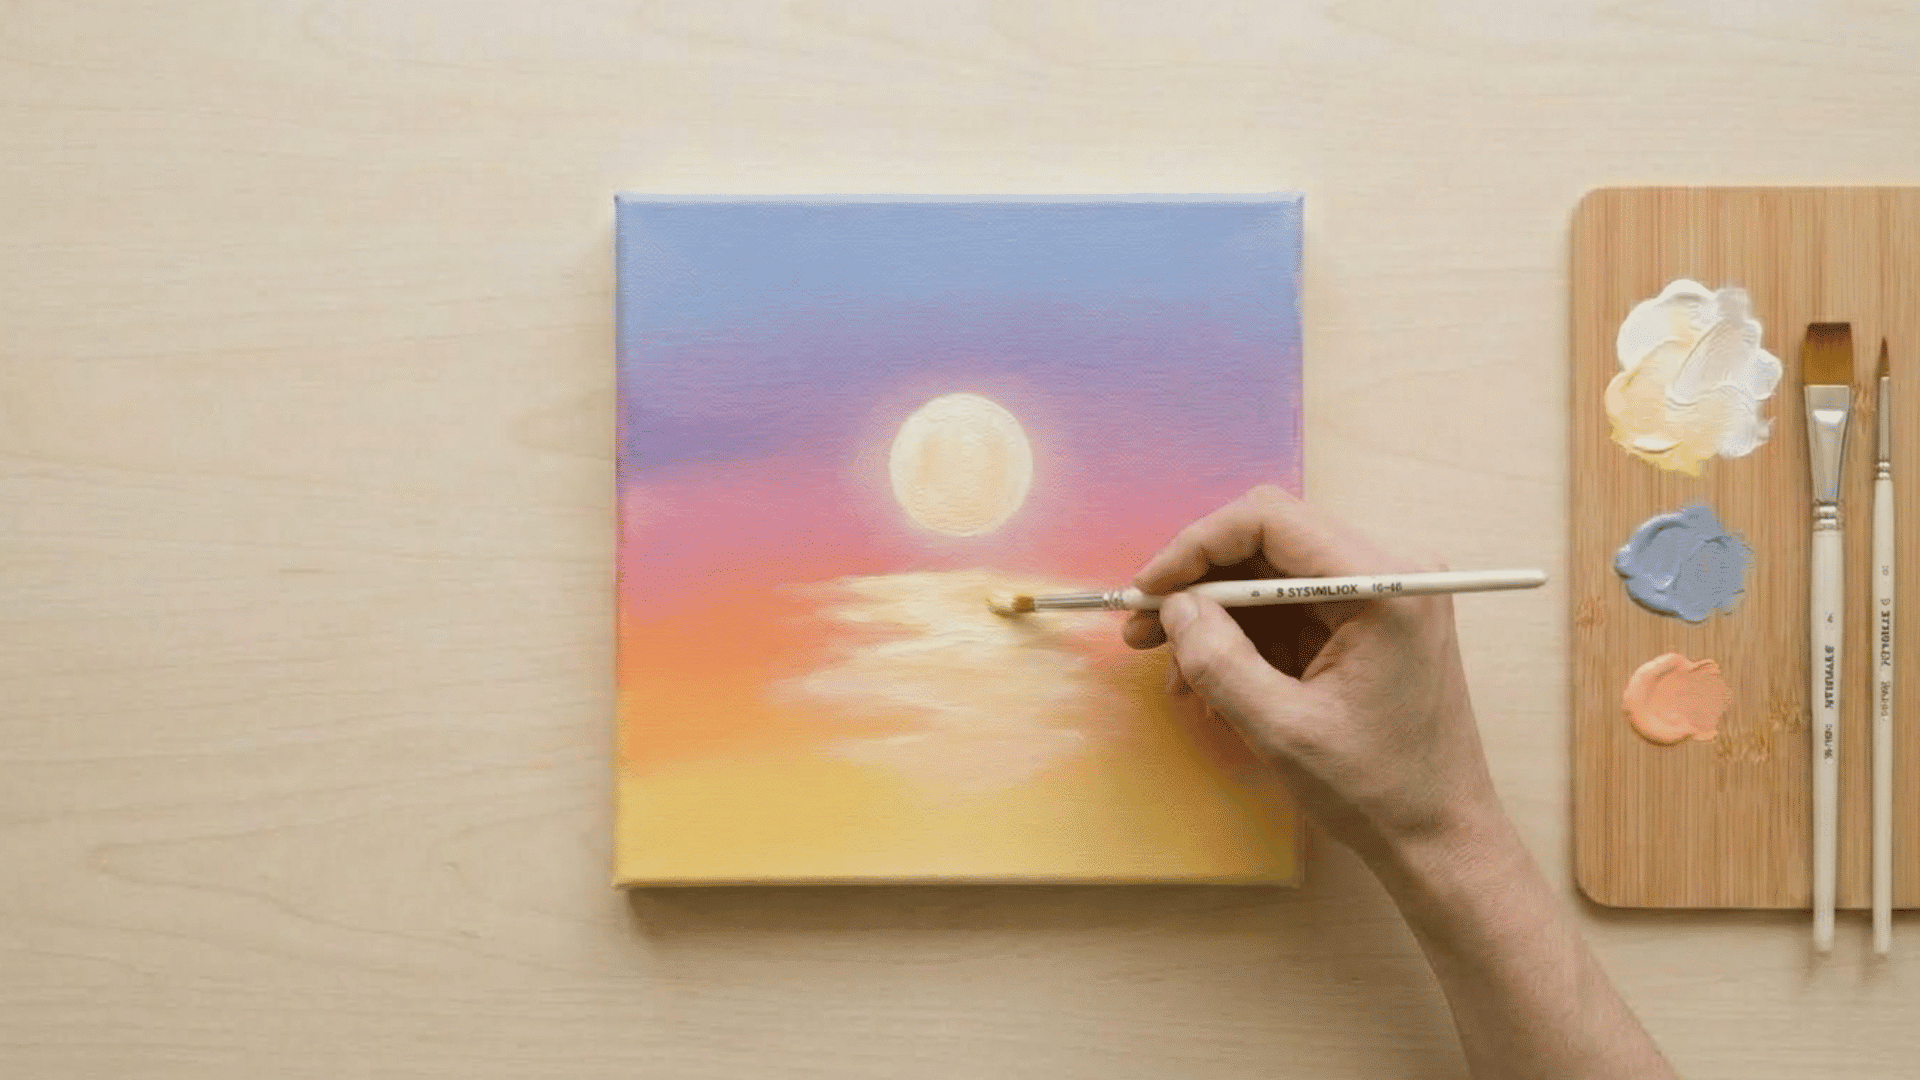
Using white mixed with a little yellow, lightly paint a vertical reflection in the center, starting at the horizon and working downward.
Use soft horizontal strokes to blend it into the background. Don’t make it too sharp. Keep it slightly blurry to make it look like light reflecting on water.
Step 5: Paint the Tree Silhouette
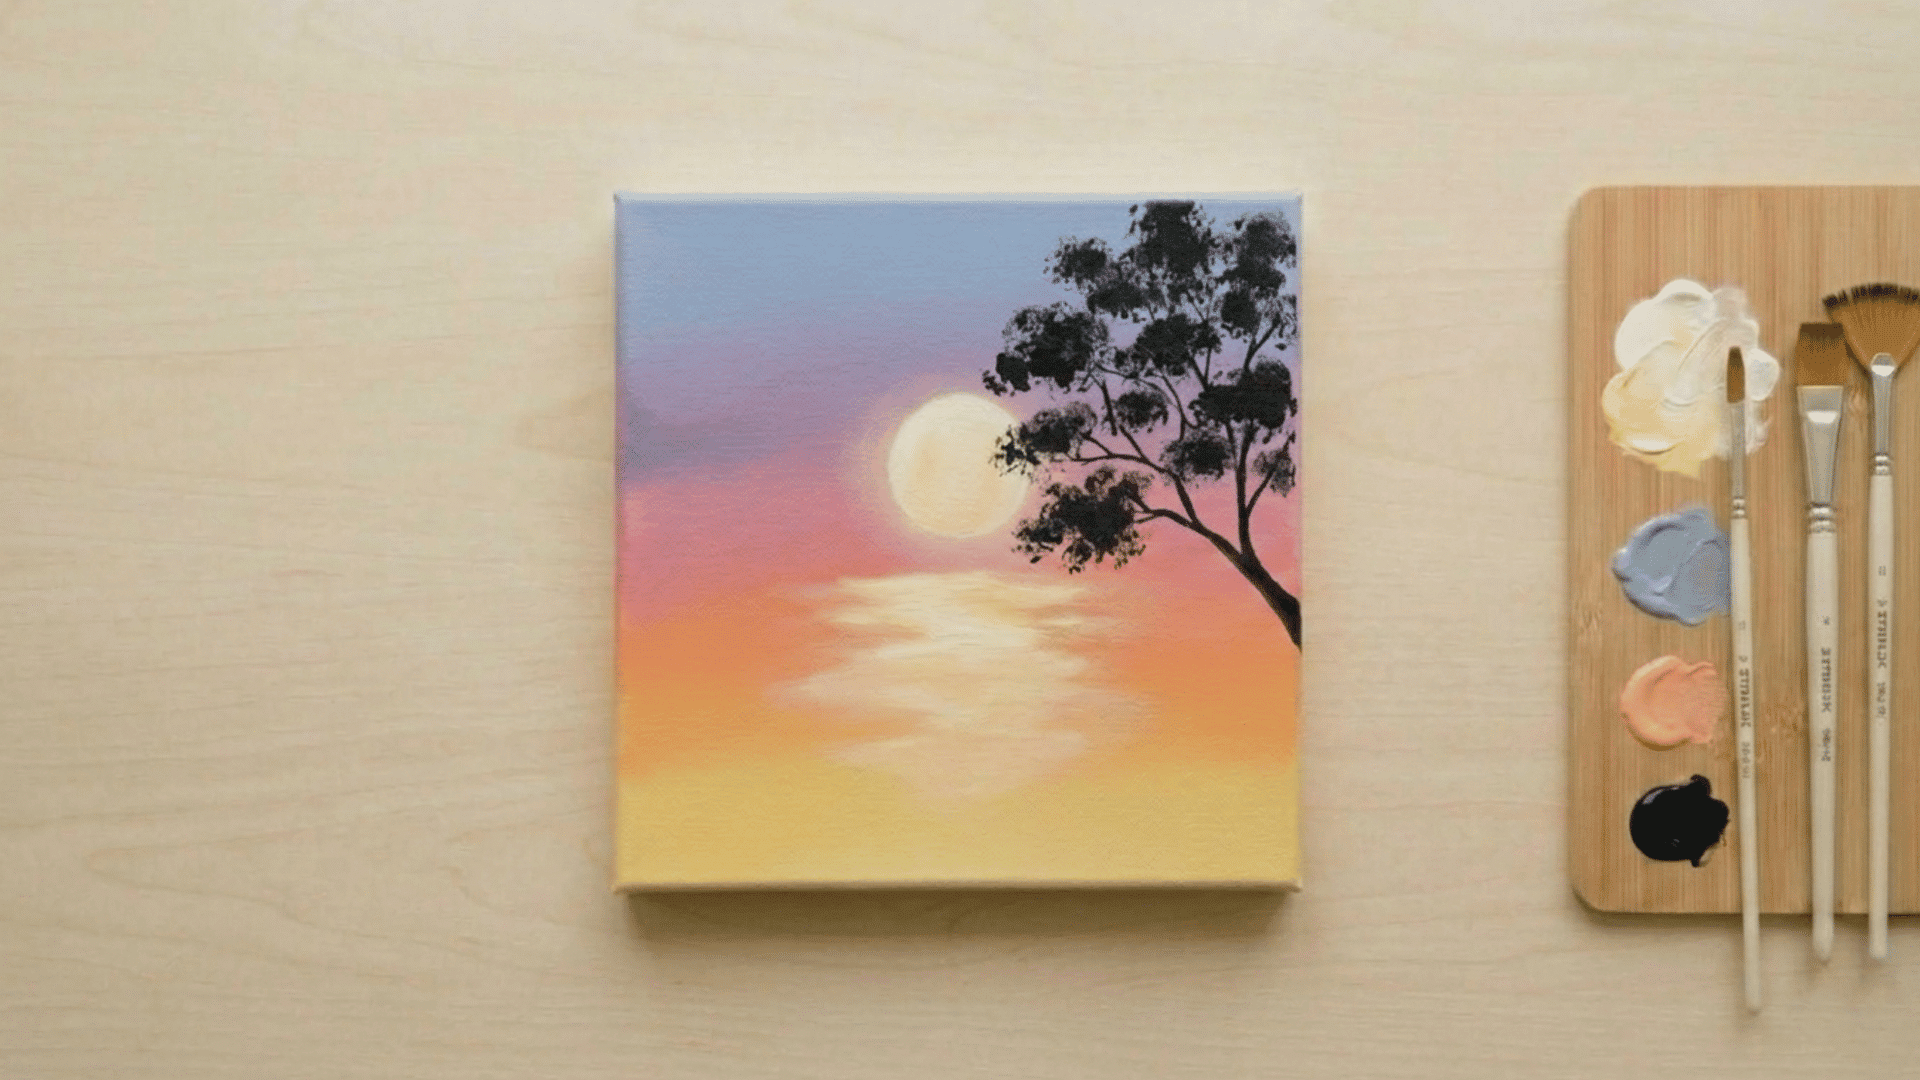
Start by dabbing the leaves with black paint using a dry, slightly fan-shaped brush. Gently tap the brush to create soft, uneven clusters instead of clear shapes.
Build the overall tree form this way, keeping it loose and natural.
Once the leaf mass is ready, use a thin brush to paint the trunk and branches. Let them flow into the leaves, connecting everything while keeping the lines slightly irregular.
Step 6: Final Touches
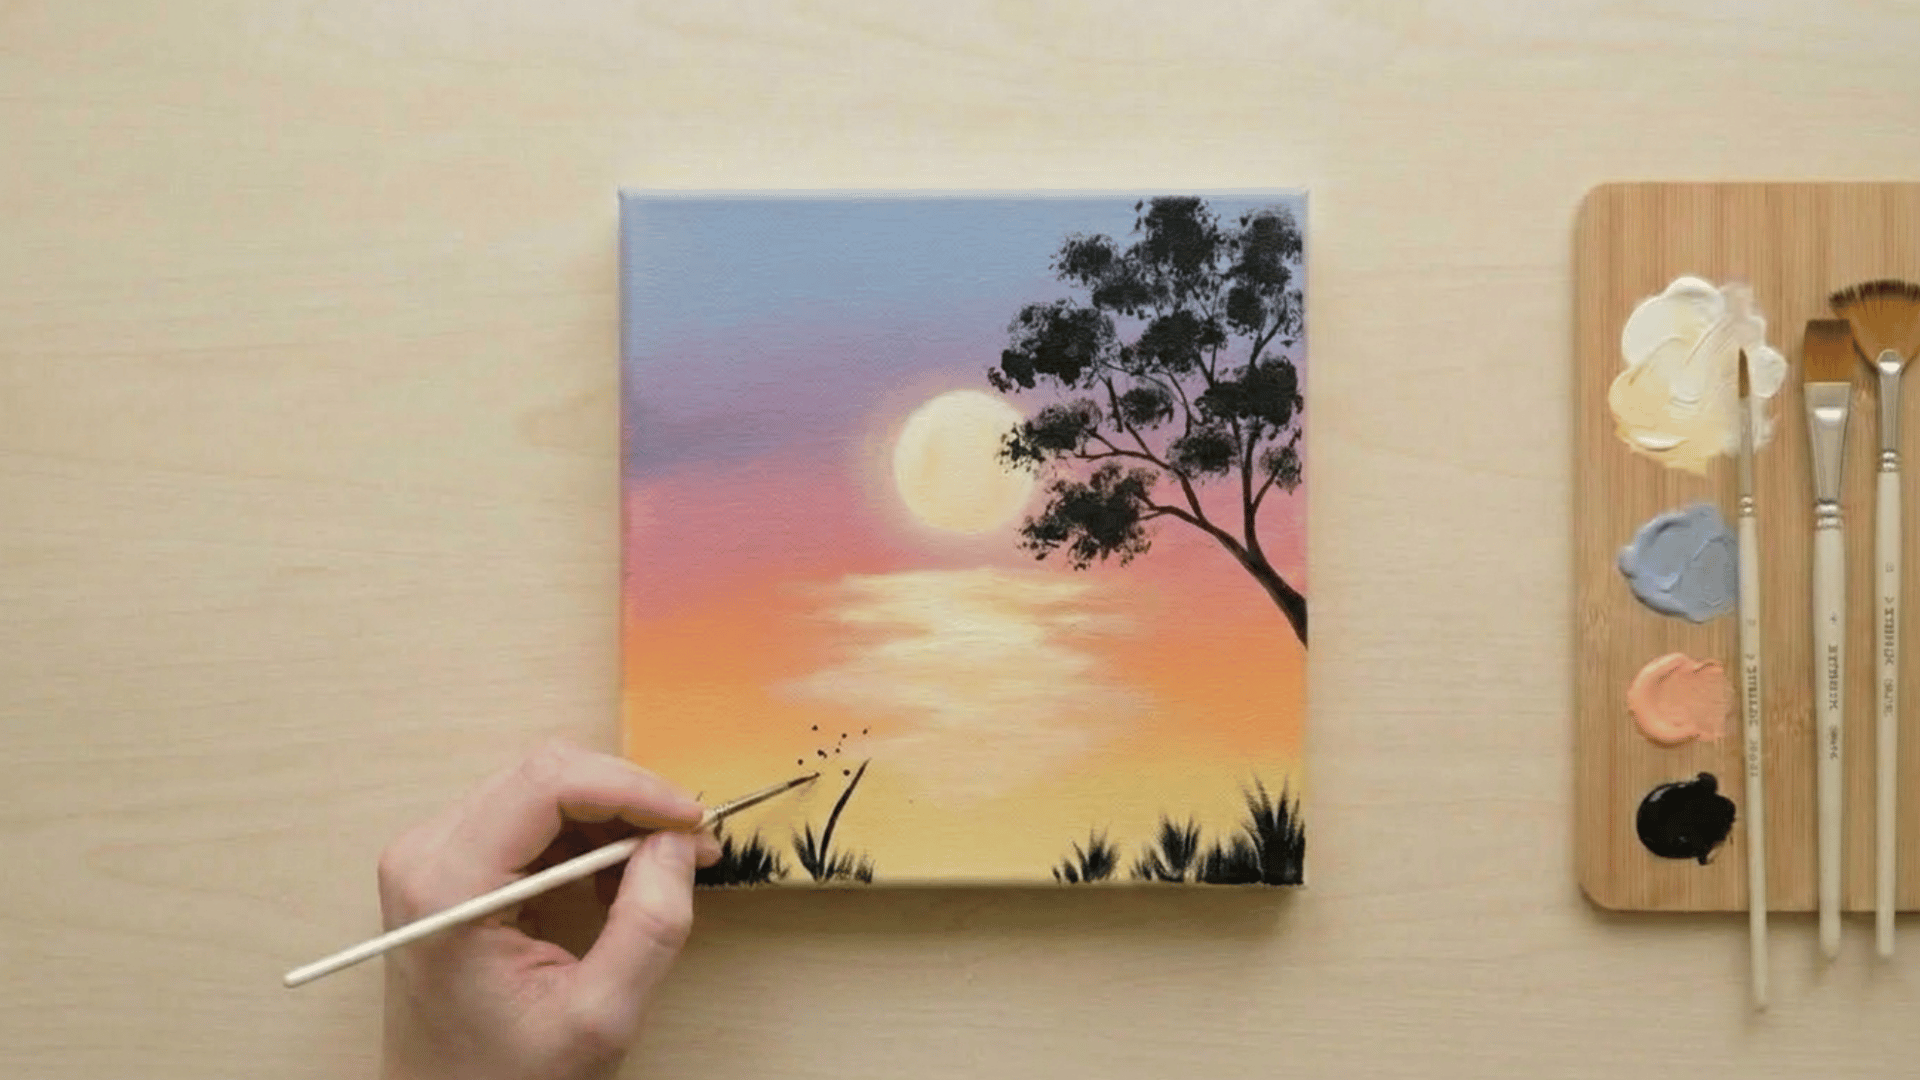
Using black paint, create small grass strokes at the bottom. Use quick, upward flicks with a thin brush. Keep them uneven and natural-looking to avoid stiffness.
Step back and look at your painting. Deepen dark areas if needed and soften any rough blends. Add a few light highlights in the reflection if needed. Then let it dry and enjoy your work.
Acrylic Painting Techniques You Can Try
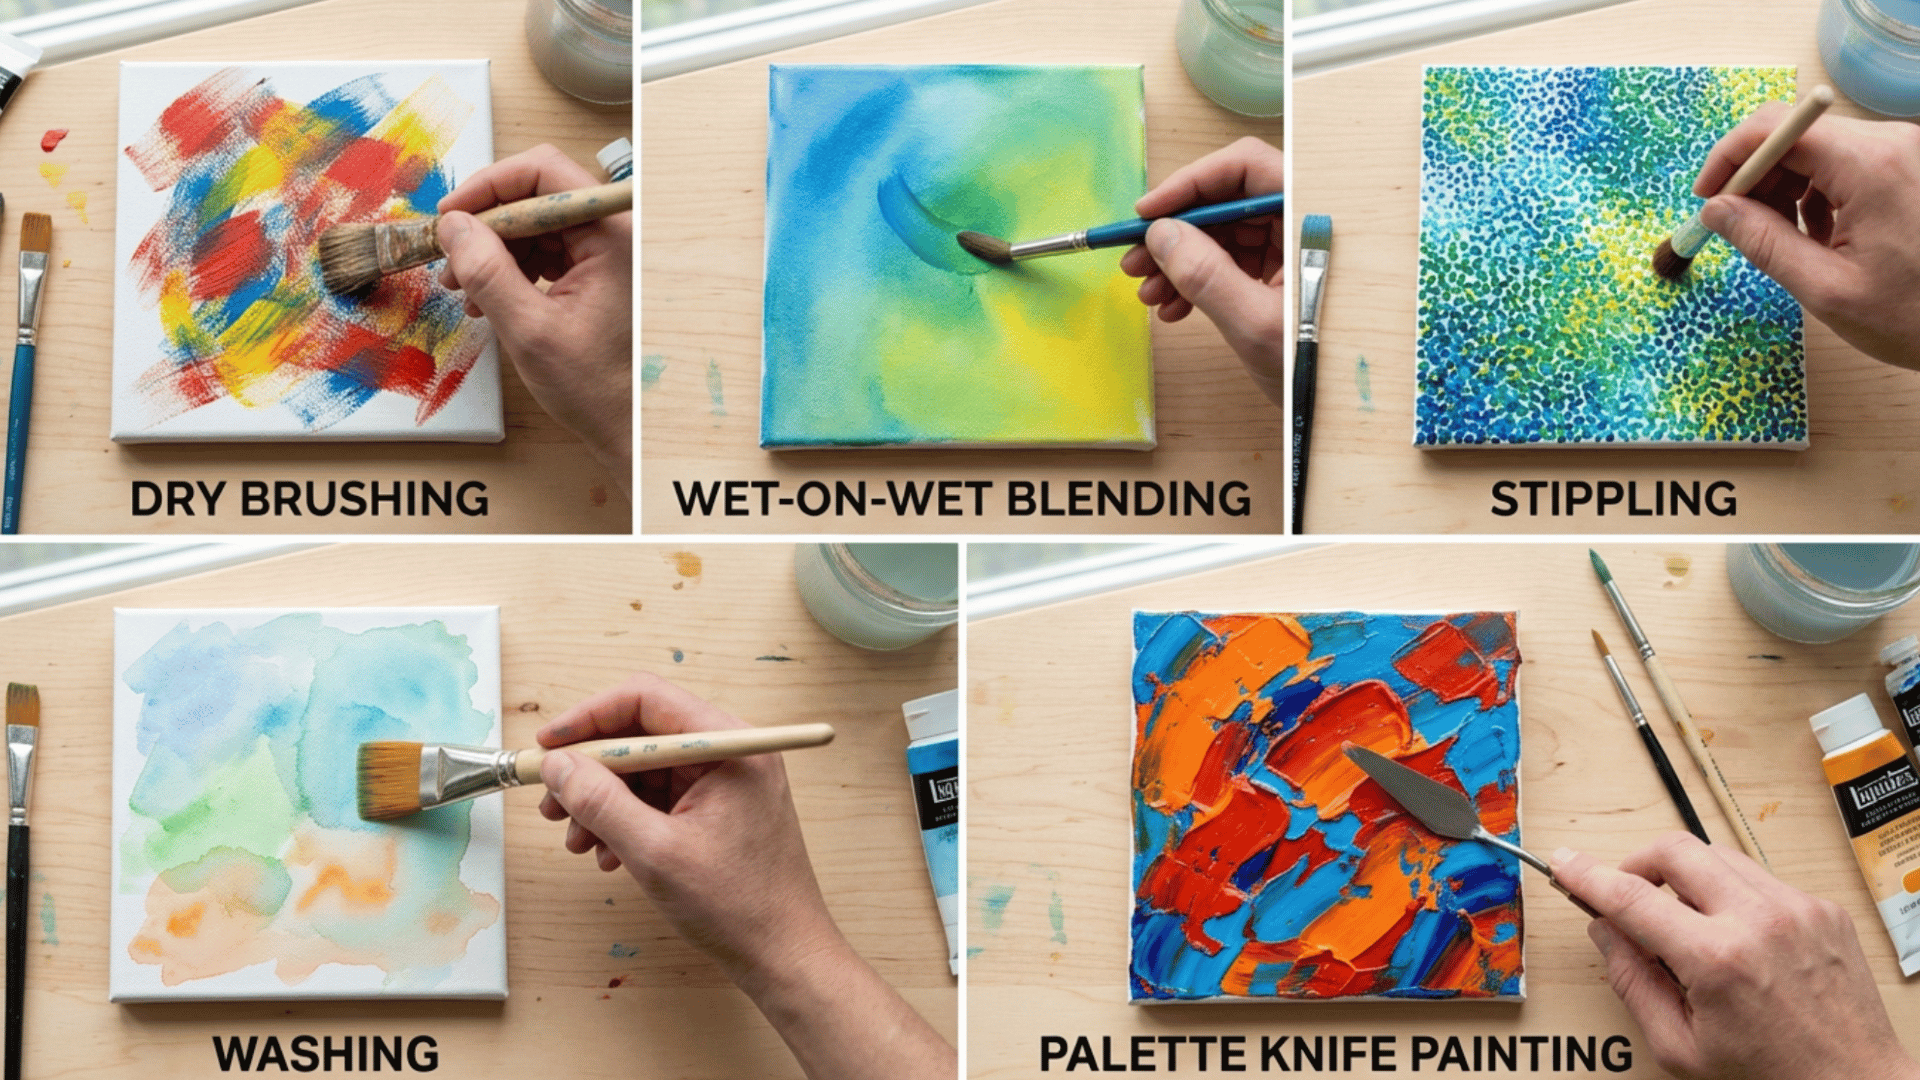
You don’t need to master every technique right away, but knowing a few basics will make a huge difference from the very first stroke. Here are five simple techniques every beginner should get familiar with.
1. Dry Brushing
Dry brushing is exactly what it sounds like. You load a small amount of paint onto your brush, wipe most of it off on a cloth or tissue, and then lightly drag it across the canvas.
The result is a rough, textured effect that works brilliantly for grass, fur, hair, and rocky surfaces. It’s one of those techniques that looks impressive but is surprisingly easy to pull off.
2. Wet-on-Wet Blending
This technique involves applying wet paint directly onto another layer of wet paint, allowing the two colors to blend softly.
It’s perfect for painting skies, water, or anything that needs a smooth transition. Work quickly, though remember, acrylics dry fast, so you’ve got a limited window to get that blend just right.
3. Stippling
Stippling is the process of repeatedly dabbing small dots or flecks of paint onto the canvas with the tip of your brush.
It’s a great way to gradually build texture and add depth to leaves, clouds, or even skin tones. It takes a little patience, but the effect it creates is totally worth it.
4. Washing
A wash is simply acrylic paint heavily diluted with water, think of it almost like a light, transparent stain rather than a solid coat.
It’s a brilliant technique for building up subtle layers of color without overpowering what’s already on the canvas. Washes work especially well for backgrounds, shadows, and adding a soft tint over a dried layer.
5. Palette Knife Painting
A palette knife lets you apply thick, chunky strokes of paint directly onto the canvas, creating bold textures and sharp edges that brushes can’t replicate.
It’s a great way to add drama and dimension to your painting, and honestly, it’s a lot of fun to experiment with. Try it on landscapes or abstract pieces and see what happens.
Simple Tips to Improve Faster
Getting better at painting takes consistency, not complexity. Small changes in your routine can help you improve much faster.
- Practice Regularly: Try to paint a little every day or a few times a week. Even short sessions help build control and confidence over time.
- Start with Small Canvases: Working on smaller surfaces feels less overwhelming and helps you finish paintings faster, which keeps motivation high.
- Learn Basic Color Mixing: Spend time understanding how colors blend. This helps you create better shades rather than relying solely on ready-made colors.
- Use Limited Colors: Stick to a few colors in the beginning. It makes your painting look more balanced and easier to manage.
Final Thoughts
Getting started with painting for beginners is less about talent and more about showing up and trying. Each stroke teaches something new, even if the result isn’t perfect.
Over time, simple practice builds confidence and helps develop your own style. The key is to keep things simple, stay consistent, and enjoy the process rather than overthink every detail.
Acrylics make that path smoother and more approachable. Pick up your brush, set up your space, and start your next painting. Progress comes faster when you keep going.

James McLaren, with a rich background in architecture from the University of Manchester, has been contributing his expertise to the world of creative construction and home innovation for over 20 years. His journey began as a project manager for a leading construction firm, where he honed his skills in bringing complex designs to life. James joined our platform as a freelancer in 2019, quickly becoming a favorite for his insightful and practical advice. He has been a pivotal force to our wing ever since, bringing our readers a blend of technical know-how and creative flair. Beyond his professional life, James is an avid woodworker and enjoys restoring vintage furniture, a hobby that complements his professional insights beautifully.